Customized development
1. Sanplex API development guides
1.1 Configuration and FAQ
1.2 Examples of the calling SDK
1.3. Department interface
1.3.1 Get the department list
1.3.2 Batch create departments
1.4. User interface
1.4.1 Get patameters of adding users
1.4.2 Add a single user
1.4.3 Get the user list
1.5. Product interface
1.5.1 Get the product list
1.5.2 Optional information for adding a single product
1.5.3 Create a single product
1.6. Project interface
1.6.1 Get the project list
1.6.2 Optional information for adding a single project
1.6.3 Create a single project
1.7. Task interface
1.7.1 Get the task list
1.7.2 Optional information for adding a single task
1.7.3 Create a single task
1.7.4 Optional information for finishing a single task
1.7.5 Finish a single task
1.8. Bug interface
1.8.1 Get the bug list
1.8.2 Optional information for reporting a single bug
1.8.3 Report a single bug
1.8.4 Optional information for resolving a single bug
1.8.5 Resolve a single bug
2. Sanplex API documents (V1.0)
2.1. Token
2.1.1 Get Token
2.2. Department
2.2.1 Get the department list
2.2.2 Get department details
2.3. User
2.3.1 Access to my profile
2.3.2 Get the user list
2.3.3 Get user information
2.3.4 Edit user information
2.3.5 Delete users
2.3.6 Create users
2.4. Program
2.4.1 Get the program list
2.4.2 Edit programs
2.4.3 Access to program details
2.4.4 Delete programs
2.4.5 Create programs
2.5. Product
2.5.1 Get the product list
2.5.2 Create products
2.5.3 Get product details
2.5.4 Edit products
2.5.5 Delete products
2.6. Product plan
2.6.1 Get the list of product plans
2.6.2 Create plans
2.6.3 Get plan details
2.6.4 Edit plans
2.6.5 Delete plans
2.6.6 Link the stories to the product plan
2.6.7 Cancel the link between the product plans and stories
2.6.8 Link the bugs to the product plan
2.6.9 Cancel the link between the product plan and bugs
2.7. Release
2.7.1 Get the release list of product
2.7.2 Get the release list of project
2.8. Story
2.8.1 Get the story list of product
2.8.2 Get the story list of project
2.8.3 Get the story list of execution
2.8.4 Create story
2.8.5 Get story details
2.8.6 Change a story
2.8.7 Change some other fileds of story
2.8.8 Delete a story
2.9. Project
2.9.1 Get project list
2.9.2 Create a project
2.9.3 Get project details
2.9.4 Modify a project
2.9.5 Delete a project
2.10. Build
2.10.1 Get the build list of project
2.10.2 Get the build list of execution
2.10.3 Create a build
2.10.4 Get build details
2.10.5 Modify a build
2.10.6 Delete a build
2.11. Execution
2.11.1 Get the execution list of project
2.11.2 Create execution
2.11.3 Check the details of execution
2.11.4 Modify execution
2.11.5 Delete execution
2.12. Task
2.12.1 Get the task list of execution
2.12.2 Create task
2.12.3 Get task details
2.12.4 Modify task
2.12.5 Delete task
2.12.6 Start task
2.12.7 Suspend task
2.12.8 Continue task
2.12.9 Finish task
2.13. Bug
2.13.1 Get the bug list of product
2.13.2 Create bug
2.13.3 Get bug details
2.13.4 Modify bug
2.13.5 Delete bug
2.14. Use case
2.14.1 Get use case list of product
2.14.2 Create use case
2.14.3 Get use case details
2.14.4 Modify test case
2.14.5 Delete test case
2.14.6 Run test case
2.15. Test request
2.15.1 Get test request list
2.15.2 Get the test request of project
2.15.3 Get the details of test reuqest
2.16. Feedback
2.16.1 Create feedback
2.16.2 Assign feedback
2.16.3 Close feedback
2.16.4 Delete feedback
2.16.5 Modify feedback
2.16.6 Get feedback details
2.16.7 Get feedback list
2.17. Ticket
2.17.1 Get the ticket list
2.17.2 Get the ticket details
2.17.3 Modify a ticket
2.17.4 Create a ticket
2.17.5 Delete a ticket
3. Customized development
3.1 Secondary development mechanism
3.2 The directory structure of Sanplex
3.3 Find your target file to be modified
3.4 The database structure of Sanplex
3.5 Public module - common
3.6 How to register on menu
3.7 How to register on permission
3.8 Example: how to modify the prompt
3.9 Example: priority field setting when creating bugs
3.10 The online extension editor
3.11 Secondary development editor and translation function restrictions instructions
3.12 Sanplex project management software packaging specification (V1.1)

Secondary development editor and translation function restrictions instructions

2022-12-21 13:29:03
Kelsea
1780
Last edited by on 2023-01-09 11:14:57
Share links

Note: Starting from Sanplex 11.7, the editor and translation functions of the secondary development have been taken out as plug-ins because of security considerations.

Please feel free to download at Sanplex website - Product - Marketplace.

Download link: https://www.sanplex.com/extension-viewExt-51.html


Starting from Sanplex 11.6, Admin - Develop - Editor and Admin - Translation function can be only accessed under http://127.0.0.1: port number due to security concerns.

The following is a brief explanation of how to use the edit and translation functions of the secondary development.

1. For Sanplex one-click install packs

You can directly login to the machine where Sanplex is installed and use http://127.0.0.1: port number to access Sanplex, then you can go to Admin - Develop - Editor and Admin - Translation to access and use the feature normally.

2. For Sanplex server on Windows system

You can log in to the Sanplex server remotely, and use http://127.0.0.1: port number to access Sanplex on the browser on Sanplex server

This way you can go to Admin - Develop - Editor and Admin - Translation to access and use the feature normally.

3. For Sanplex server on Linux system

For Sanplex server on a Linux system, even if the address to access Sanplex is http://127.0.0.1:port number, it won't be judged as http://127.0.0.1:port number, it's because of port forwarding or bridging connections, and the functions of Admin - Develop - Editor and Admin - Translation cannot be used.

But it's possible to use the SSH tunnel of the editor to access Sanplex, so that you can access Admin - Develop - Editor and Admin - Translation via http://127.0.0.1:port number.
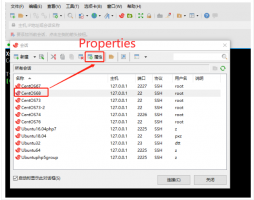
3.1 Connecting to the Sanplex server host

In the editor, open the Sanplex server host that needs to be connected, and click Properties.

3.2 Set up an SSH tunnel connection

For the target port, please fill in the port number used when accessing Sanplex. Click OK when the setting is done.

Then click the button Connect below.

Note: When setting up SSH tunnel connection, if the editor has already connected to this server before, please disconnect first before setting up.

3.3 Access to Sanplex

The previous address for accessing Sanplex is http://127.0.0.1:10271 , after setting up the SSH tunnel connection, Sanplex will be accessed at http://127.0.0.1:2222 . The port number should be changed to the listening port when setting up the SSH tunnel connection.

In this way, the functions of translation and second development editor can be used properly.

Write a Comment
Comment will be posted after it is reviewed.