
Feedback
1. Introduction of Sanplex features
1.1. Core Management Framework
1.1.1 Program
1.1.2 Project
1.1.3 Product
1.1.4 Execution
1.1.5 Management Models
1.2. Dashboard
1.2.1 Getting Started with Tutorials
1.2.2 Quick Add
1.2.3 Notification Center
1.2.4 Effort Tracking
1.2.5 Dashboard - Project and Execution
1.2.6 Dashboard - My Work, Contribution, and Recents
1.2.7 Dashboard - Approval
1.2.8 Contacts
1.3. Program
1.3.1 Program List
1.3.2 Program Kanban
1.3.3 Create Program
1.3.4 Create Sub-Programs
1.3.5 Project Charter Management
1.4. Product
1.4.1 Create Product
1.4.2 Manage Modules
1.4.3 Multi-Branch and Multi-Platform Management
1.4.4 Manage Plans
1.4.5 Manage Stories
1.4.6 Requirement Reviews
1.4.7 Requirement Status and Phase
1.4.8 Create Releases
1.4.9 Track Progress
1.4.10 Business Requirements and Multi-Level Requirements
1.5. Project
1.5.1 Scrum Project
1.5.2. Waterfall Project
1.5.2.1 Manage Project Phases
1.5.2.2 Project Design
1.5.2.3 Project Matrix
1.5.2.4 Project Reports and Earned Value Management
1.5.2.5 Project Baselines
1.5.2.6 Project Change
1.5.3. Kanban Project
1.5.3.1 Set Up Kanban Projects
1.5.3.2 Configure Kanban Boards
1.5.3.3 Use Kanban Boards
1.5.4 Hybrid Agile Project
1.5.5 Hybrid Waterfall Project
1.5.6. Project Settings
1.5.6.1 Project Setup
1.5.6.2 Project Executions
1.5.6.3 Project Requirements
1.5.6.4 Project Builds
1.5.6.5 Project Tests
1.5.6.6 Project Docs
1.5.6.7 Project Releases
1.5.6.8 Project Reports
1.5.6.9 Project Risks
1.5.6.10 Project Issues
1.5.6.11 Project Opportunities
1.5.6.12 Project Deliverables
1.5.6.13 Project Reviews
1.5.6.14 Project Process
1.5.6.15 Deliverables
1.5.6.16 Quality Assurance
1.5.6.17 Project-specific Workflow Management
1.5.7 Project Templates
1.6. Execution
1.6.1 Product Planning and Task Breakdown
1.6.2 Task Assignment and Daily Tracking
1.6.3 Build Creation and Test Requests
1.6.4 Bug Confirmation and Resolution
1.6.5 Execution Kanban Boards
1.7. Testing
1.7.1 Write Test Cases
1.7.2 Execute Test Cases
1.7.3 Bug Submission and Reports
1.7.4 Verify and Close Bugs
1.7.5 Test Case Scenes
1.7.6 Submit a Test Request
1.7.7 Test Report
1.8. Agent
1.8.1 Conversation
1.8.2 Sanplex Agents
1.8.3 General Agents
1.8.4 Skill Management
1.8.5 AI Knowledge Library
1.8.6 Models
1.8.7 ZAI Service Installation
1.8.8 ZAI Service Control Panel
1.8.9 ZAI Configuration
1.9. Kanban
1.9.1 Kanban Spaces
1.9.2 Kanban Regions
1.9.3 Kanban Cards
1.10. Company
1.10.1 View Team Members and Work Information
1.10.2 View Recent Company Activity
1.10.3 View and Edit Company Information
1.11. Feedback
1.11.1 Configure, Create, and Review Feedback
1.11.2 Process Feedback and Send Notifications
1.12. Admin Settings
1.12.1. System Settings
1.12.1.1 Mode
1.12.1.2 Backup
1.12.1.3 Trash
1.12.1.4 License
1.12.1.5 Security
1.12.1.6 Cron Job
1.12.1.7 Time Zone
1.12.1.8 Rebuild Index
1.12.1.9 LDAP
1.12.1.10 Table Engine
1.12.2 Feature Options
1.12.3. Users Management
1.12.3.1 Set Departments and Edit Company Profile
1.12.3.2 Manage Users
1.12.3.3 Set Permisions
1.12.4. Feature Configuration
1.12.4.1 Dashboard
1.12.4.2 Product
1.12.4.3 Project
1.12.4.4 Execution
1.12.4.5 Test
1.12.4.6 Kanban
1.12.4.7 Feedback
1.12.4.8 Tickets
1.12.4.9 User
1.12.4.10 Relations (Standard Version)
1.12.4.11 Meaturement
1.12.5 Migrate Jira Data to Sanplex
1.12.6 Jira to Sanplex Migration Mapping
1.12.7. Agent Configuration
1.13. Asset Library (Premium)
1.13.1 Asset Library Management (Premium)

Configure, Create, and Review Feedback

2025-12-31 23:58:07
Sanplex Content
387
Last edited by Jing WANG on 2026-10-12 19:17:22
Share links
Summary: Learn how to configure feedback permissions and managers, organize feedback by product and module, add feedback individually or in batch, and review submitted feedback.

Feature Overview

Feedback helps teams collect, organize, and review product feedback in a centralized workflow. Feedback can be categorized by product and module, assigned to responsible users, and reviewed when required.

By configuring feedback permissions, managers, module structures, and review rules, teams can standardize how feedback is submitted, organized, and reviewed before it proceeds through the feedback workflow.

Use Cases

  • User feedback: Collect issues, requests, and suggestions from users and track them through submission and review.
  • Internal feedback: Capture observations and improvement suggestions from internal teams and route them to the appropriate feedback workflow.
  • Centralized feedback management: Organize feedback from different sources in one place and classify it by product and module.
  • Feedback access management: Configure responsible managers and product-specific access to control how feedback is submitted and managed.
  • Feedback review: Apply review rules to determine whether submitted feedback can proceed or requires additional clarification.

I. Configure Feedback Permissions

1. Configure Feedback and Ticket Managers

Go to Feedback > Settings, then click Product Settings to configure the Feedback Manager and Ticket Manager for each product.

The configured managers are responsible for handling feedback and tickets associated with the corresponding product.
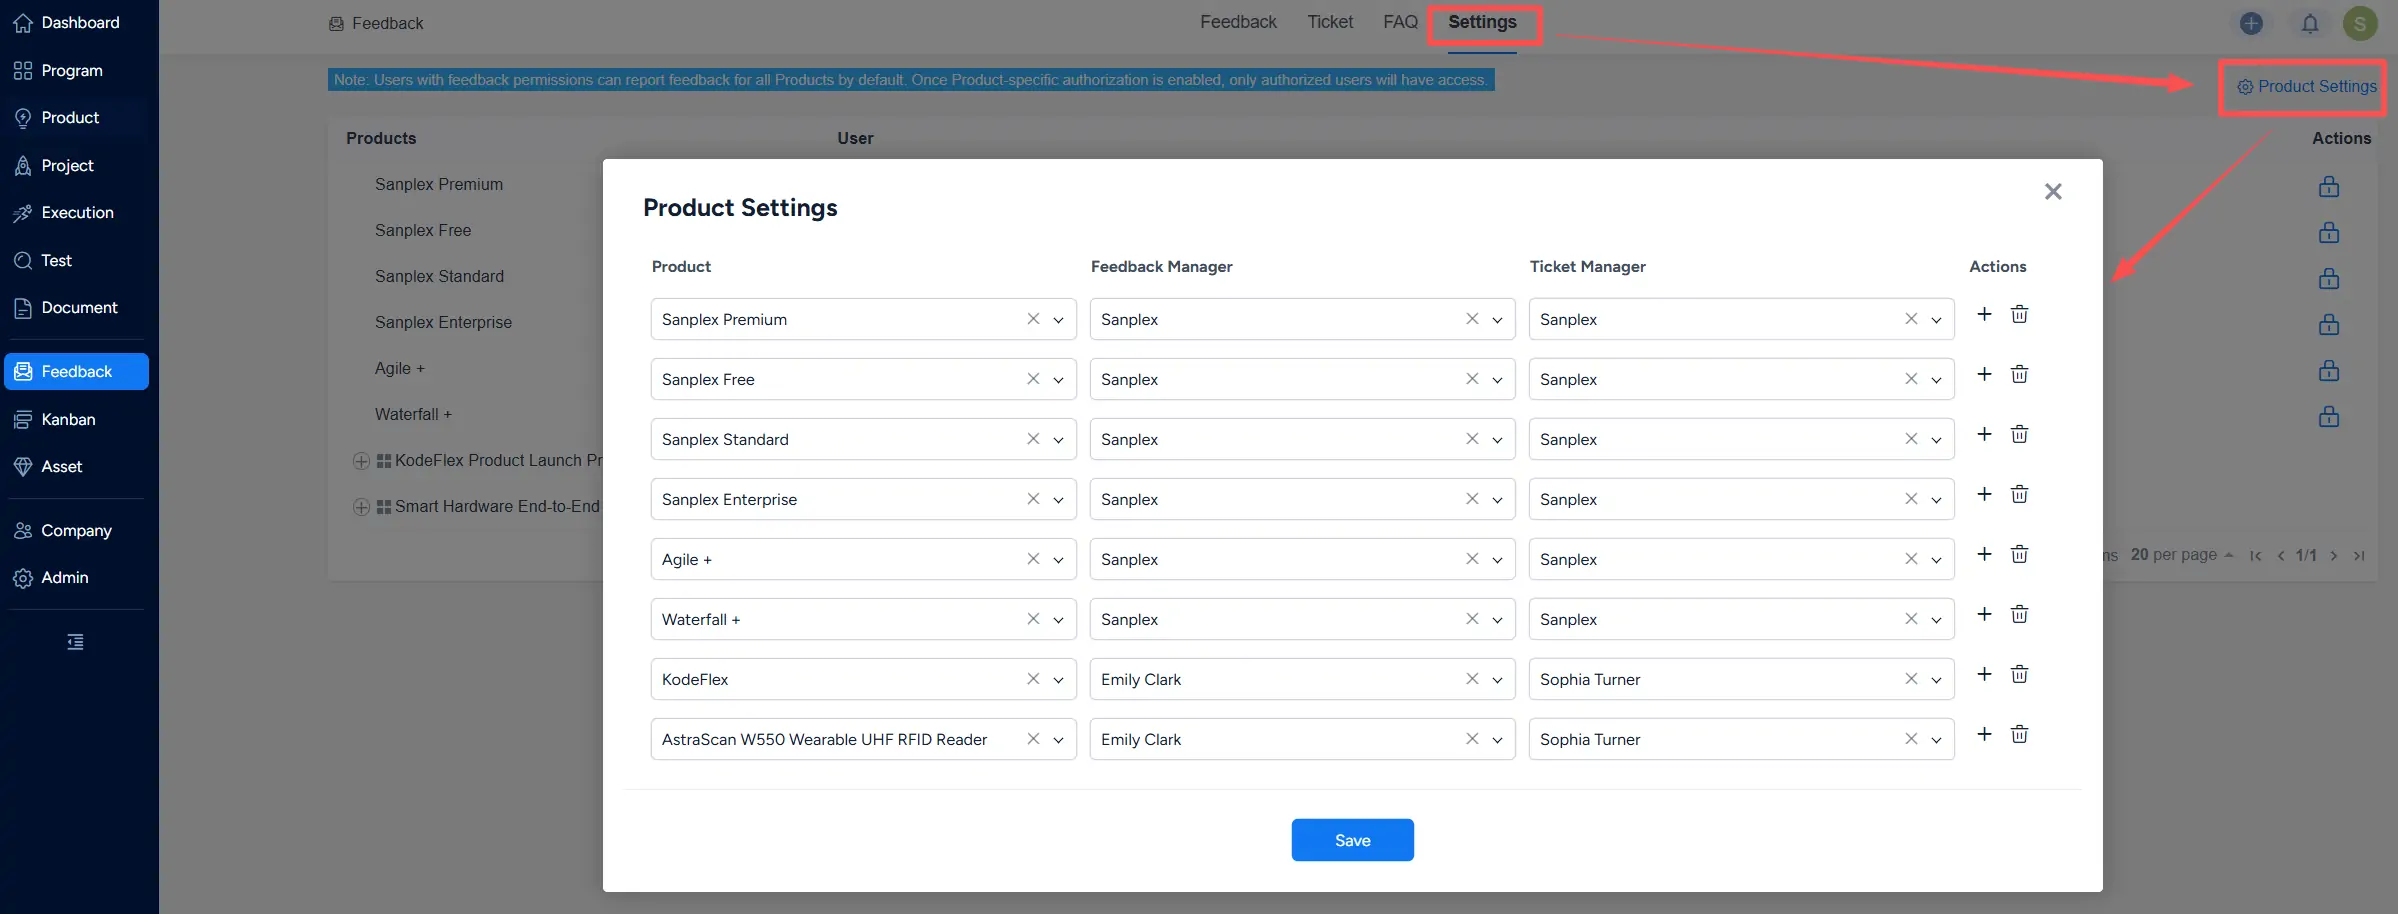
Product Settings dialog in Feedback Settings, showing products with Feedback Manager and Ticket Manager fields.

2. Configure Authorized Users

By default, users with feedback permissions can submit feedback for all products. Product-specific authorization can be configured to control which users have access to feedback for a particular product.

On Feedback > Settings, click the authorization icon in the Actions column for a product. In the dialog, select the users to authorize, then click Save.
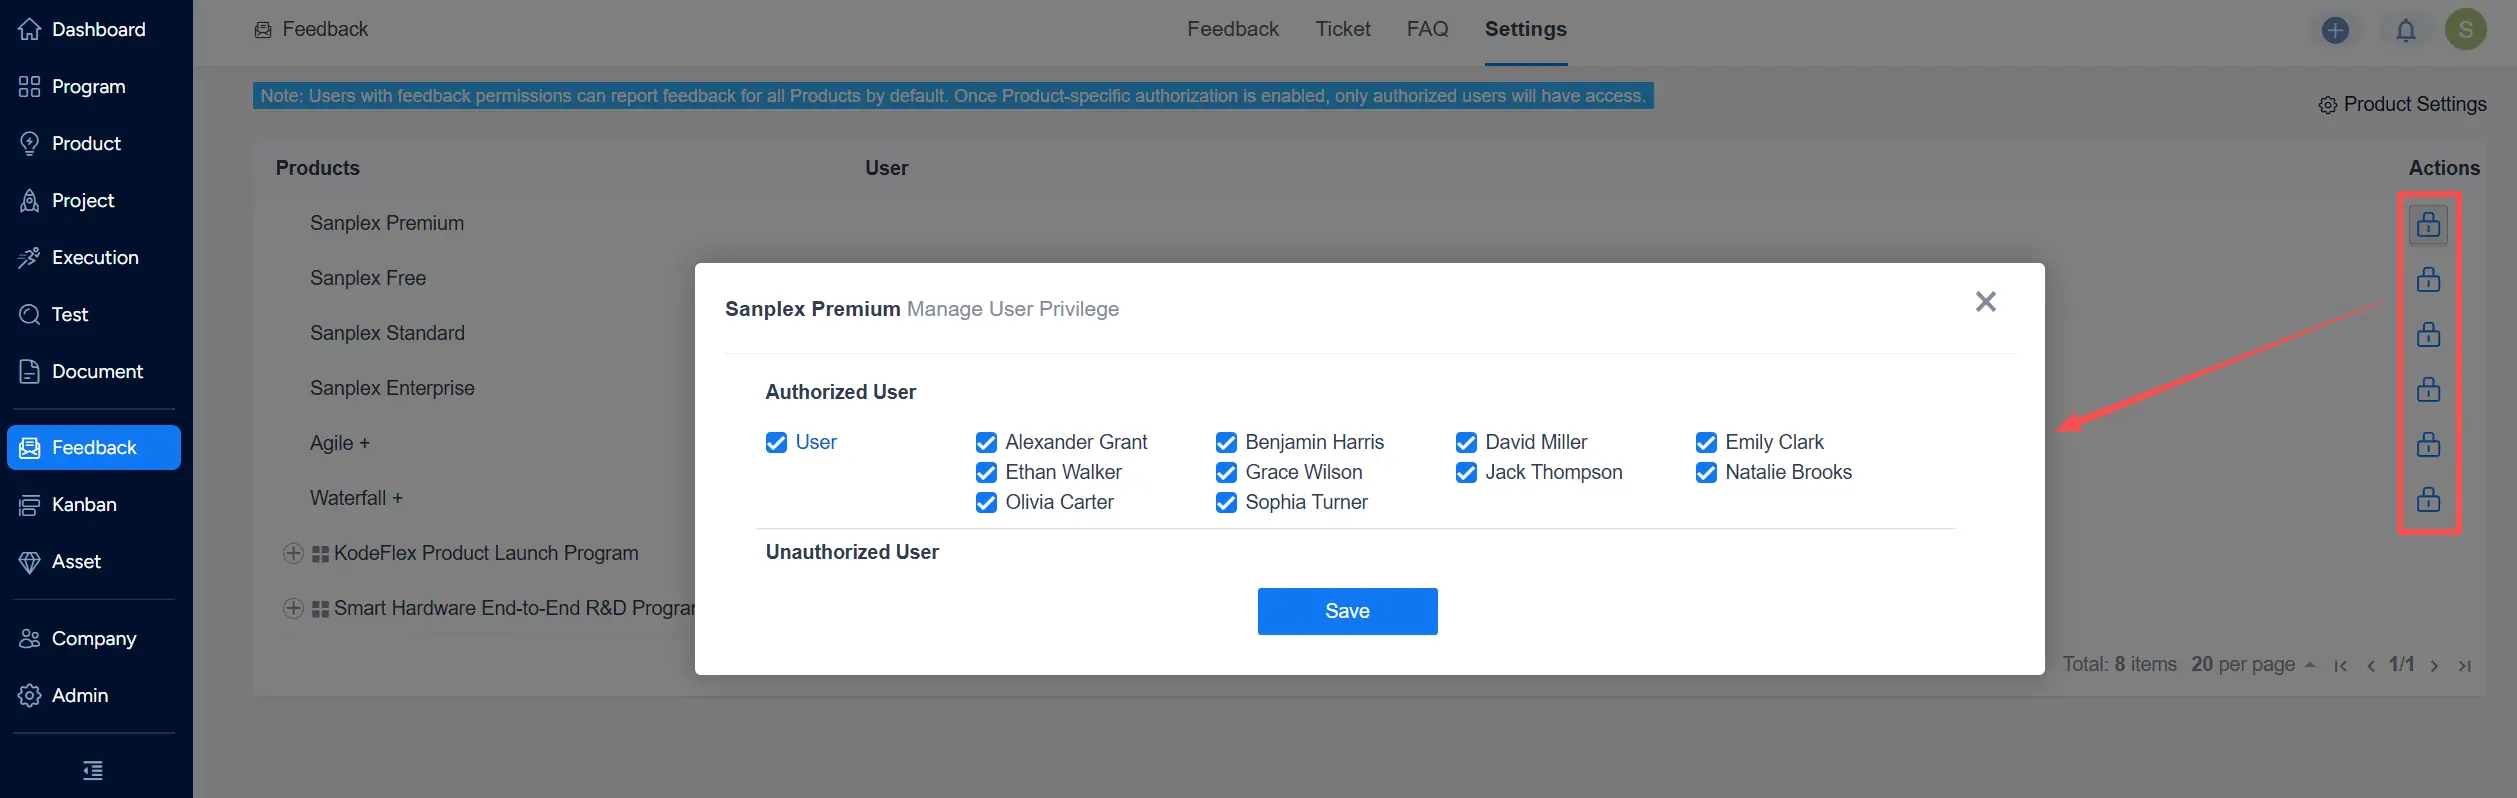
Manage User Privilege dialog for a product, showing Authorized User and Unauthorized User sections with selectable users.

II. Create Feedback

1. Select a Product and Maintain Feedback Modules

Use the product selector at the top-left of the Feedback page to switch between products. The selector groups available products under categories such as Managed by Me and Others.
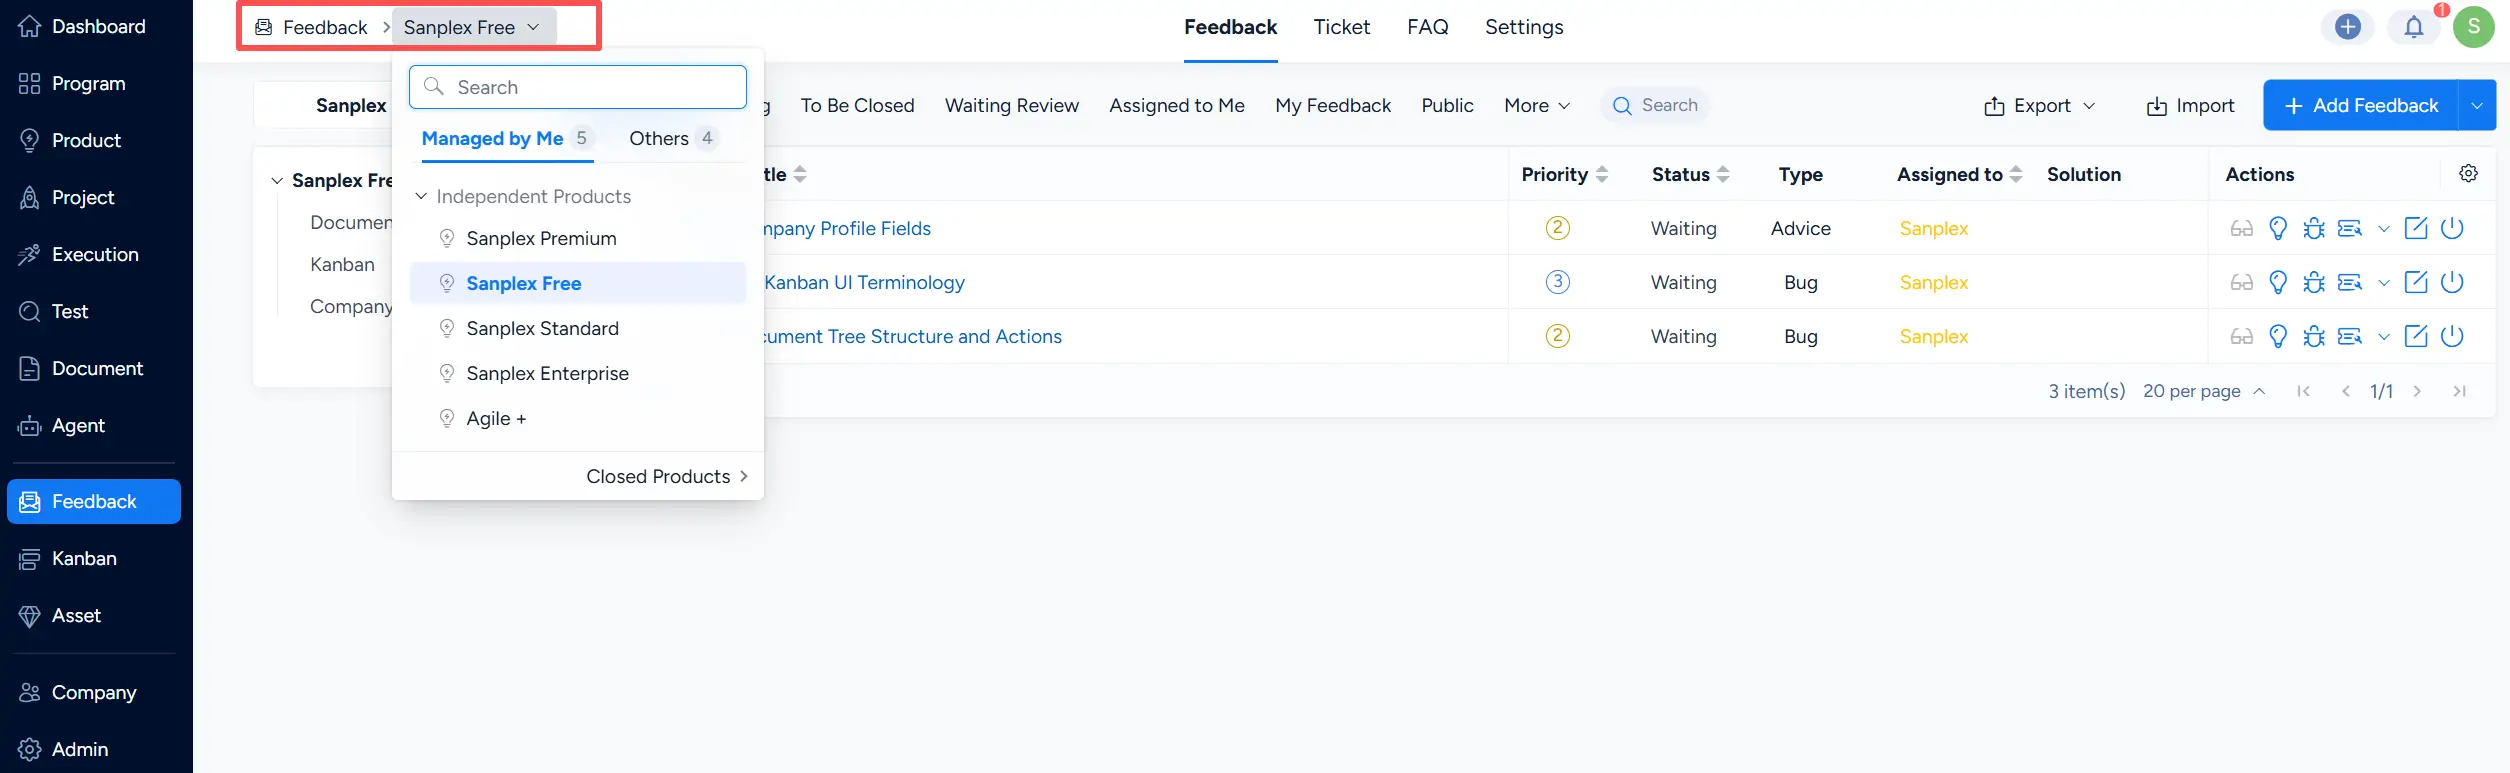
Feedback product selector showing a search box, Managed by Me and Others tabs, and a list of available products.

Feedback can be organized using a module structure. To maintain modules for the selected product, click the settings icon at the bottom of the module panel and select Set Module.

Feedback list with the module panel settings menu open and Set Module highlighted.

On the Module Management page, add, edit, delete, or organize modules as needed. Click Save after completing the module configuration.
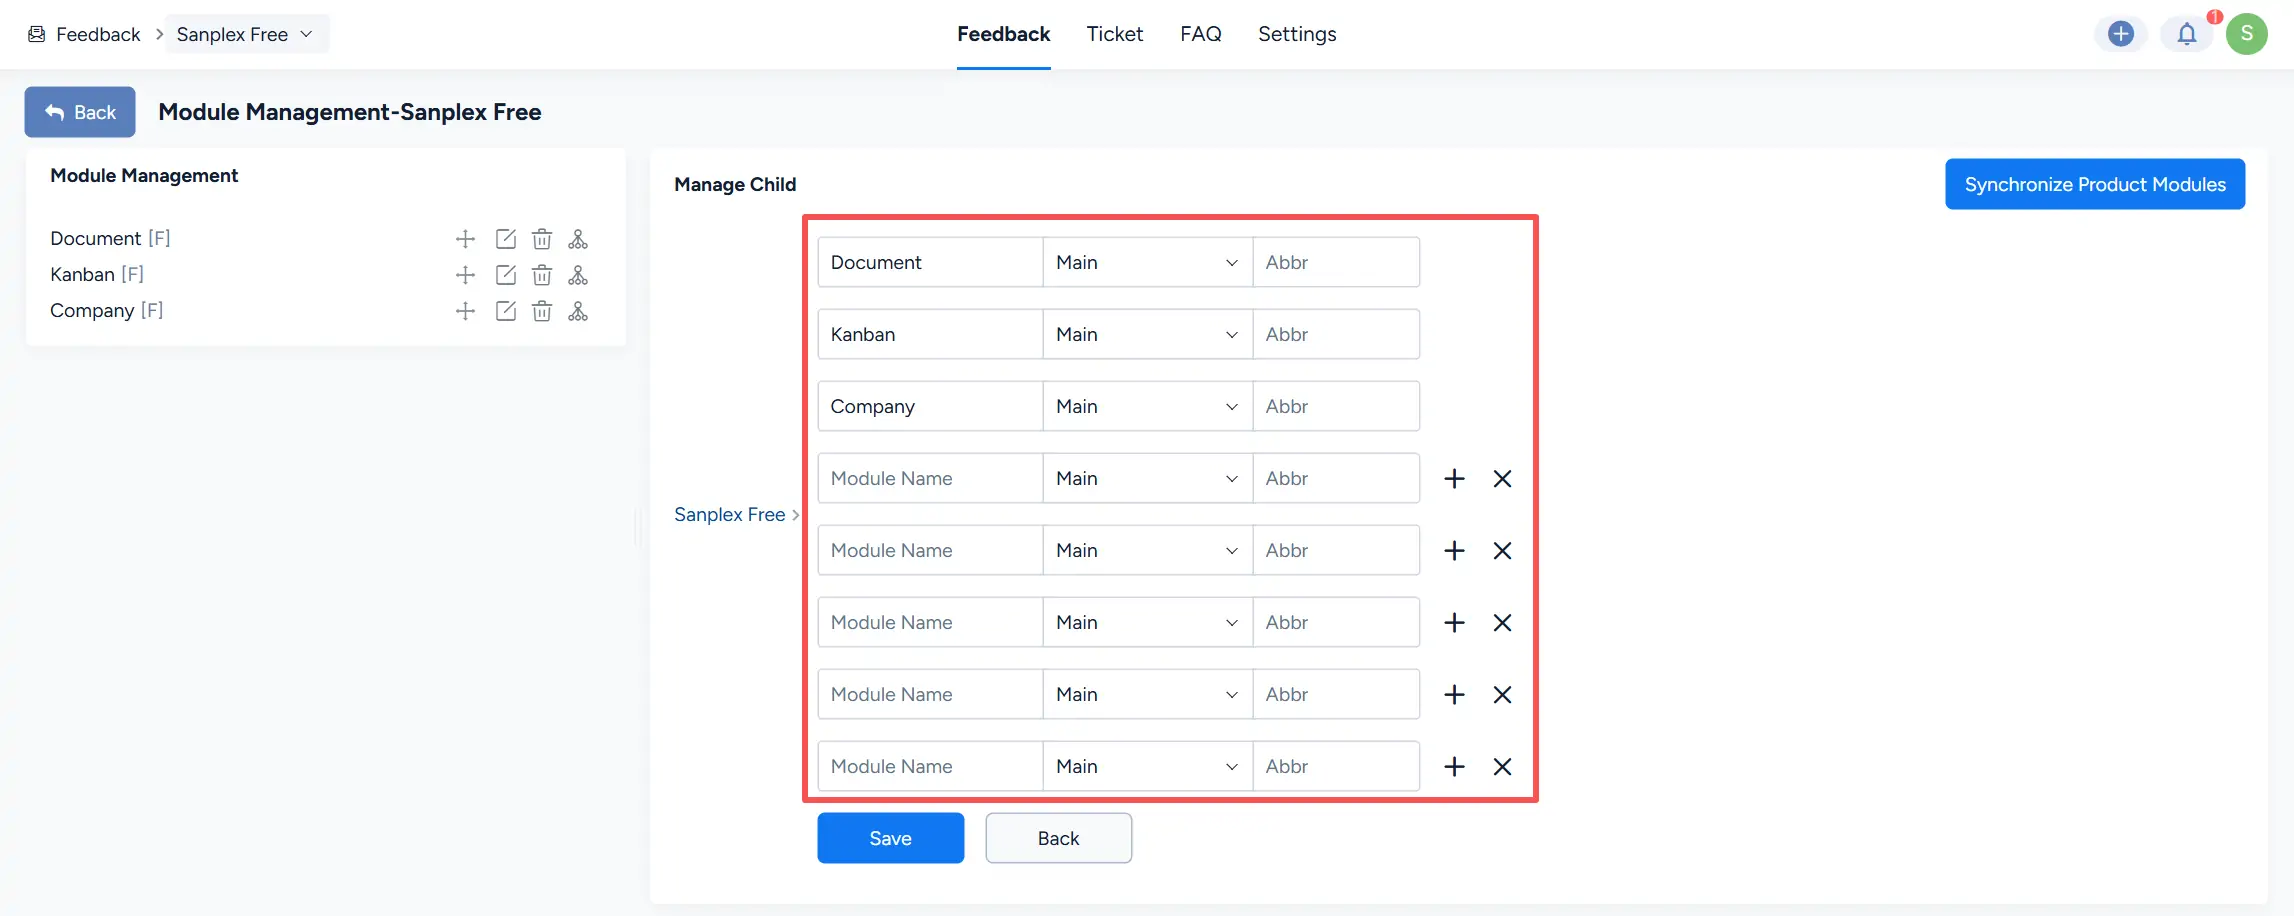
Module Management page for Sanplex Free showing existing modules and fields for adding and organizing child modules.

Feedback modules can also be synchronized from product modules. Click Synchronize Product Modules, then select the number of module levels to synchronize.

Sanplex provides synchronization options from one level through five levels.
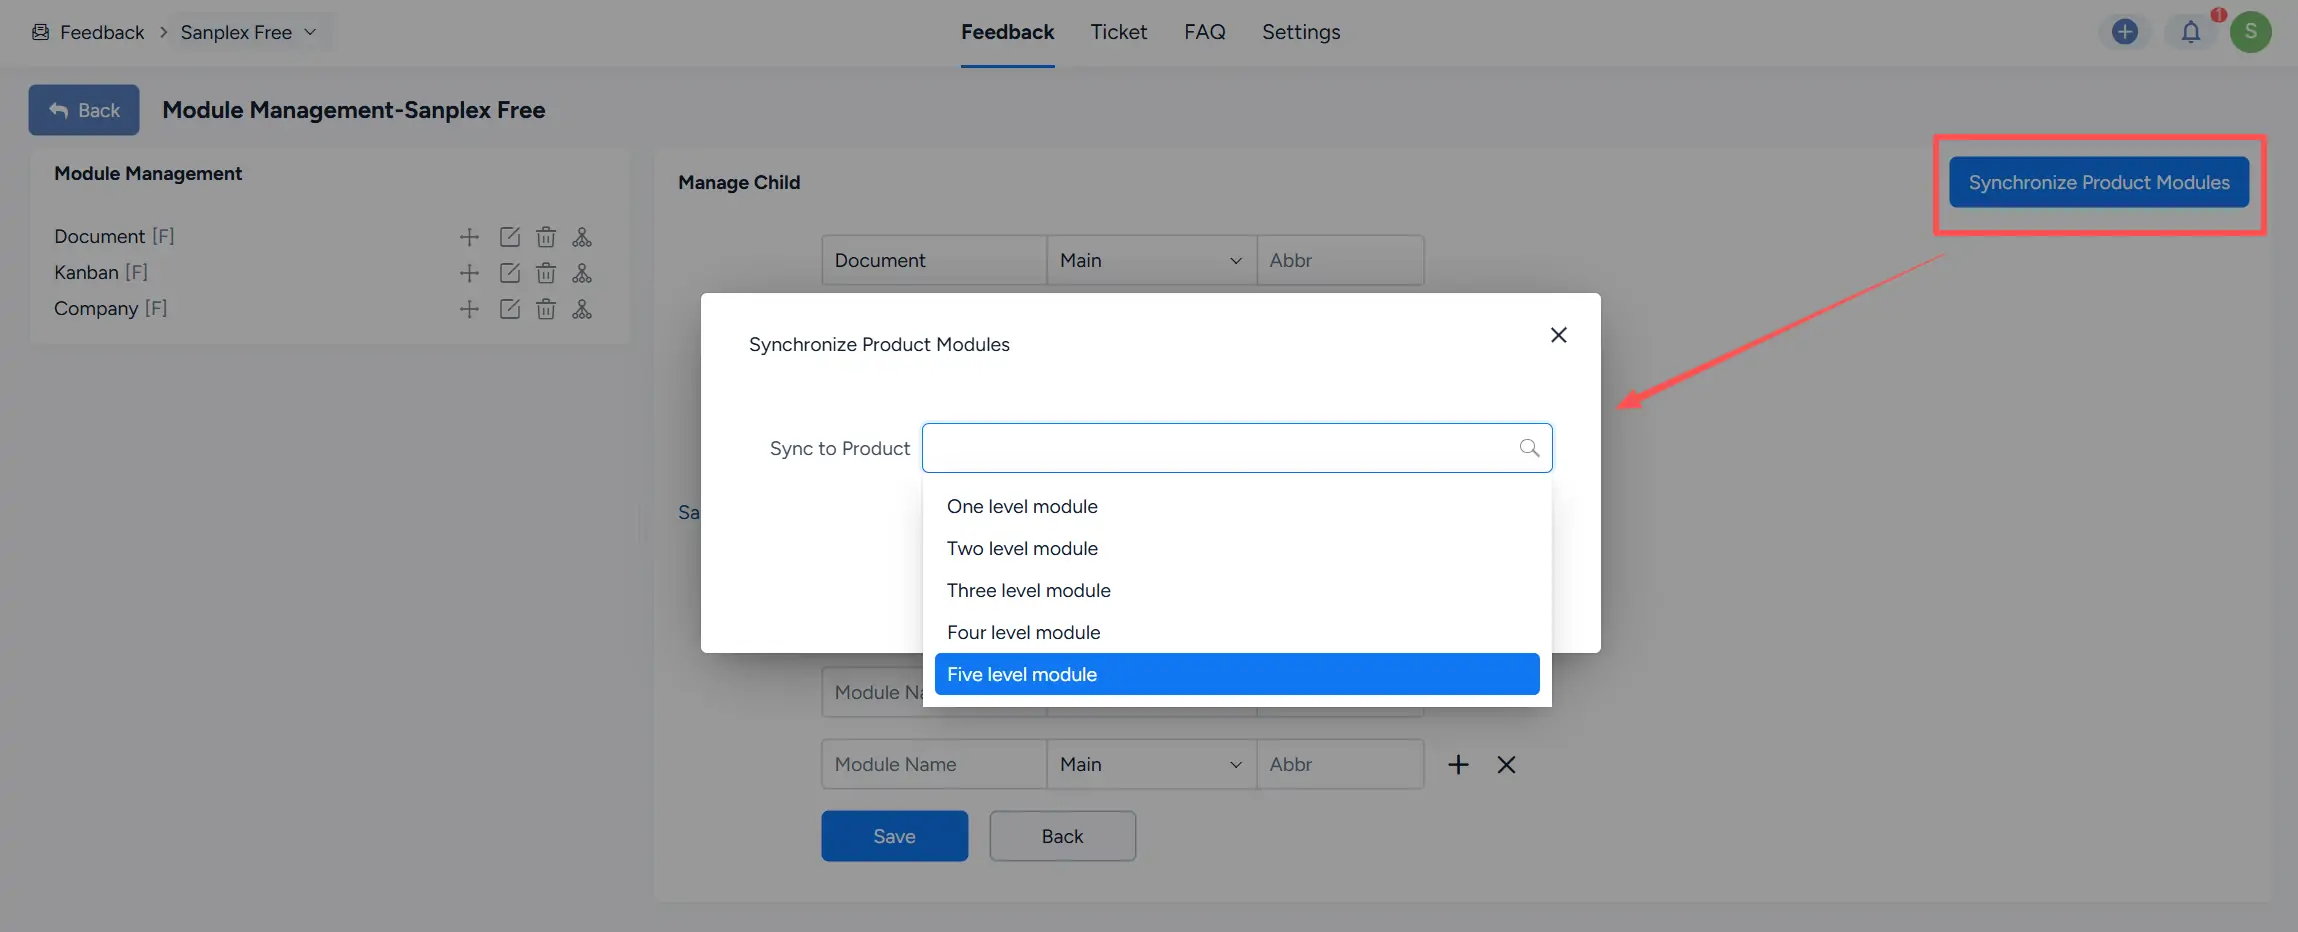
Synchronize Product Modules dialog showing options from One level module through Five level module.

After the module structure is configured, return to the feedback list. The modules are displayed in the left-side navigation panel and can be used to organize and filter feedback.
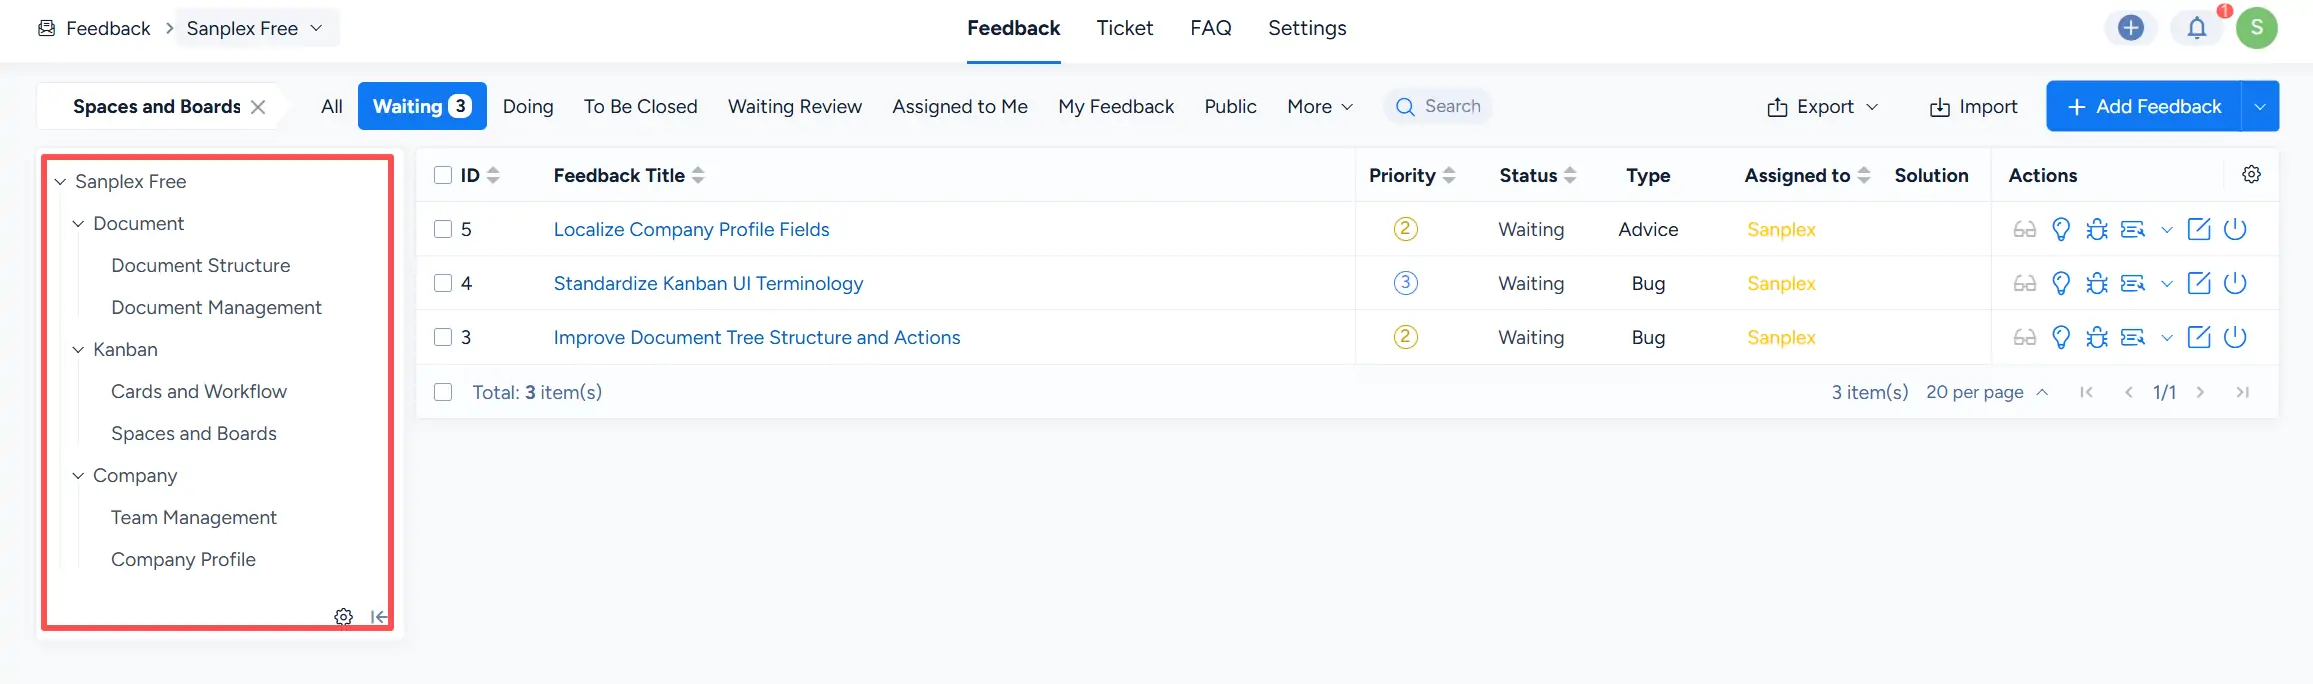
Feedback list showing the configured module hierarchy in the left-side navigation panel.

2. Add Feedback

On the Feedback page, open the Add Feedback menu in the upper-right corner. You can select Add Feedback to create a single feedback item or Batch Create to create multiple items.
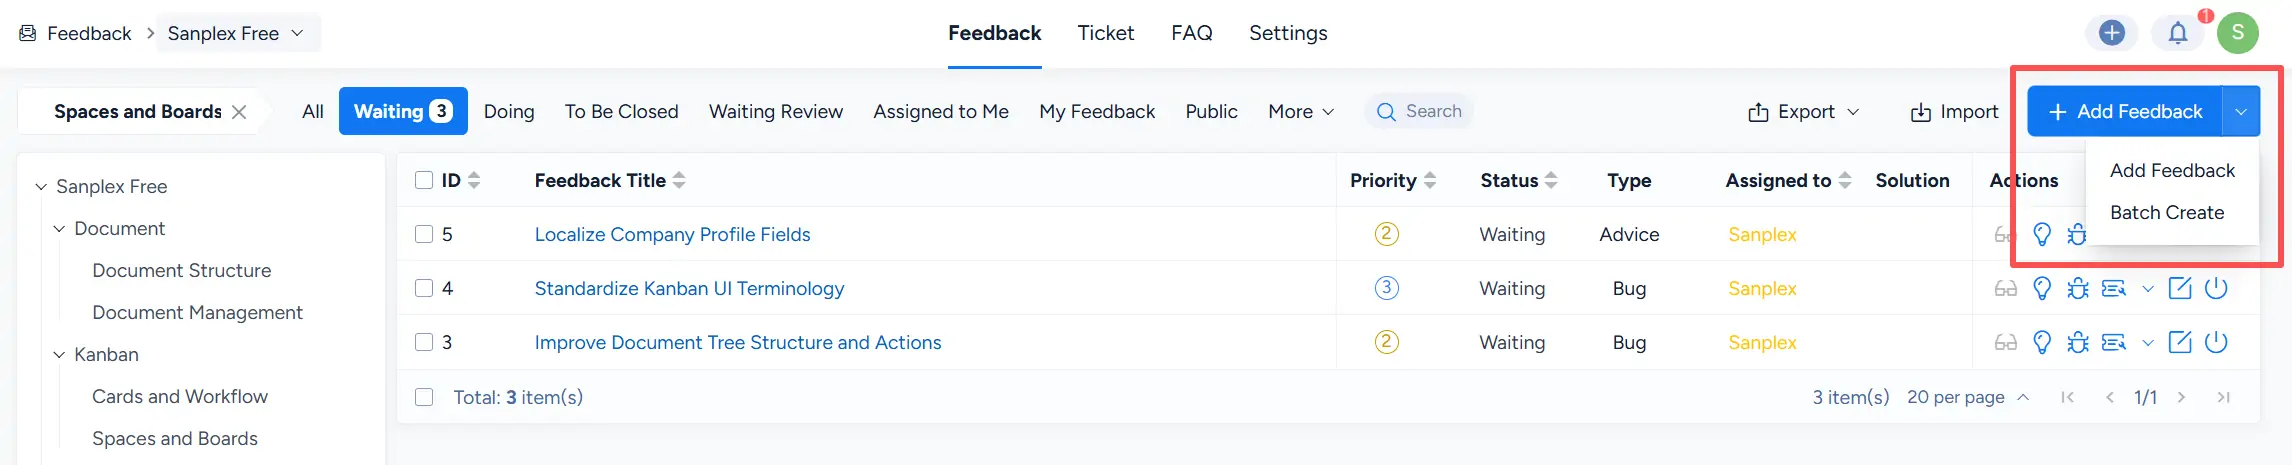
Add Feedback menu showing Add Feedback and Batch Create options.

On the Add Feedback page, select the product, module, and feedback type, then enter the feedback title and description. Additional information such as the feedback provider, source company, notification email, recipients, keywords, and attachments can also be provided.

Available feedback types include Story, Task, Bug, To-do, Advice, Issue, Risk, and Opportunity.

If a Feedback Manager has been configured for the product, the feedback can be assigned to the responsible manager as part of the feedback workflow.

You can also configure whether the feedback is public and whether email notifications are enabled.
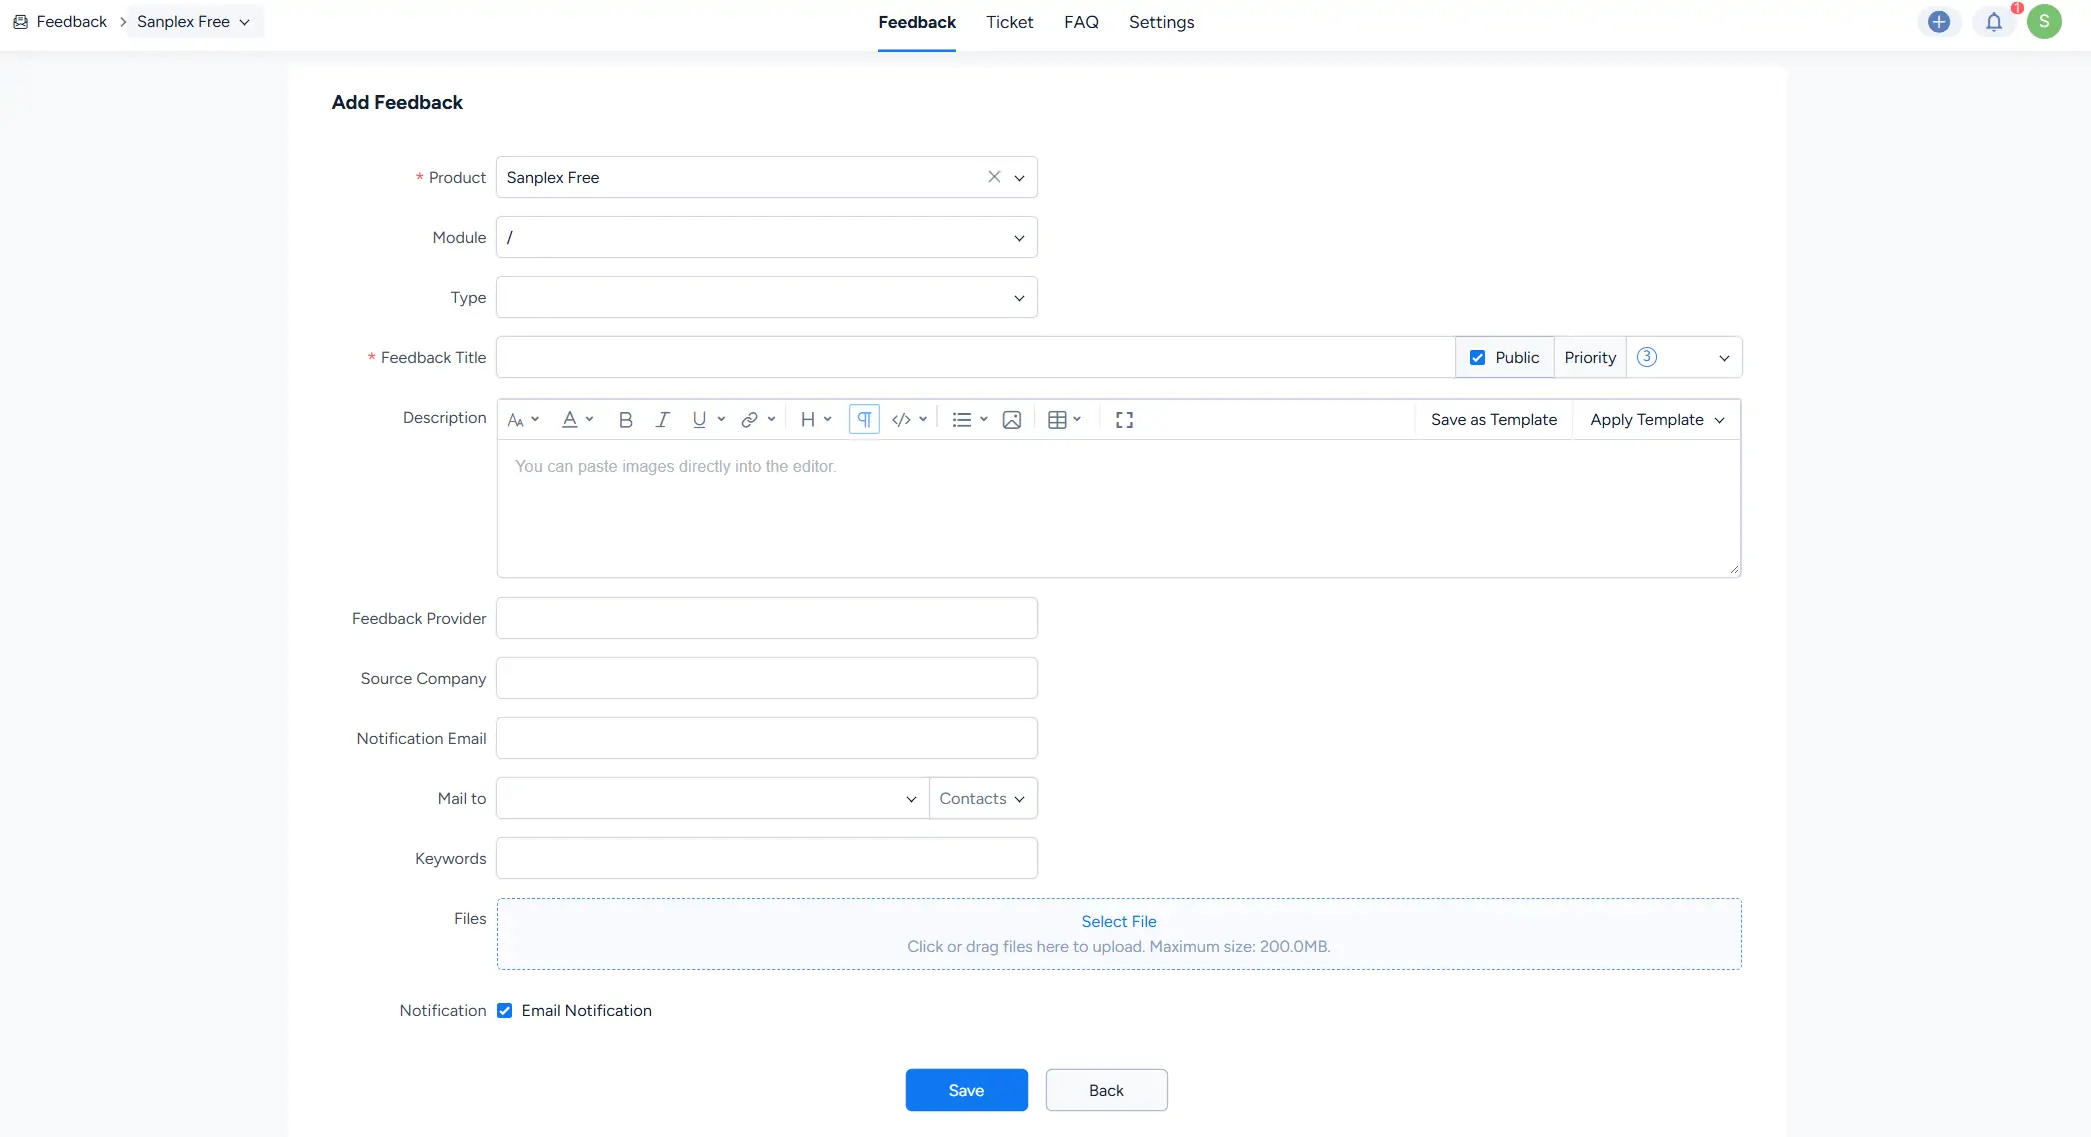
Add Feedback page showing fields for product, module, type, feedback title, description, feedback provider, notification information, keywords, files, and email notification.

After feedback is created, it appears in the feedback list. Use the status tabs, Search, Export, and Import controls to locate or manage feedback items. The Actions column provides processing actions for each feedback item according to its current status.

Feedback list showing Search, Export, Import, Add Feedback, status filters, and action icons for individual feedback items.

The More menu provides additional views and filters, including Assigned to Me, Reviewed by Me, Closed by Me, and conversion-related views such as To Story, To Feature, To Epic, To Task, To Bug, and To To-do.
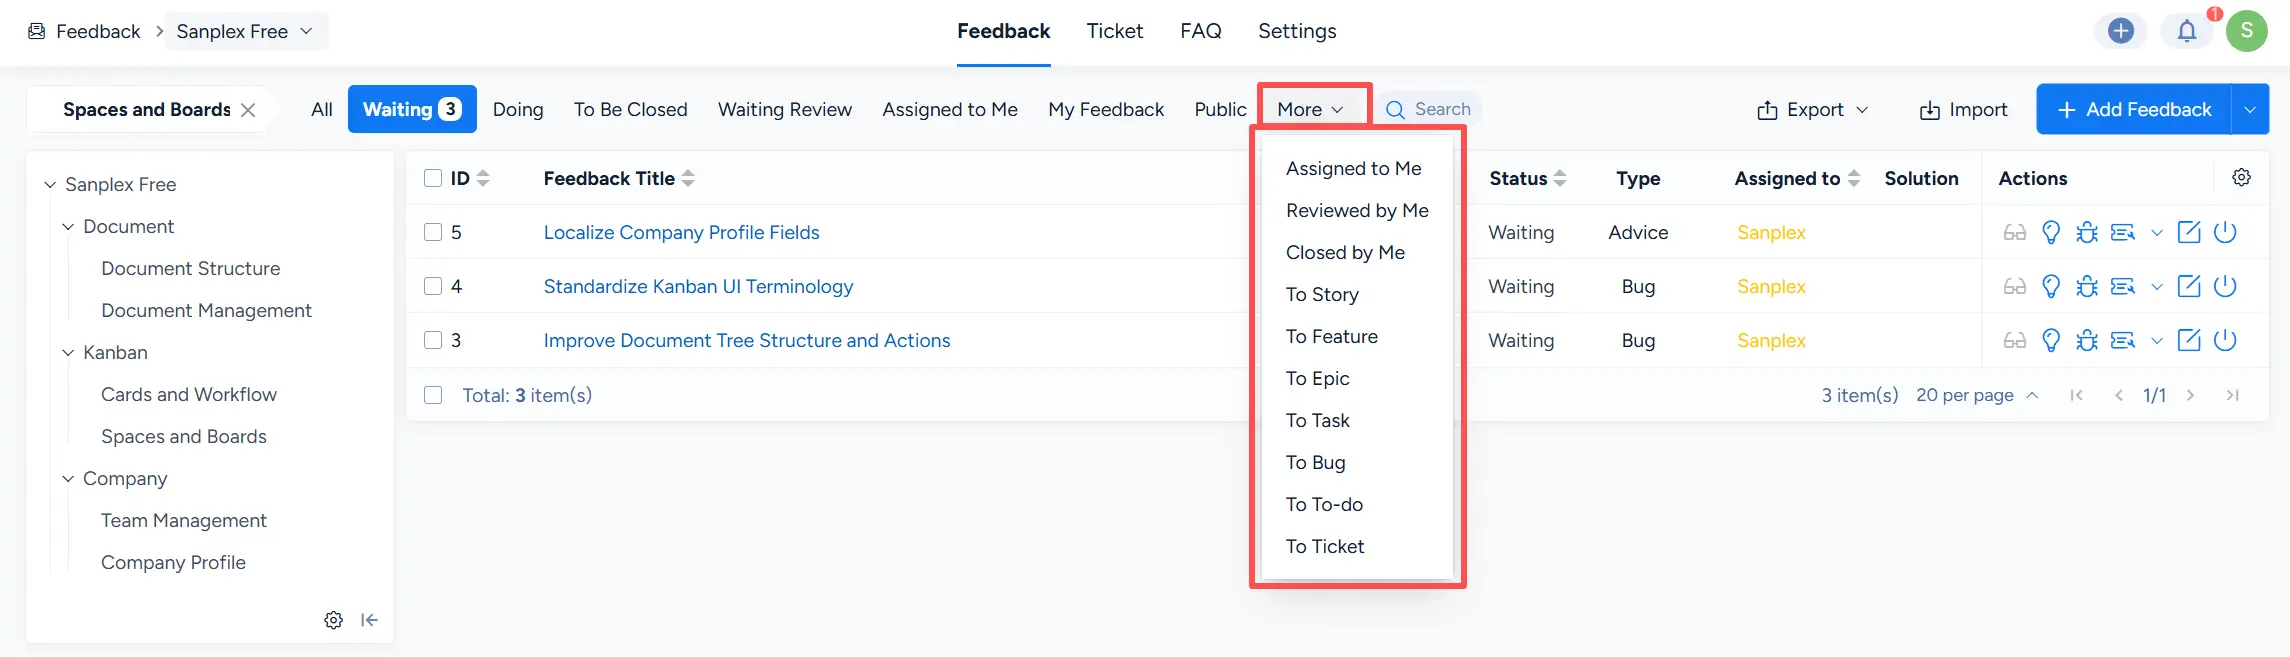
More menu on the Feedback page showing user-based and conversion-based feedback filters.

3. Review Feedback

Feedback review can be configured in Admin > Features > Feedback > Feedback Review.

When Feedback Review is enabled, use No Review Required to specify users whose submitted feedback does not require review. You can also configure the Reviewer.
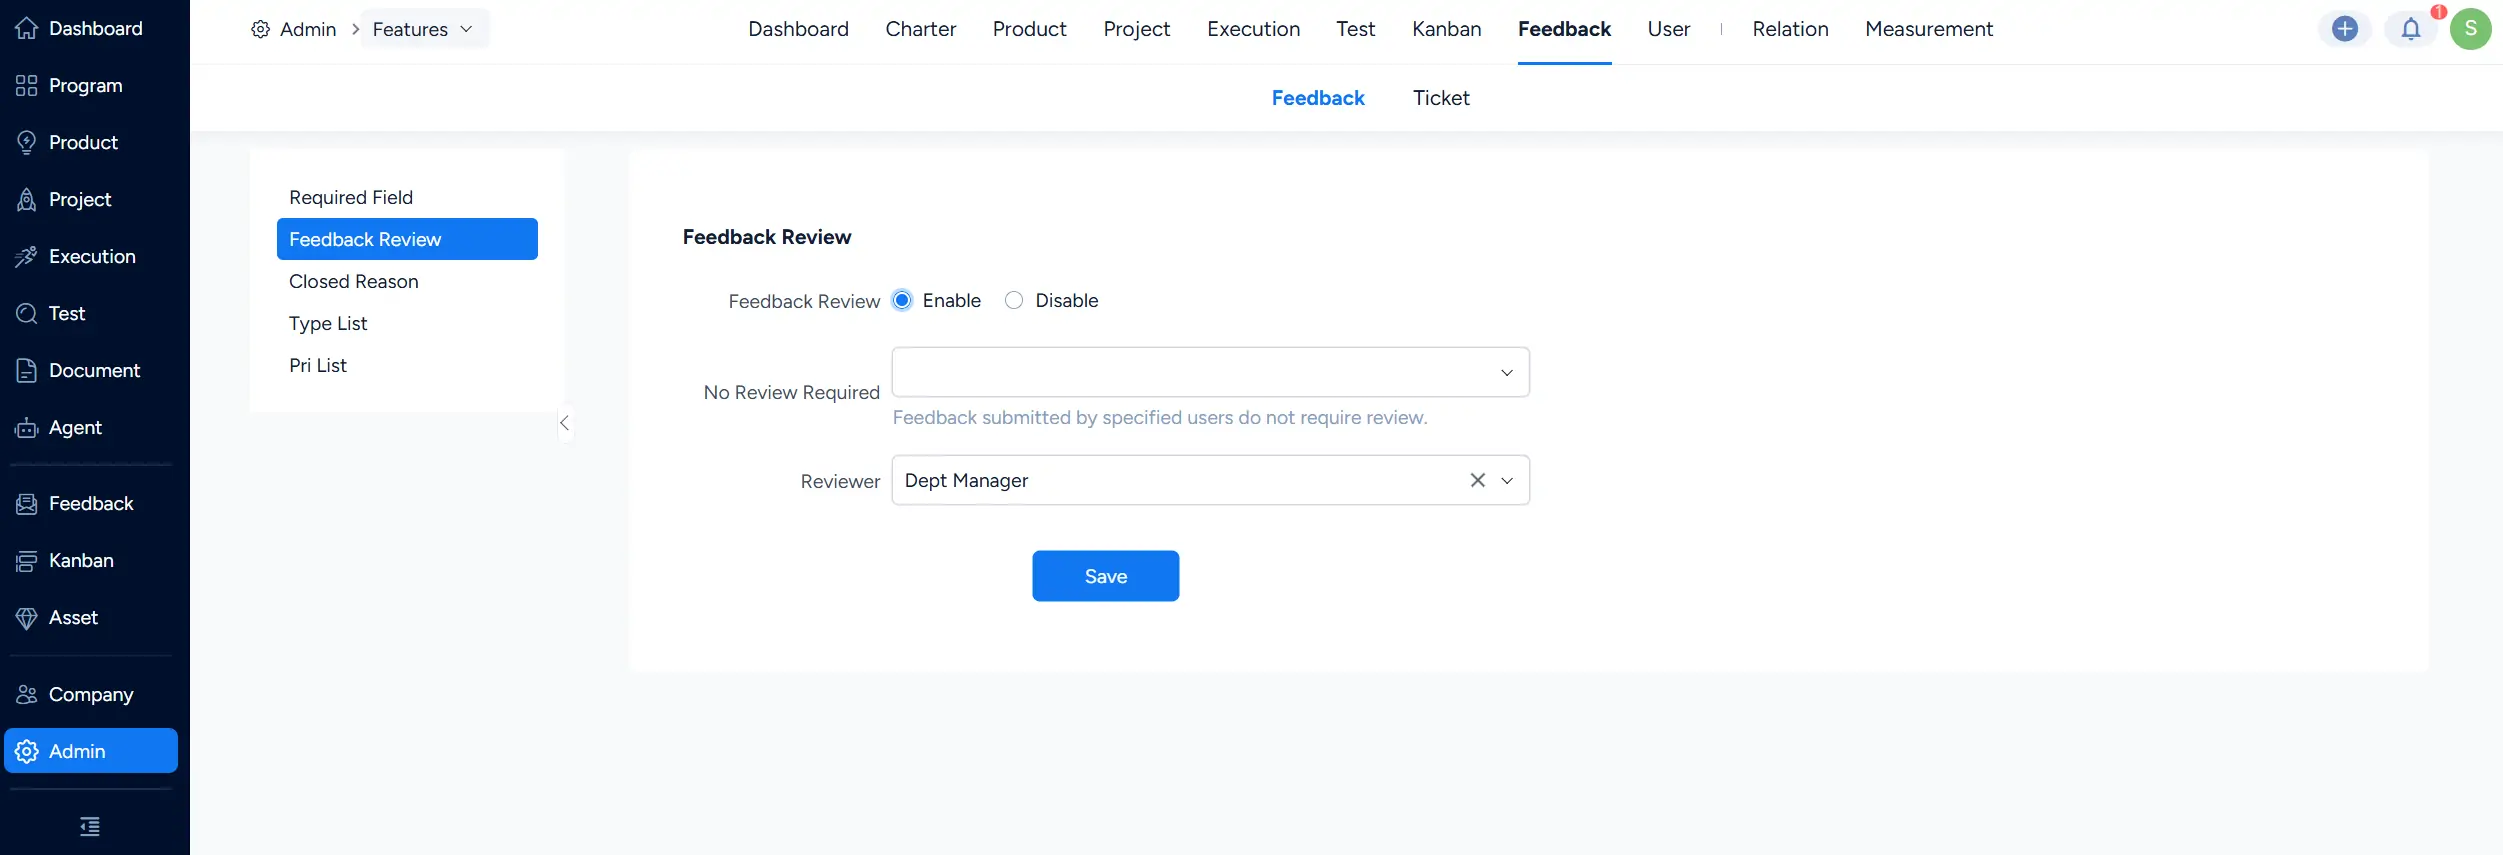
Feedback Review settings page with Enable selected, No Review Required configuration, and Reviewer set to Dept Manager.

When Feedback Review is disabled, the page provides a Mandatory Review setting for submissions that still require review. A reviewer can also be configured.
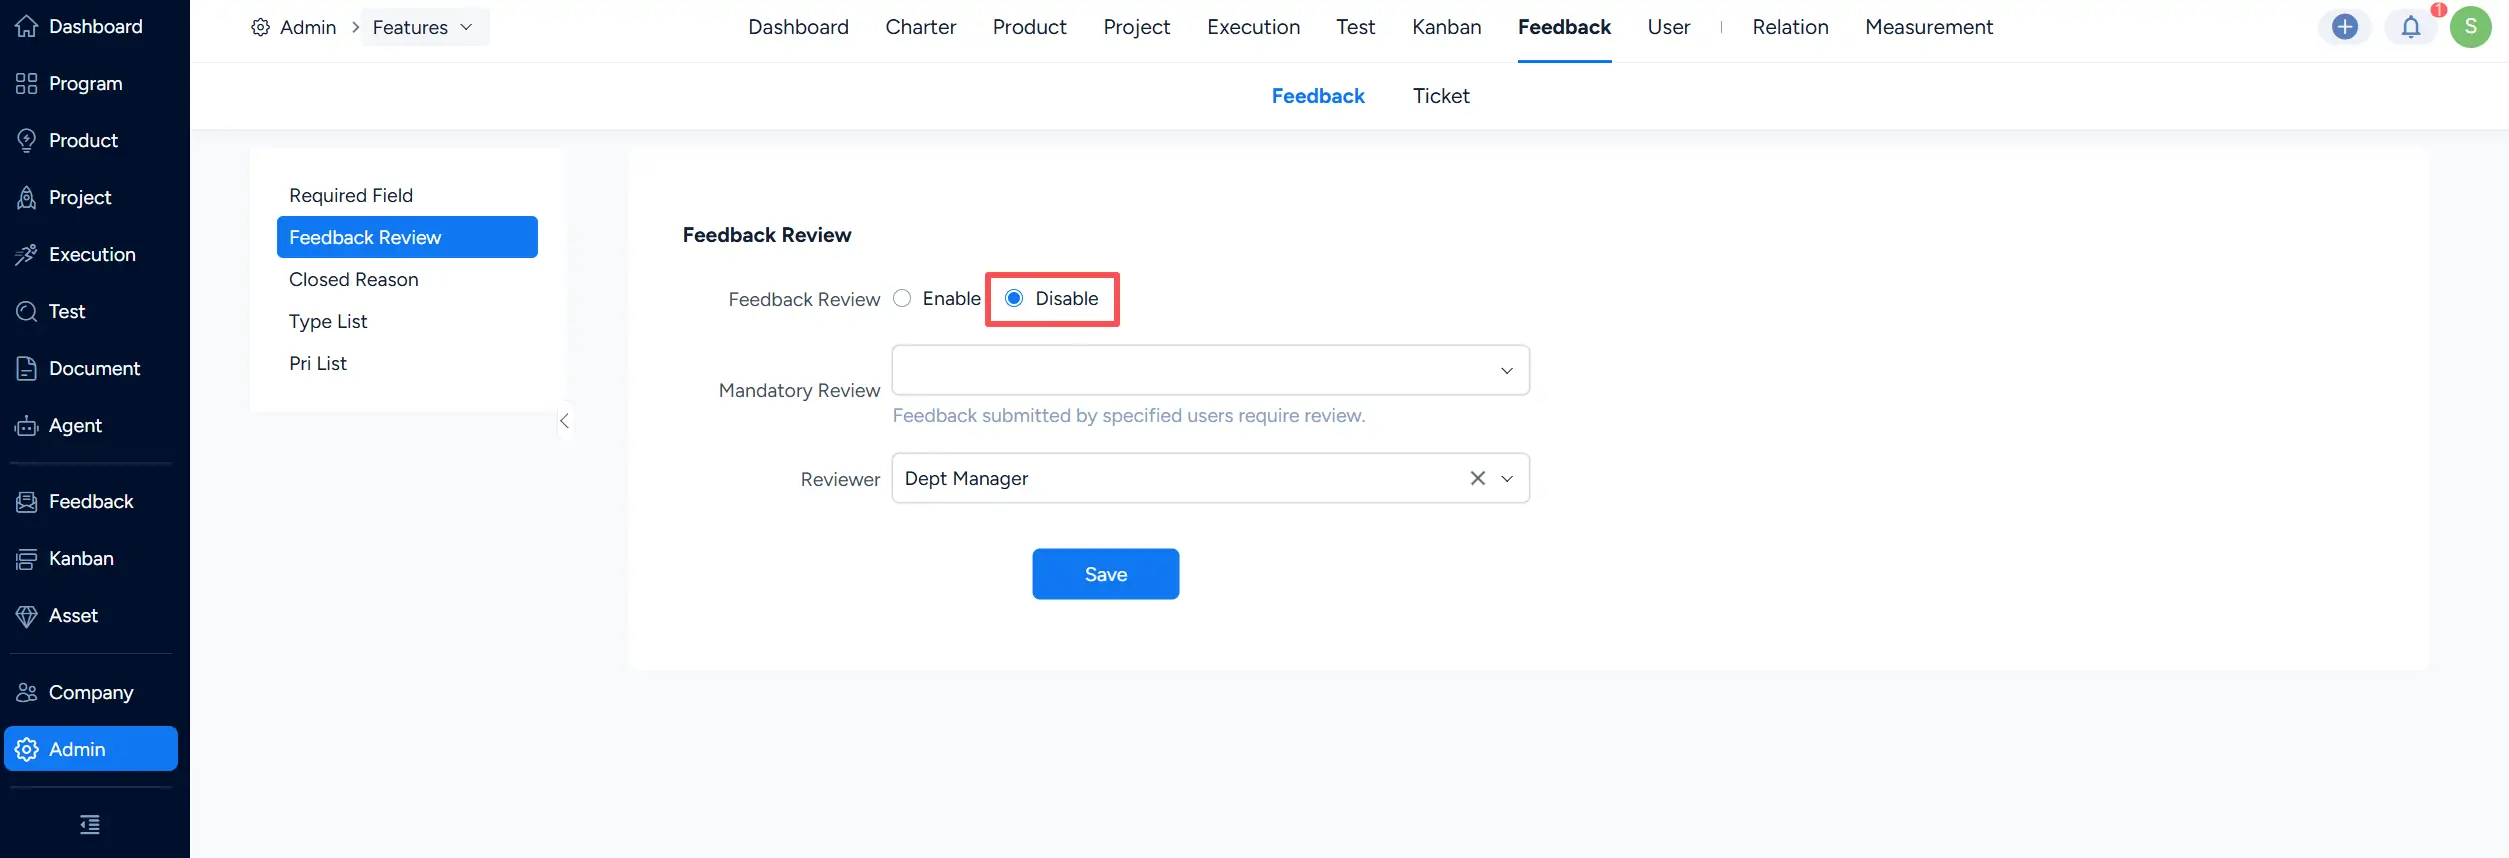
Feedback Review settings page with Disable selected, Mandatory Review configuration, and Reviewer set to Dept Manager.

Feedback that requires review appears in Waiting Review. Use the review action in the Actions column to open the review dialog.
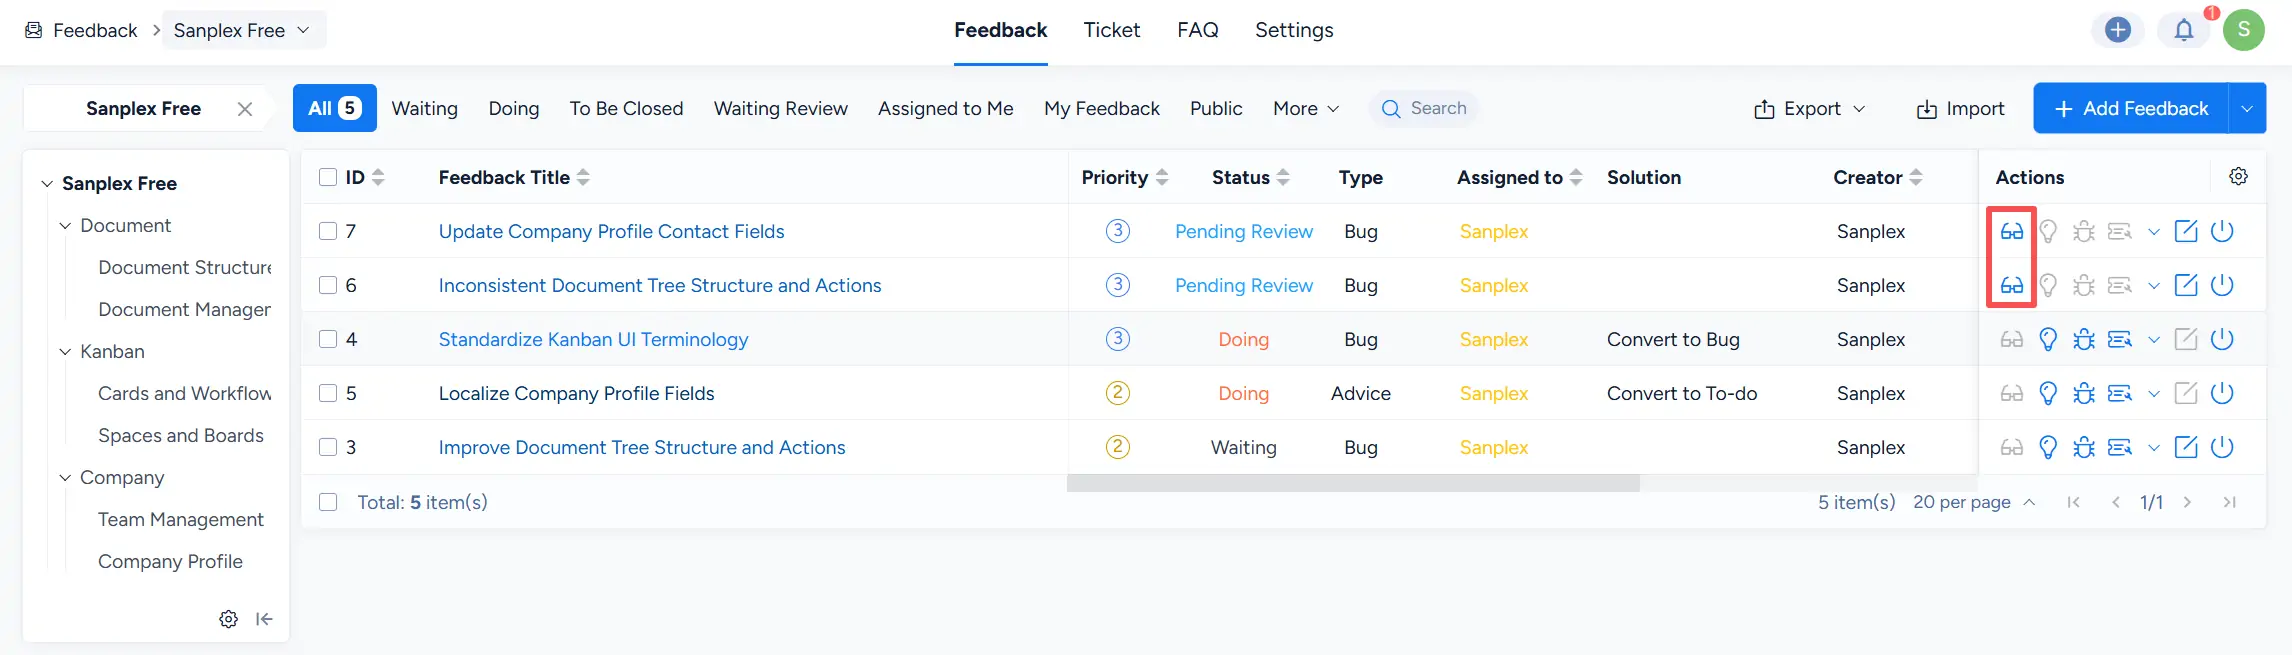
Feedback list showing feedback items in Pending Review and the review action highlighted in the Actions column.

In the Review Feedback dialog, select a review result, specify the reviewer as needed, and enter a review opinion.

Available review results include:

  • Pass — the feedback passes review and can continue through the feedback workflow.
  • To Be Clarified — additional clarification is required before the feedback proceeds.

Click Review to submit the result. The review activity is recorded in the feedback history.
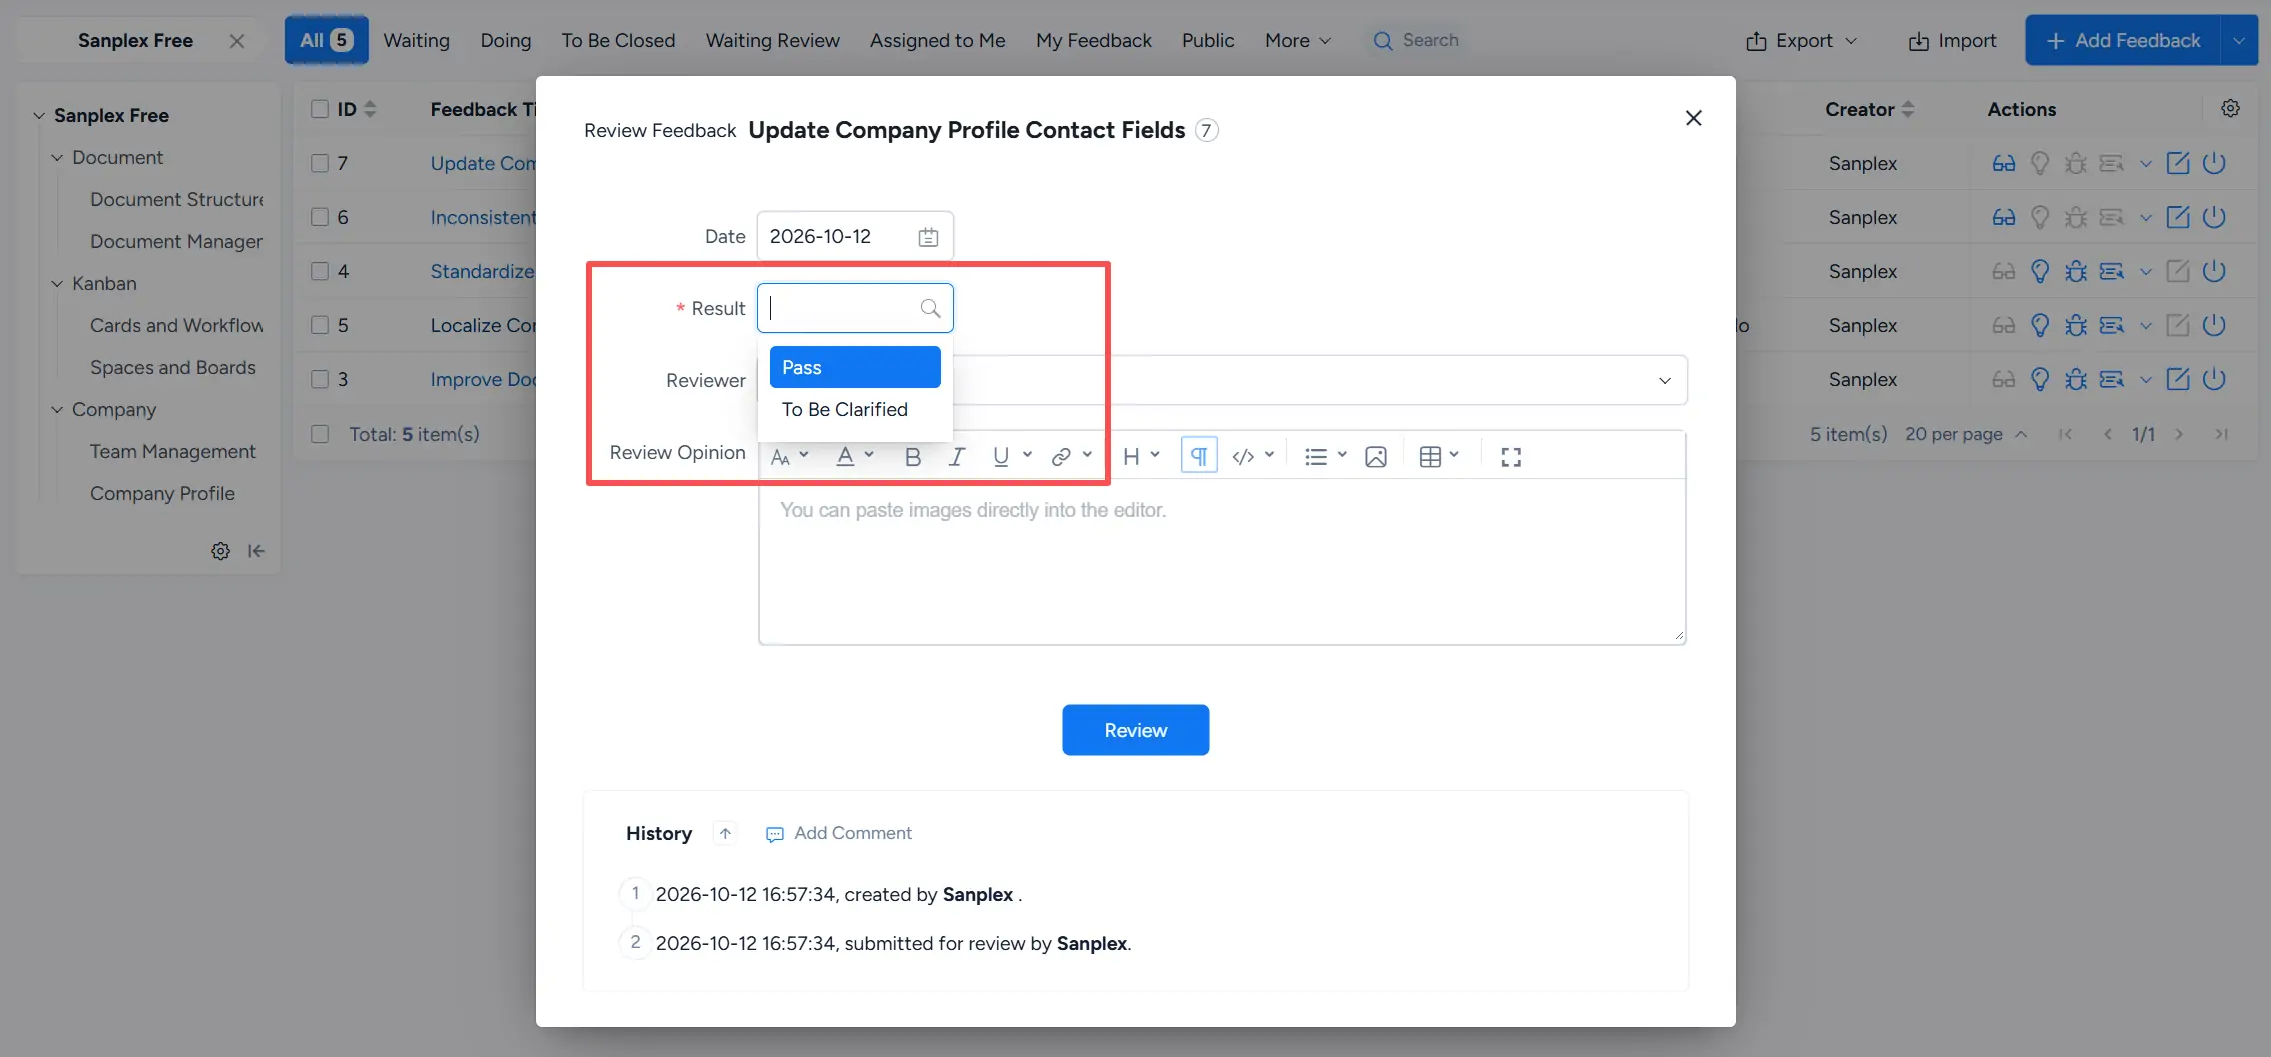
Review Feedback dialog showing the Result options Pass and To Be Clarified, Reviewer, Review Opinion, and Review button.

Tags

Write a Comment
Comment will be posted after it is reviewed.
