
Project Settings
1. Introduction of Sanplex features
1.1. Core Management Framework
1.1.1 Program
1.1.2 Project
1.1.3 Product
1.1.4 Execution
1.1.5 Management Models
1.2. Dashboard
1.2.1 Getting Started with Tutorials
1.2.2 Quick Add
1.2.3 Notification Center
1.2.4 Effort Tracking
1.2.5 Dashboard - Project and Execution
1.2.6 Dashboard - My Work, Contribution, and Recents
1.2.7 Dashboard - Approval
1.2.8 Contacts
1.3. Program
1.3.1 Program List
1.3.2 Program Kanban
1.3.3 Create Program
1.3.4 Create Sub-Programs
1.3.5 Project Charter Management
1.4. Product
1.4.1 Create Product
1.4.2 Manage Modules
1.4.3 Multi-Branch and Multi-Platform Management
1.4.4 Manage Plans
1.4.5 Manage Requirements
1.4.6 Requirement Reviews
1.4.7 Requirement Status and Phase
1.4.8 Create Releases
1.4.9 Track Progress
1.4.10 Business Requirements and Multi-Level Requirements
1.5. Project
1.5.1 Scrum Project
1.5.2. Waterfall Project
1.5.2.1 Manage Project Phases
1.5.2.2 Project Design
1.5.2.3 Project Matrix
1.5.2.4 Project Reports and Earned Value Management
1.5.2.5 Project Baselines
1.5.2.6 Project Change
1.5.3. Kanban Project
1.5.3.1 Set Up Kanban Projects
1.5.3.2 Configure Kanban Boards
1.5.3.3 Use Kanban Boards
1.5.4 Hybrid Agile Project
1.5.5 Hybrid Waterfall Project
1.5.6. Project Settings
1.5.6.1 Project Setup
1.5.6.2 Project Executions
1.5.6.3 Project Requirements
1.5.6.4 Project Builds
1.5.6.5 Project Tests
1.6. Admin Settings
1.6.1 Confluence Data Import
1.7. Workflow

Project Tests

2026-08-26 00:02:23
Sanplex Content
378
Last edited by Jing WANG on 2026-08-26 00:21:08
Share links
Summary: Learn how to manage project Bugs, Test Cases, Test Requests, and Test Reports, including reporting bugs, creating and running cases, managing testing requests, and reviewing test results.

Project-level Bugs, Test Cases, Test Requests, and Test Reports can be managed under the Test tab of a project.

The project Test module provides separate pages for managing bugs, test cases, testing requests, and test reports. When multiple products are available, you can use the product selector to view the test data for a specific product.

The following example uses a Scrum project to explain how to manage these testing activities under Project > Test.

I. Manage Bugs

Go to Project > Select a Project > Test > Bug.

If multiple products are available, use the product selector in the upper-left corner to select the product whose bugs you want to view. The Test area provides the Bug, Test Case, Test Request, and Test Report tabs.

Project Test page with the product selector expanded in the upper-left corner, showing Product List and Sanplex Free, with Bug, Test Case, Test Request, and Test Report tabs across the top.

Click Report Bug to create a bug.

The Bug list displays information such as the bug name, severity, priority, status, reporter, reported date, confirmation status, assignee, and available actions.

Project Bug page showing two existing bugs and the Report Bug button in the upper-right corner, with columns for severity, priority, status, reporter, reported date, confirmation status, and actions.

On the Report Bug page, enter the required bug information. You can switch between Lite Mode and Full Mode in the upper-right corner according to the amount of information you need to enter.
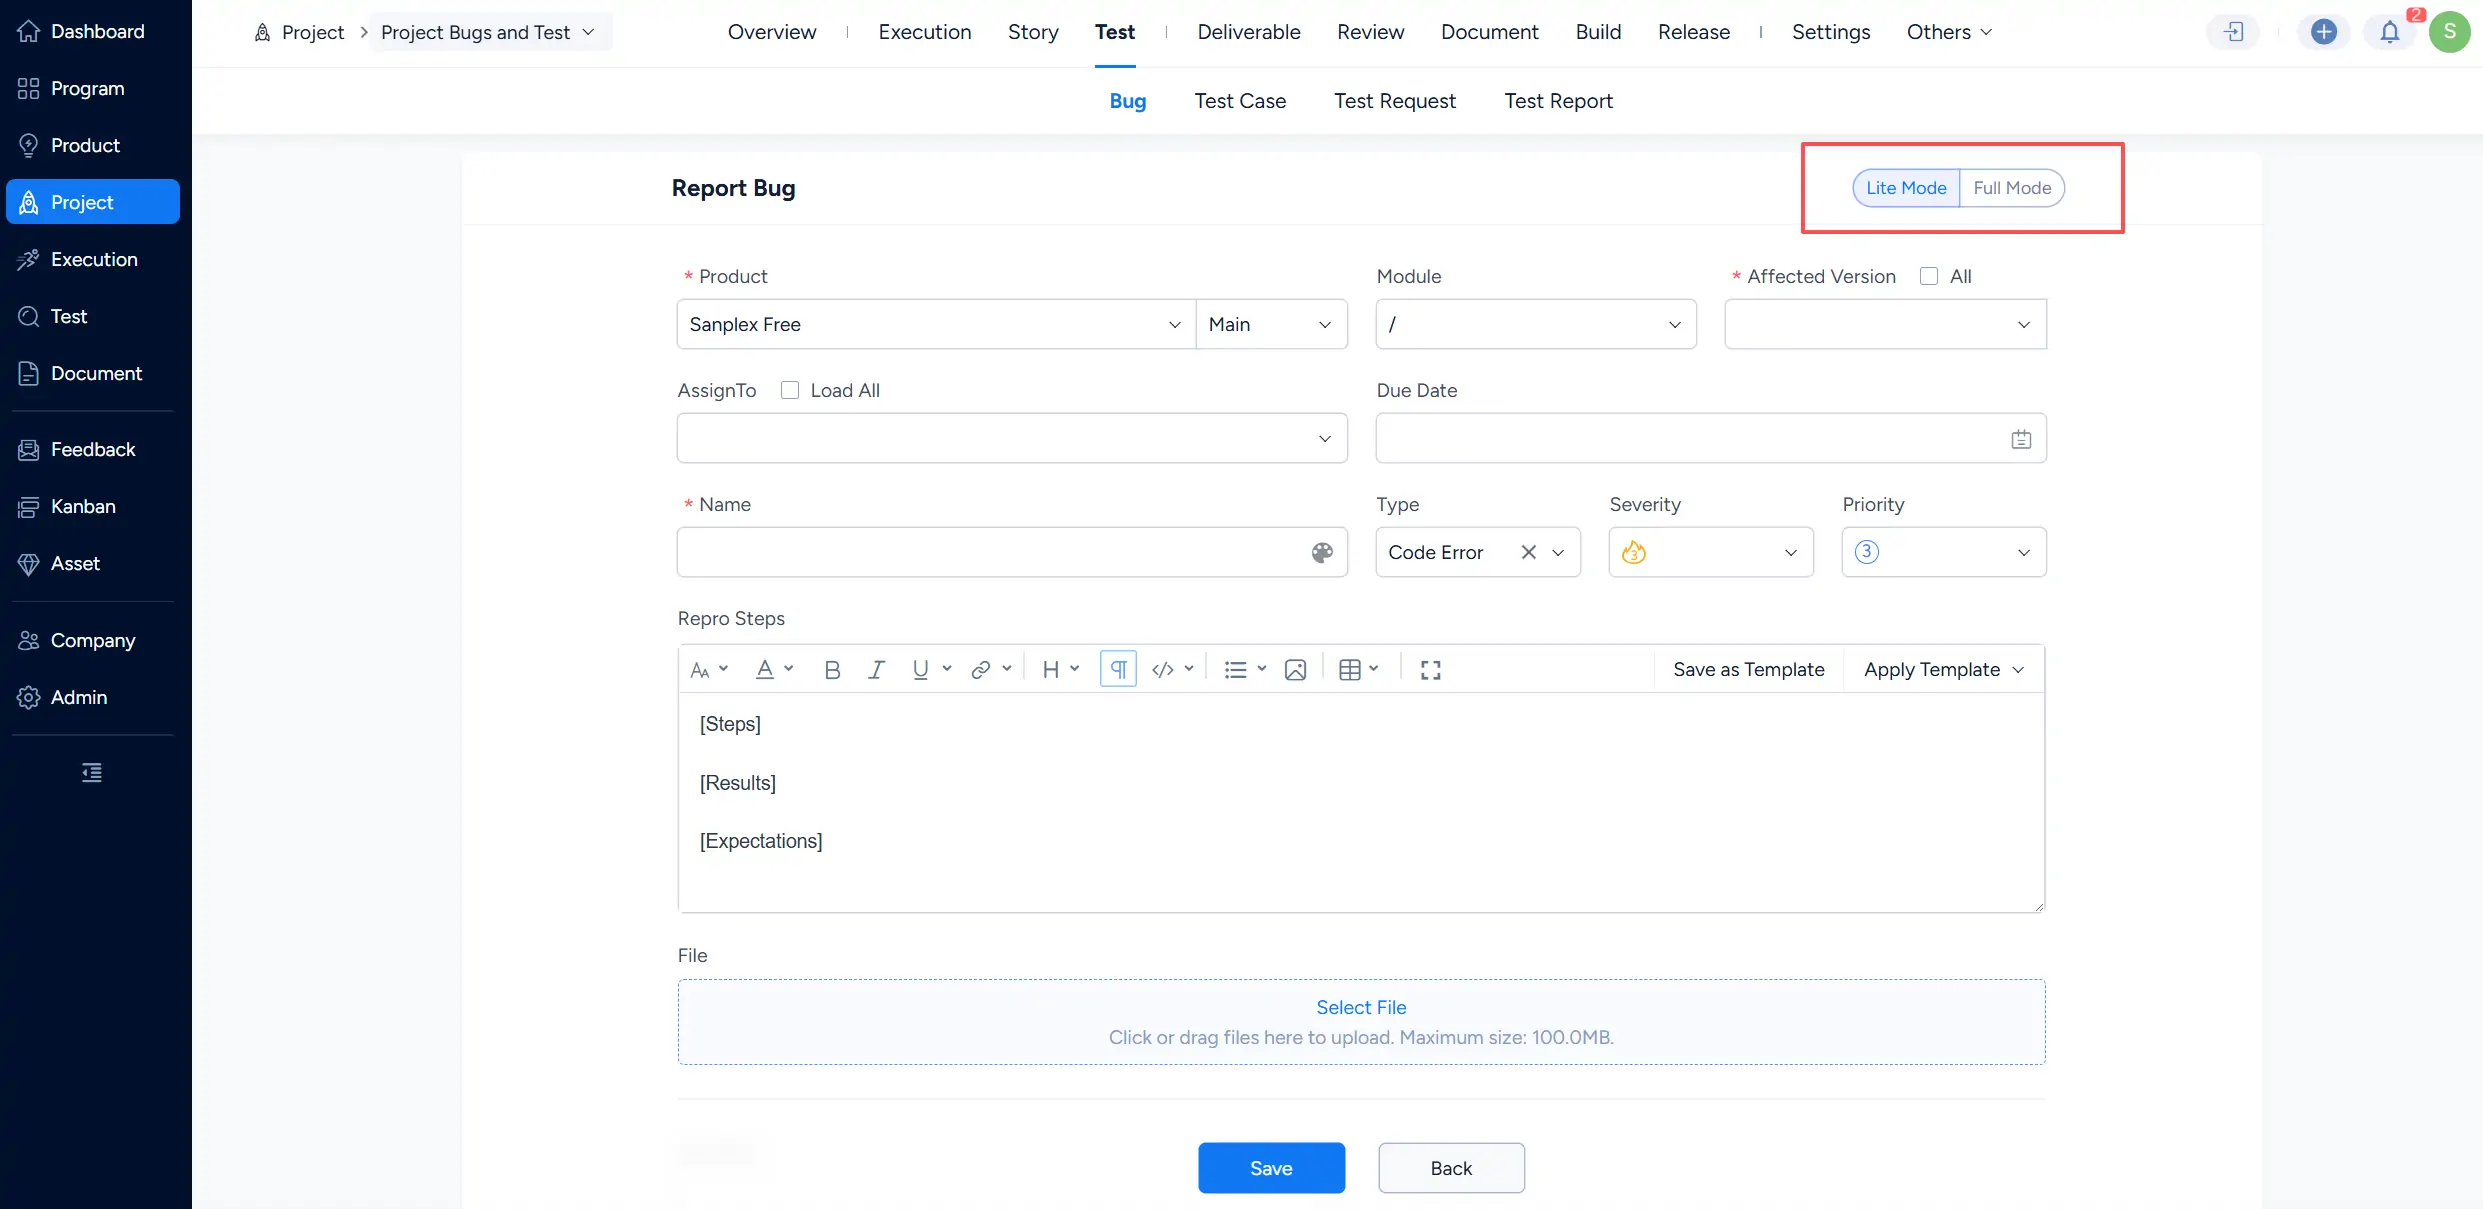
Report Bug page in Lite Mode with fields for Product, Module, Affected Version, assignee, due date, bug name, type, severity, priority, reproduction steps, and file attachments. 图3

Additional bug fields can be managed through Field display settings. Click the settings icon near Show more to open the field configuration panel.

You can choose which optional fields remain visible by using the pin icons, then click Save to apply the display settings.
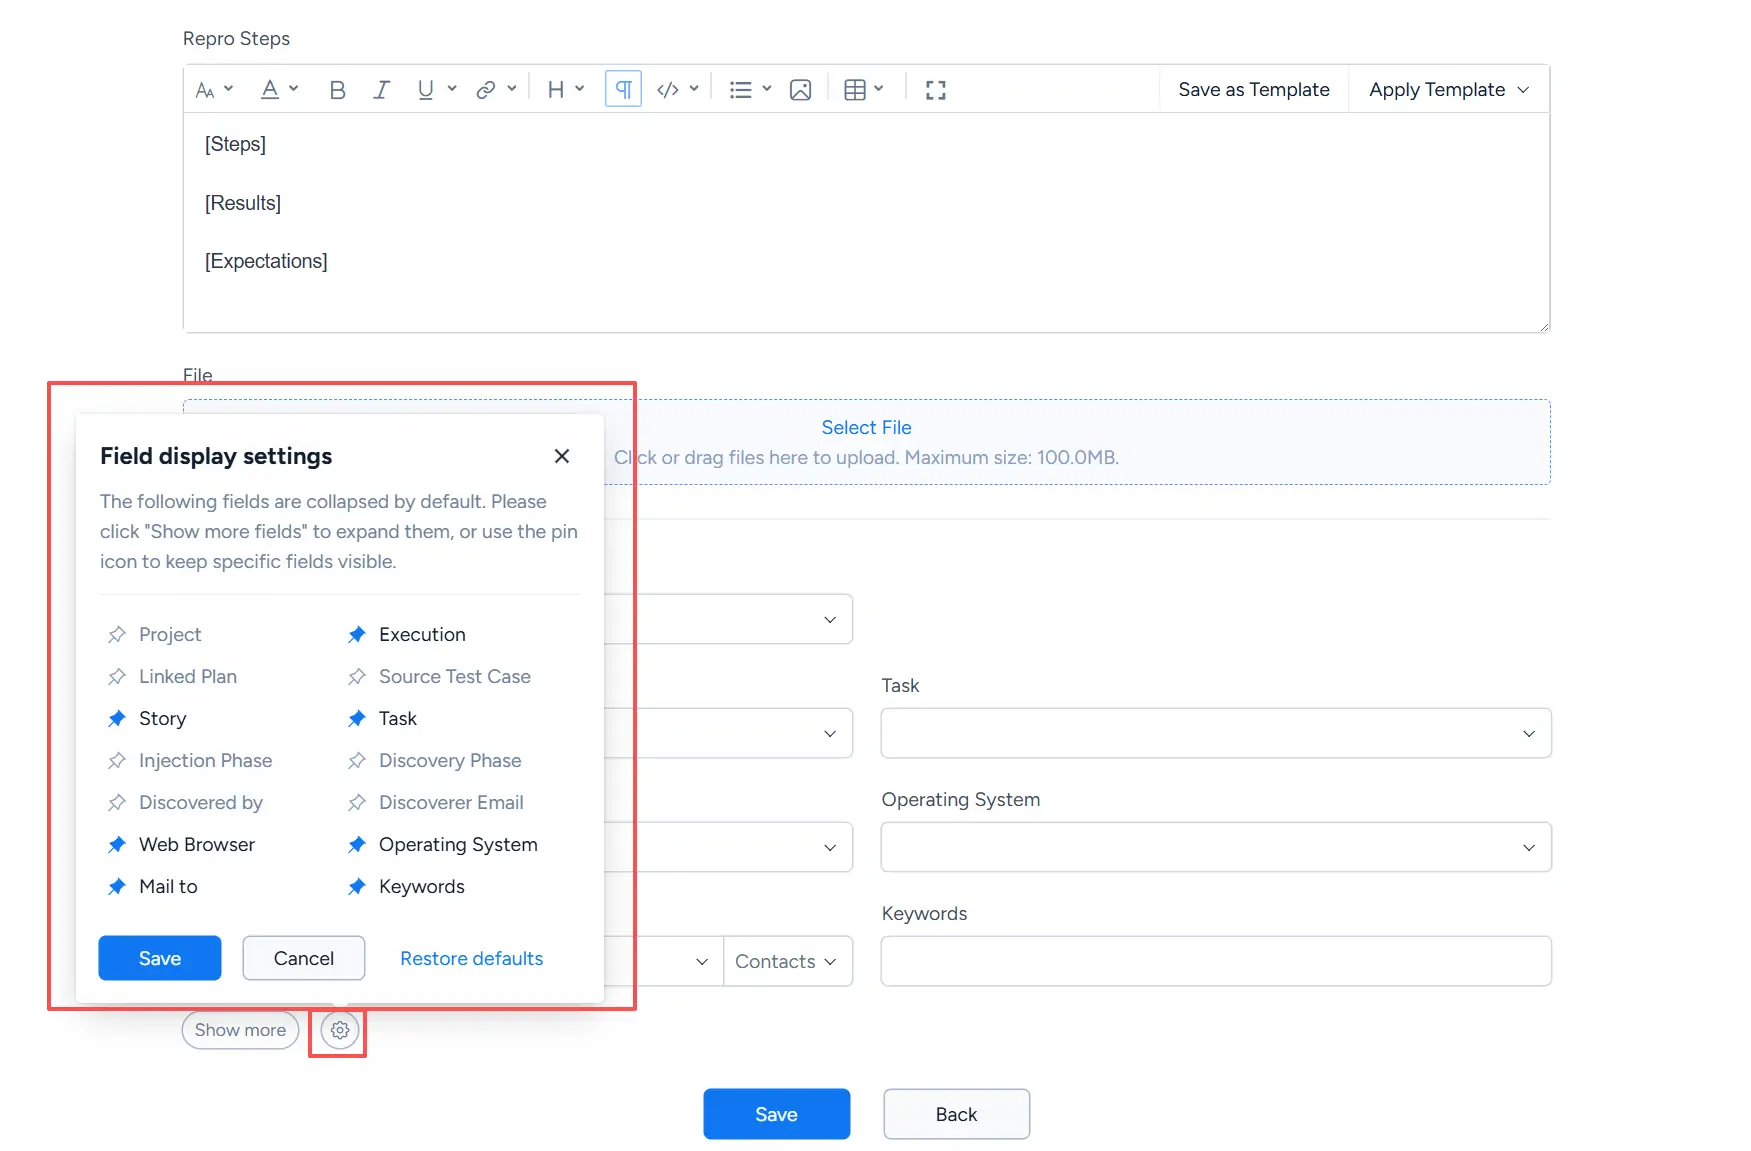
Field display settings panel on the Report Bug page showing optional fields such as Project, Execution, Story, Task, Web Browser, Operating System, Mail to, and Keywords with configurable pin icons.

After the bug is saved, it appears under Project > Test > Bug.

The Actions column displays the operations currently available for each bug according to its status.

Project Bug list showing an Activated bug and a Resolved bug with severity, priority, status, reporter, reported date, confirmation information, assignee, and available action icons.

II. Manage Test Cases

Go to Project > Test > Test Case to manage project Test Cases.

The Test Case page supports different display modes. Use the view selector in the upper-right area to switch between View by List and Group View.

Project Test Case page with the view selector expanded, showing View by List and Group View options above the Test Case list.

Click Add Case in the upper-right corner to create a Test Case.

The Test Case list displays information such as title, priority, creator, run-by user, last run time, result, and available actions.
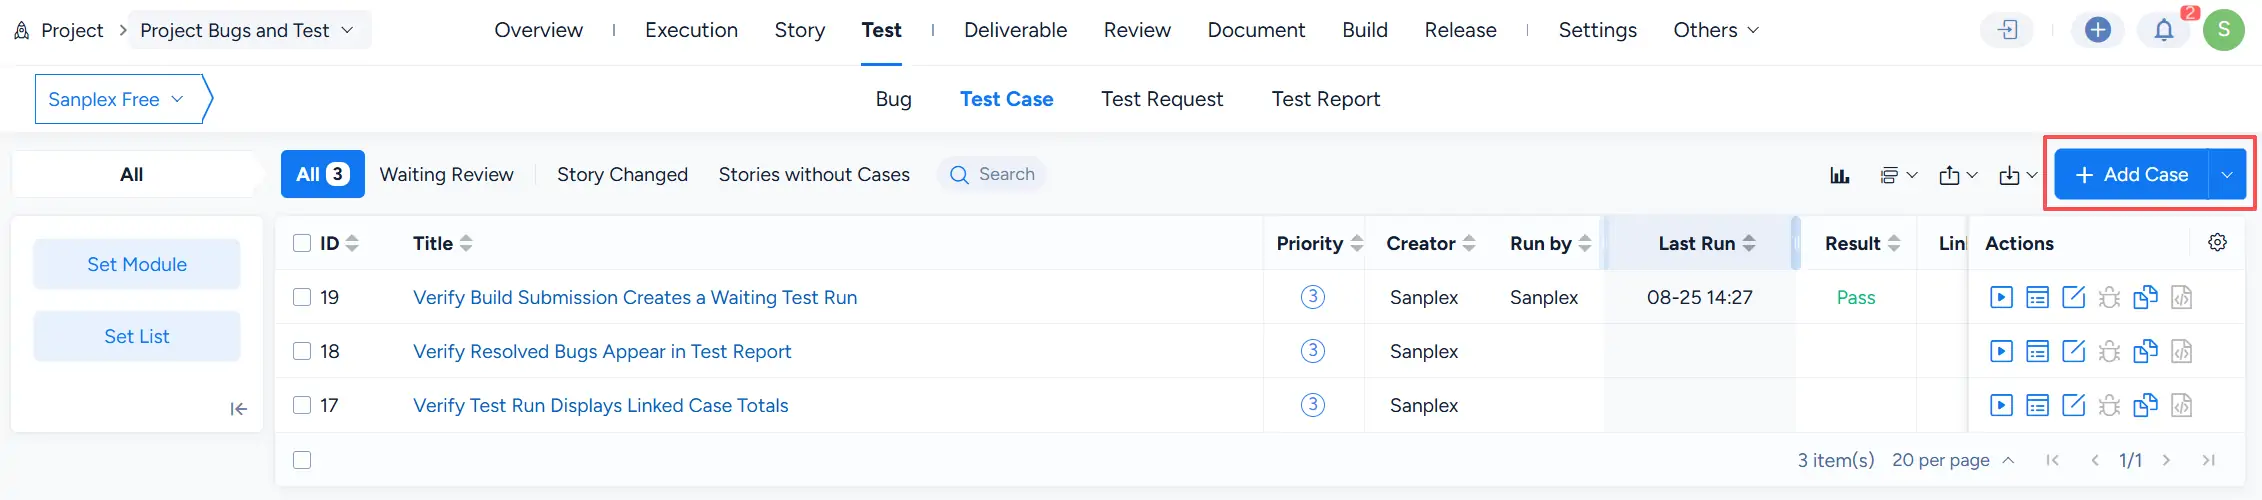
Project Test Case list showing three existing Test Cases with priority, creator, run information, result, and actions, with the Add Case button highlighted in the upper-right corner.

On the Add Case page, select the Product and configure the Test Case information. Available fields include Module, Linked Story, Scene, Type, Phase, Title, Priority, and Prerequisite.

Under Steps, enter the test steps and corresponding expectations.
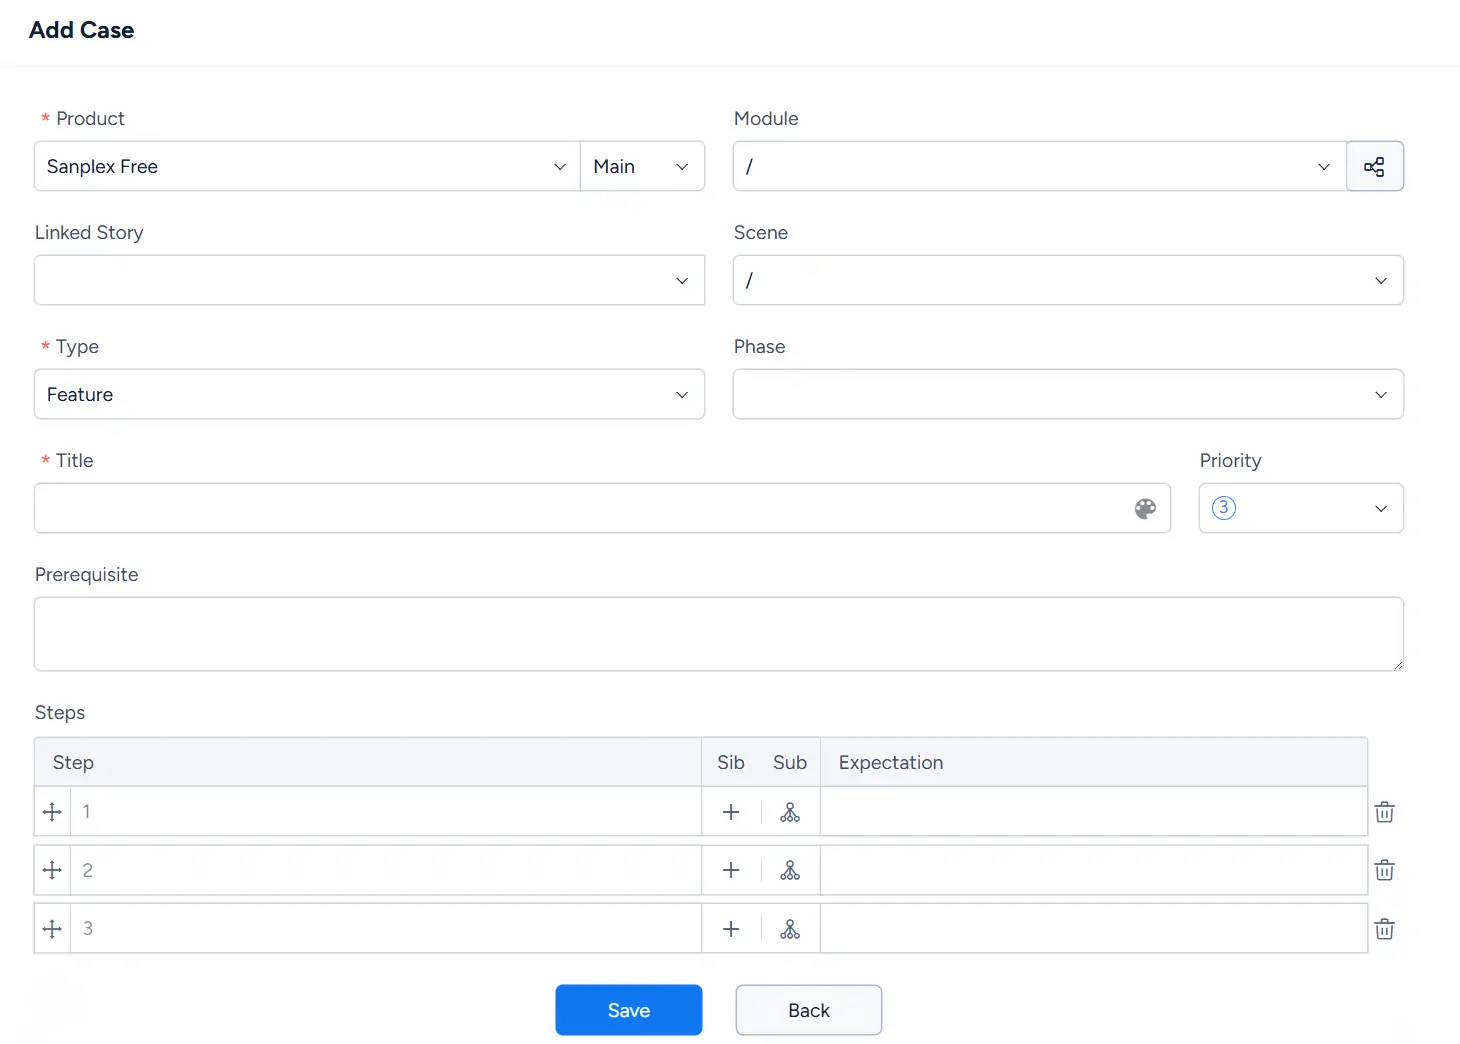
Add Case page showing Product, Module, Linked Story, Scene, Type, Phase, Title, Priority, Prerequisite, and a Steps table for defining individual test steps and expected results.

After clicking Save, the new Test Case appears in the Test Case list.

The Actions column provides the operations available for each Test Case, including actions for running, viewing related execution information, editing, bug-related processing, and copying the case where applicable.
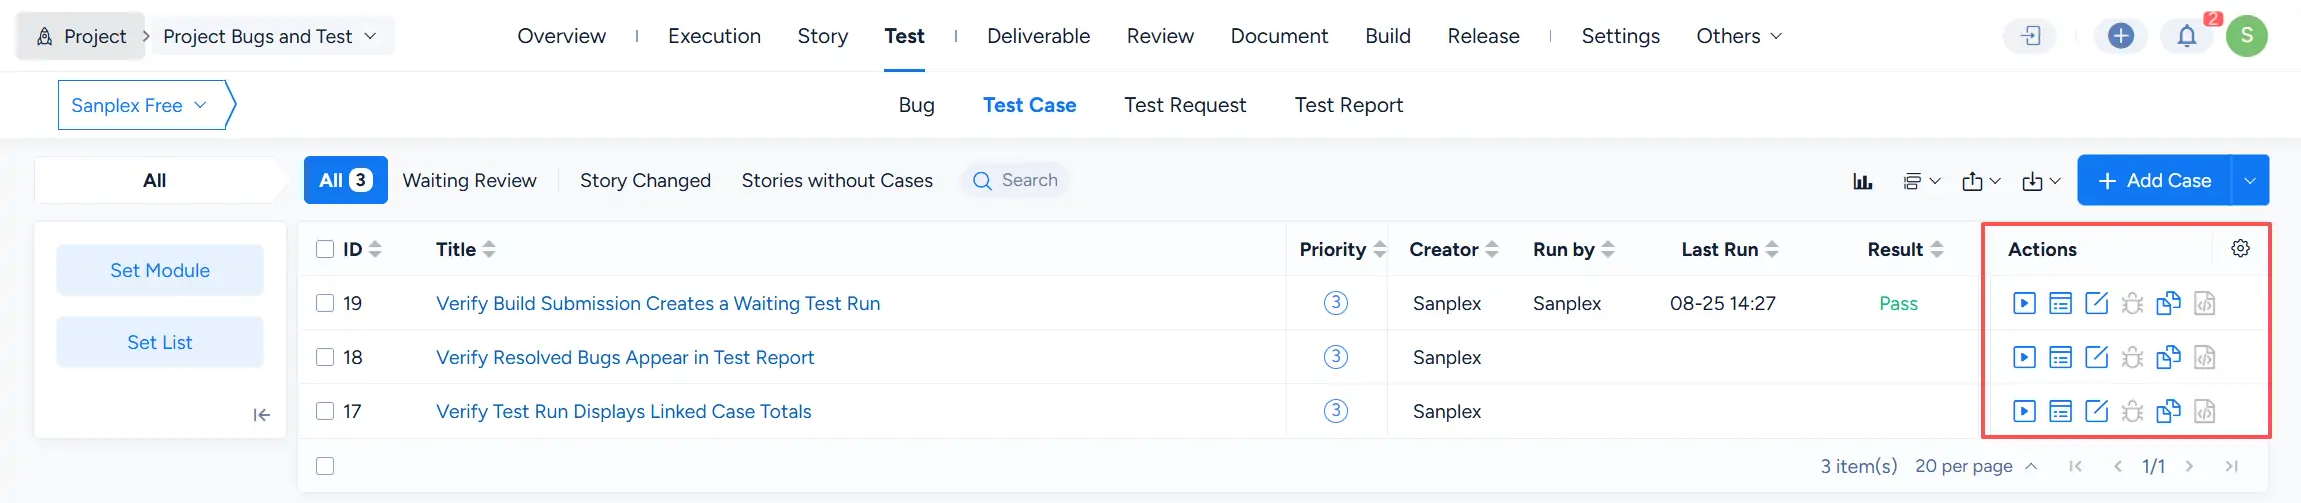
Project Test Case list with the Actions column highlighted, showing the available action icons for running, viewing, editing, bug-related processing, and copying individual Test Cases.

III. Manage Test Requests

Go to Project > Test > Test Request to manage testing requests.

A Test Request can be associated with a Product, Build, and Execution, and the list displays its owner, planned start and end dates, current status, and available actions.

Click Submit Request to create a new Test Request.

Project Test Request page showing an existing request with its priority, Product, Build, Execution, owner, start and end dates, status, and the Submit Request button in the upper-right corner.

The Actions column provides the operations available for each Test Request, including actions for managing related testing information, editing the request, and deleting it.

Project Test Request list with the Actions column highlighted, showing the available action icons for the current testing request together with its Build, Execution, owner, dates, and Doing status.

Test Requests created from Builds are also managed on this page. For details about submitting a Build for testing, see 7.5.6.4 Project Builds.

IV. Manage Test Reports

Go to Project > Test > Test Report to view Test Reports associated with project testing activities.

The Test Report list displays the Report Title, associated Project/Execution, Test Request, Creator, Created Date, and available actions.

Project Test Report page showing a release candidate report associated with an Execution and Test Request, together with its creator, creation date, and available report actions.

When editing a Test Report, you can configure the reporting period, owner, users, report title, and summary information. The page also displays generated project testing information such as the Project Goal and Profile.

Attachments can be added when needed.
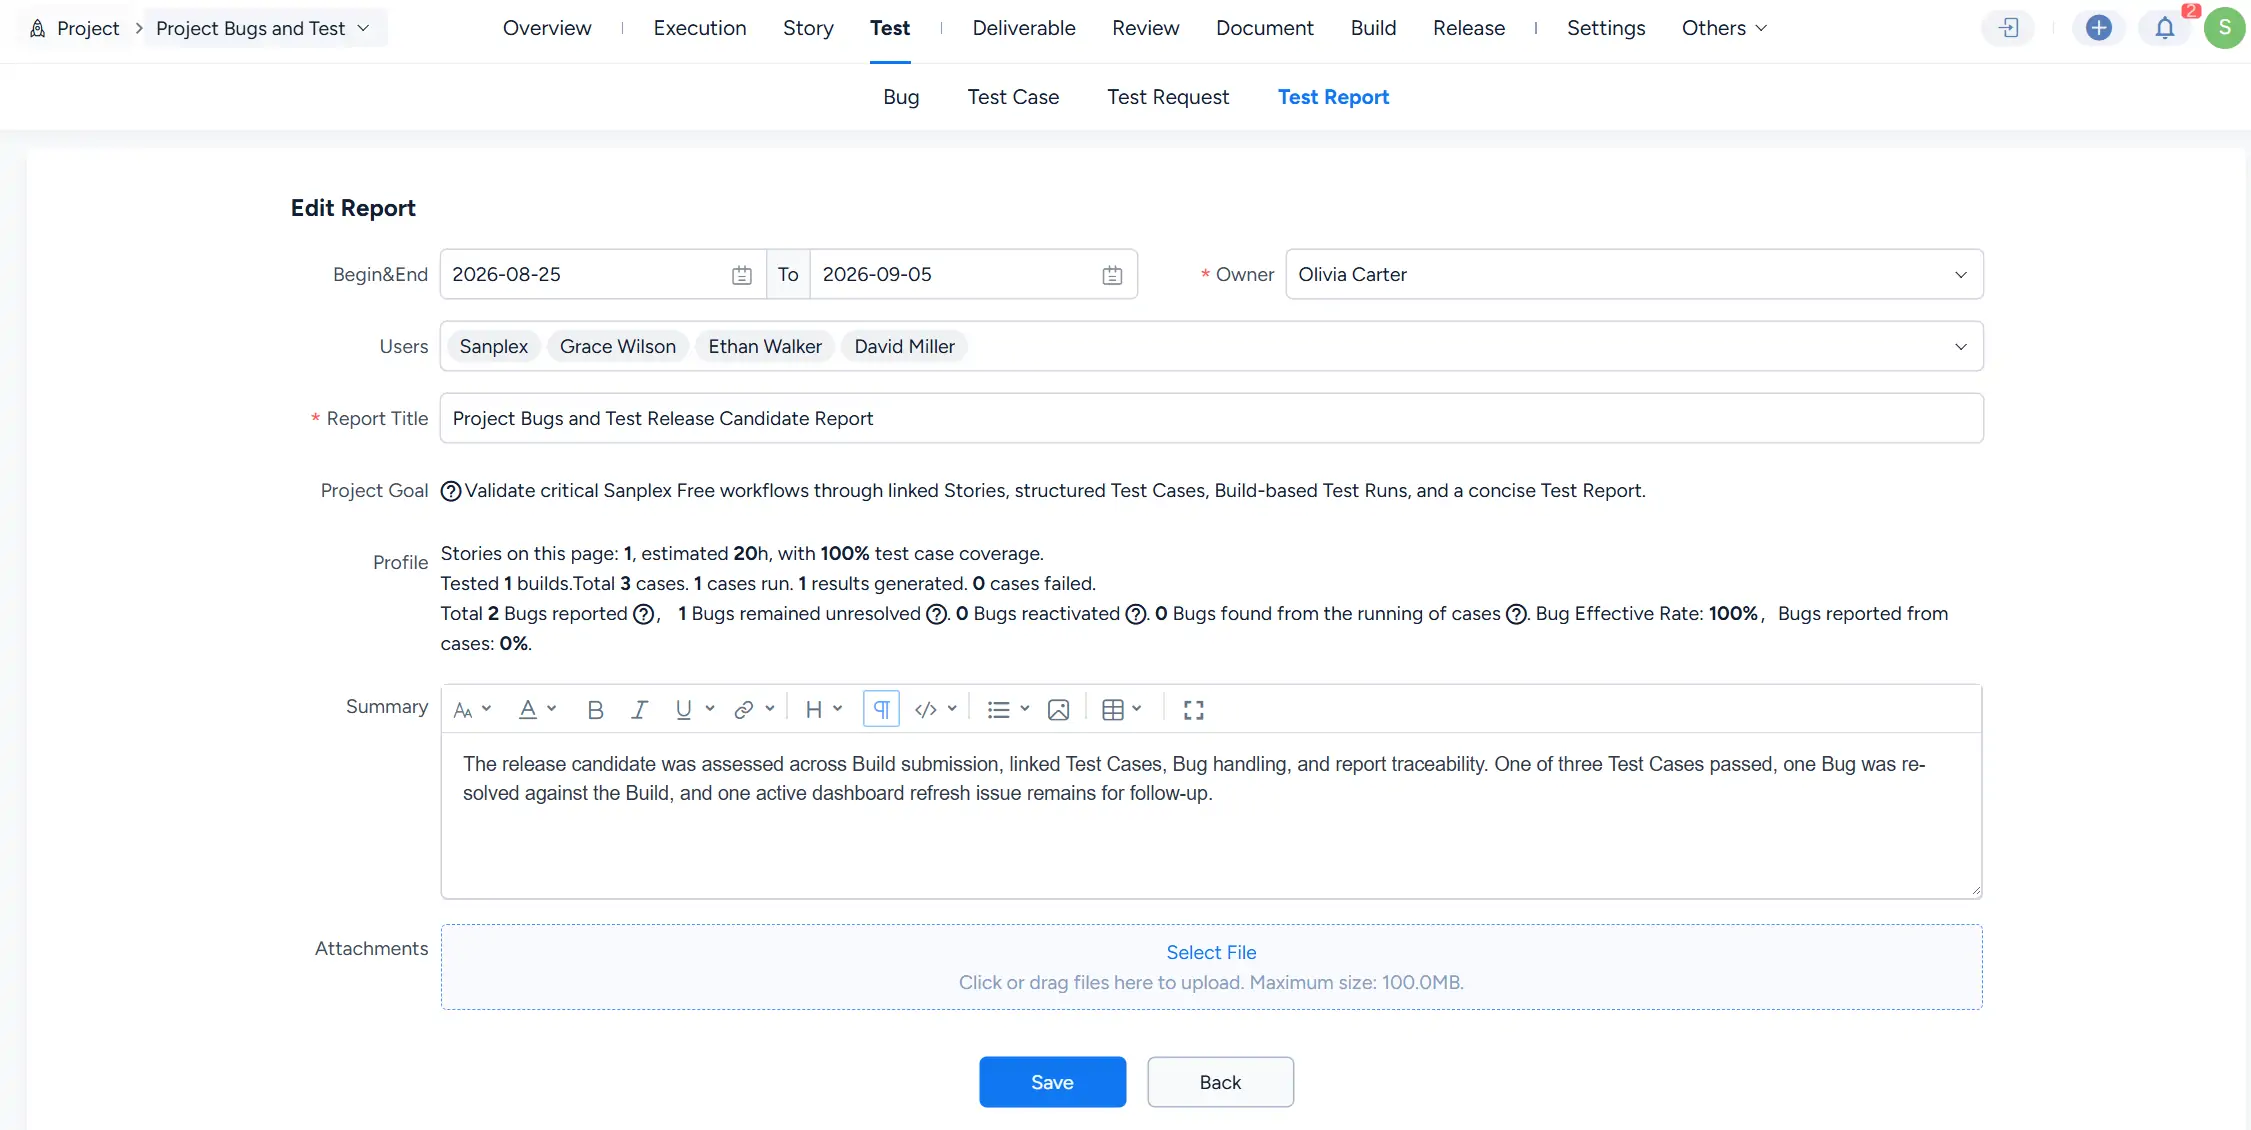
Edit Report page showing Begin and End dates, Owner, Users, Report Title, generated Project Goal and Profile information, a Summary editor, attachment upload area, and Save button.

Click a report title to open the report details page.

The Test Report provides several views for reviewing testing information, including Report Detail, Test Scope, Test Rounds, Linked Cases, Left Bugs, Report, and additional options under More.

The Report Detail view summarizes basic information, project goals, testing statistics, report summary, and history.
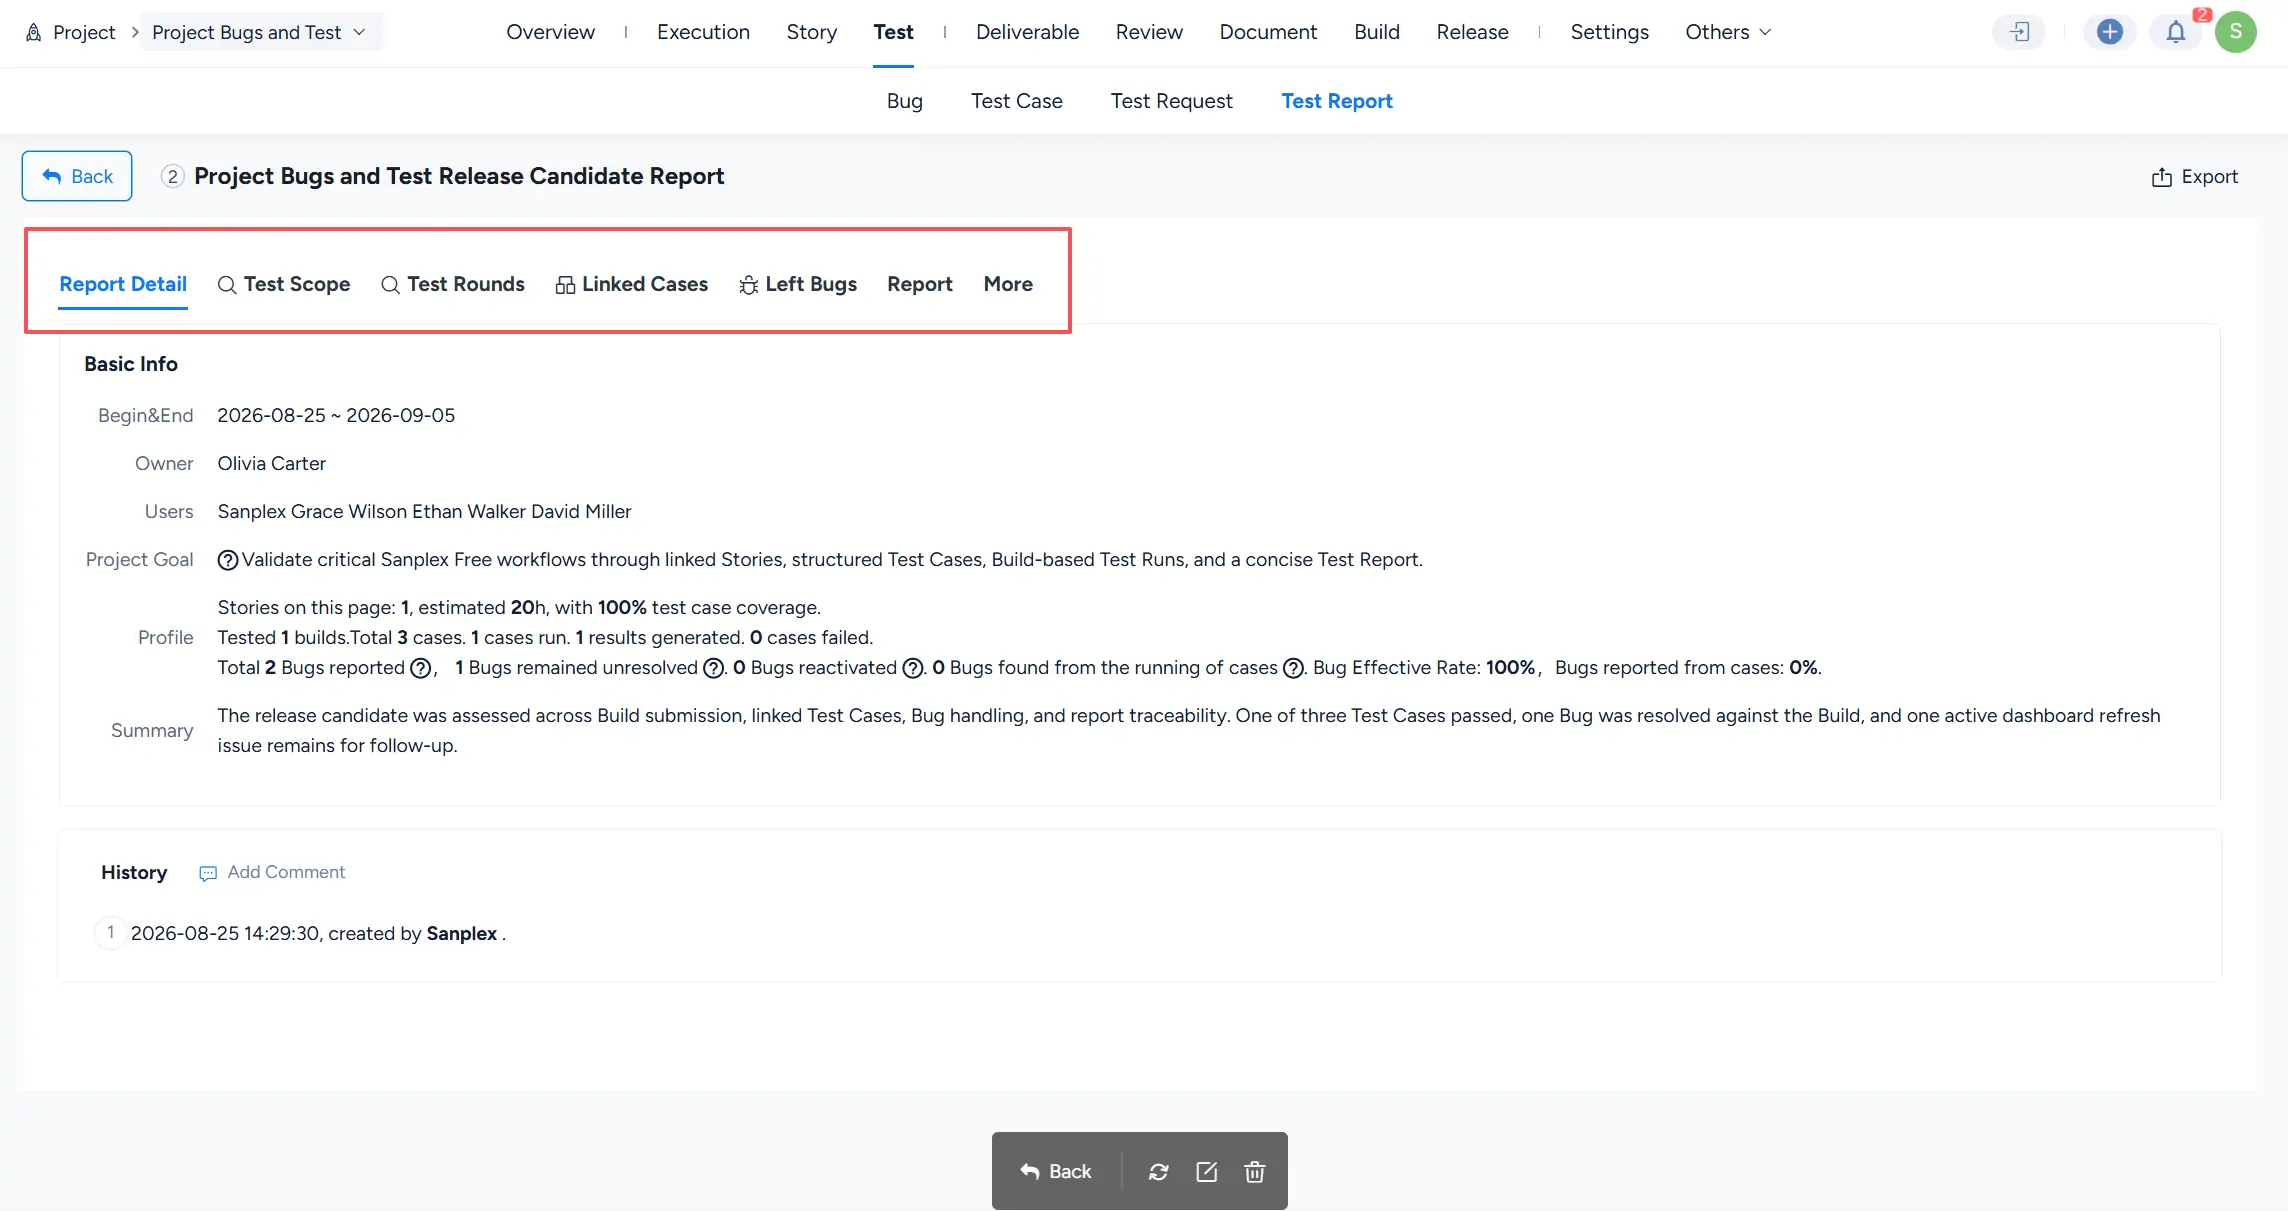
Test Report details page with Report Detail selected and tabs for Test Scope, Test Rounds, Linked Cases, Left Bugs, Report, and More, together with basic information, testing statistics, summary, and history.

Write a Comment
Comment will be posted after it is reviewed.
