
Dashboard
1. Introduction of Sanplex features
1.1. Core Management Framework
1.1.1 Program
1.1.2 Project
1.1.3 Product
1.1.4 Execution
1.1.5 Management Models
1.2. Dashboard
1.2.1 Getting Started with Tutorials
1.2.2 Quick Add
1.2.3 Notification Center
1.2.4 Effort Tracking
1.2.5 Dashboard - Project and Execution
1.2.6 Dashboard - My Work, Contribution, and Recents
1.2.7 Dashboard - Approval
1.2.8 Contacts
1.3. Program
1.3.1 Program List
1.3.2 Program Kanban
1.3.3 Create Program
1.3.4 Create Sub-Programs
1.3.5 Project Charter Management
1.4. Product
1.4.1 Create Product
1.4.2 Manage Modules
1.4.3 Multi-Branch and Multi-Platform Management
1.4.4 Manage Plans
1.4.5 Manage Stories
1.4.6 Requirement Reviews
1.4.7 Requirement Status and Phase
1.4.8 Create Releases
1.4.9 Track Progress
1.4.10 Business Requirements and Multi-Level Requirements
1.5. Project
1.5.1 Scrum Project
1.5.2. Waterfall Project
1.5.2.1 Manage Project Phases
1.5.2.2 Project Design
1.5.2.3 Project Matrix
1.5.2.4 Project Reports and Earned Value Management
1.5.2.5 Project Baselines
1.5.2.6 Project Change
1.5.3. Kanban Project
1.5.3.1 Set Up Kanban Projects
1.5.3.2 Configure Kanban Boards
1.5.3.3 Use Kanban Boards
1.5.4 Hybrid Agile Project
1.5.5 Hybrid Waterfall Project
1.5.6. Project Settings
1.5.6.1 Project Setup
1.5.6.2 Project Executions
1.5.6.3 Project Requirements
1.5.6.4 Project Builds
1.5.6.5 Project Tests
1.5.6.6 Project Docs
1.5.6.7 Project Releases
1.5.6.8 Project Reports
1.5.6.9 Project Risks
1.5.6.10 Project Issues
1.5.6.11 Project Opportunities
1.5.6.12 Project Deliverables
1.5.6.13 Project Reviews
1.5.6.14 Project Process
1.5.6.15 Deliverables
1.5.6.16 Quality Assurance
1.5.6.17 Project-specific Workflow Management
1.5.7 Project Templates
1.6. Execution
1.6.1 Product Planning and Task Breakdown
1.6.2 Task Assignment and Daily Tracking
1.6.3 Build Creation and Test Requests
1.6.4 Bug Confirmation and Resolution
1.6.5 Execution Kanban Boards
1.7. Testing
1.7.1 Write Test Cases
1.7.2 Execute Test Cases
1.7.3 Bug Submission and Reports
1.7.4 Verify and Close Bugs
1.7.5 Test Case Scenes
1.7.6 Submit a Test Request
1.7.7 Test Report
1.8. Agent
1.8.1 Conversation
1.8.2 Sanplex Agents
1.8.3 General Agents
1.8.4 Skill Management
1.8.5 AI Knowledge Library
1.8.6 Models
1.8.7 ZAI Service Installation
1.8.8 ZAI Service Control Panel
1.8.9 ZAI Configuration
1.9. Kanban
1.9.1 Kanban Spaces
1.9.2 Kanban Regions
1.9.3 Kanban Cards
1.10. Company
1.10.1 View Team Members and Work Information
1.10.2 View Recent Company Activity
1.10.3 View and Edit Company Information
1.11. Admin Settings
1.11.1. System Settings
1.11.1.1 Mode
1.11.1.2 Backup
1.11.1.3 Trash
1.11.1.4 License
1.11.1.5 Security
1.11.1.6 Cron Job
1.11.1.7 Time Zone
1.11.1.8 Rebuild Index
1.11.1.9 LDAP
1.11.1.10 Table Engine
1.11.2 Feature Options
1.11.3. Users Management
1.11.3.1 Set Departments and Edit Company Profile
1.11.3.2 Manage Users
1.11.3.3 Set Permisions
1.11.4. Feature Configuration
1.11.4.1 Dashboard
1.11.4.2 Product
1.11.4.3 Project
1.11.4.4 Execution
1.11.4.5 Test
1.11.4.6 Kanban
1.11.4.7 Feedback
1.11.4.8 Tickets
1.11.4.9 User
1.11.4.10 Relations (Standard Version)
1.11.4.11 Meaturement
1.11.5 Migrate Jira Data to Sanplex
1.11.6 Jira to Sanplex Migration Mapping
1.11.7. Agent Configuration
1.12. Asset Library (Premium)
1.12.1 Asset Library Management (Premium)

Contacts

2026-08-14 11:02:52
Sanplex Content
514
Last edited by Jing WANG on 2026-08-14 11:08:08
Share links
Summary: Learn how to create personal or public contact lists in Sanplex and reuse them in supported form fields to quickly select multiple users.

The Contacts feature allows users to create and manage reusable contact lists in Sanplex. Contact lists can be created for personal use or made public, and they can be reused in supported form fields to quickly select multiple users.

1. Create a Contact List

Go to Dashboard → Contacts and click Create Contact.

Dashboard Contacts view showing the Create Contact option and fields for creating a contact list.

Enter a List Name and select the users you want to include, then click Save to create the contact list.

If you select Public Contacts, the list will be available under the Public tab. Otherwise, it will be created under My contacts.
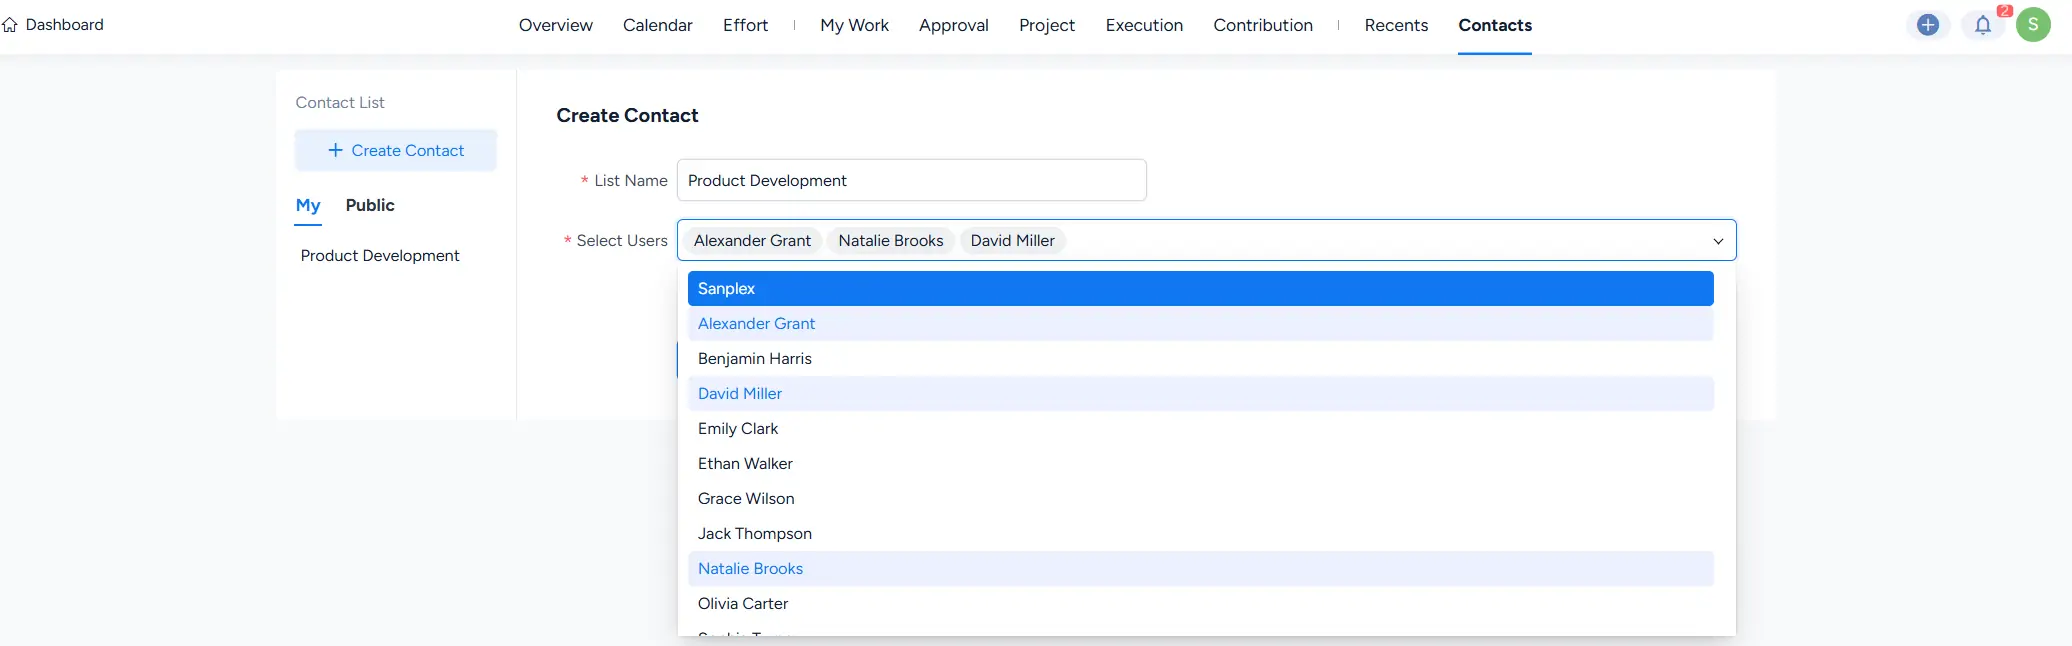
Create Contact form showing multiple users selected for a reusable contact list.

If a user you need is not available for selection, contact your administrator to confirm that the user account has been added and is available in Sanplex.

2. Use a Contact List

Using Story creation as an example, go to Product → Story and open the Create Story form. In Full Mode, locate the Mail to field and click Contacts.
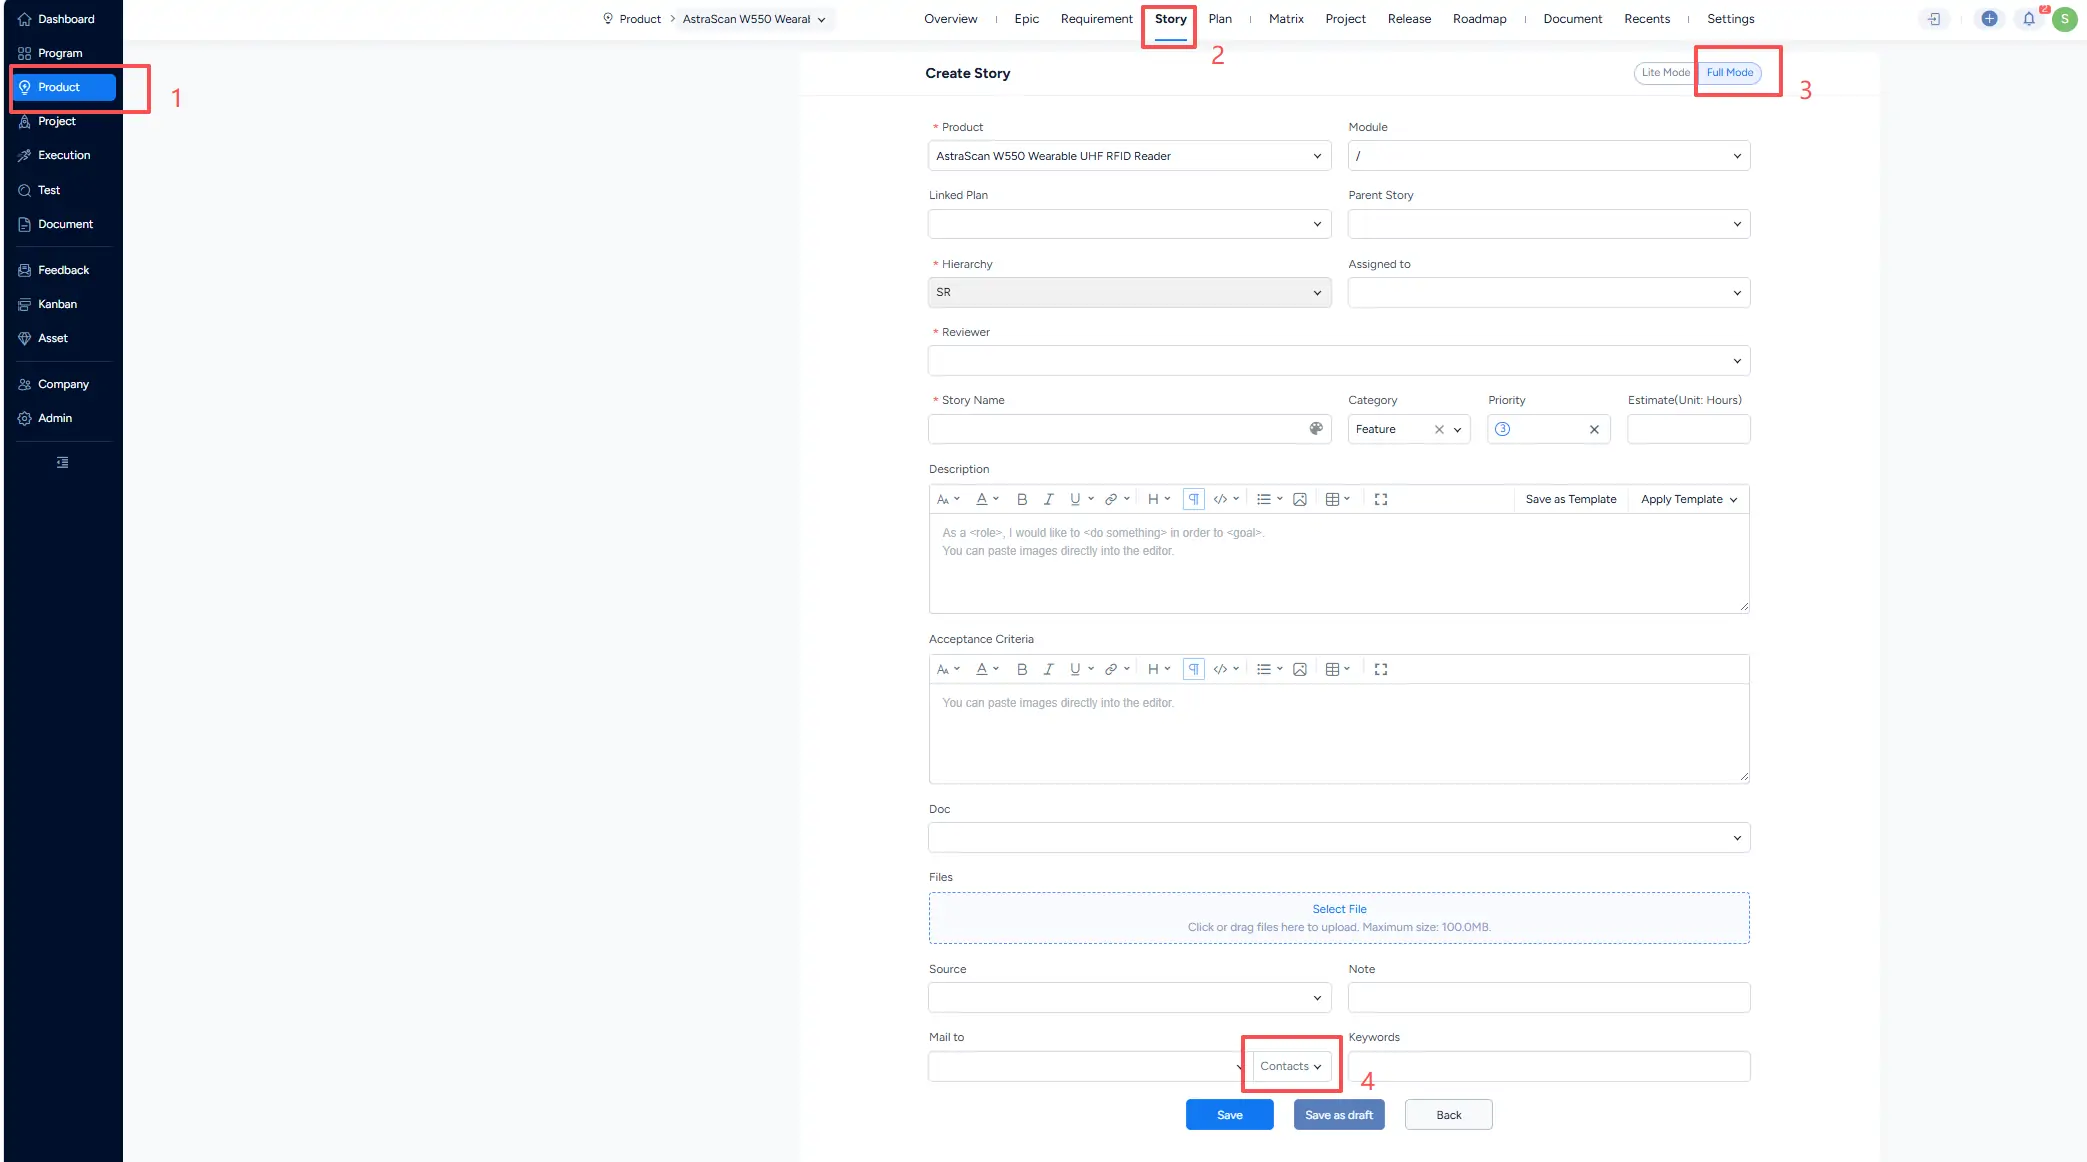
Create Story form in Full Mode showing the Contacts option in the Mail to field.

Select a previously created contact list to quickly add its members to the Mail to field.
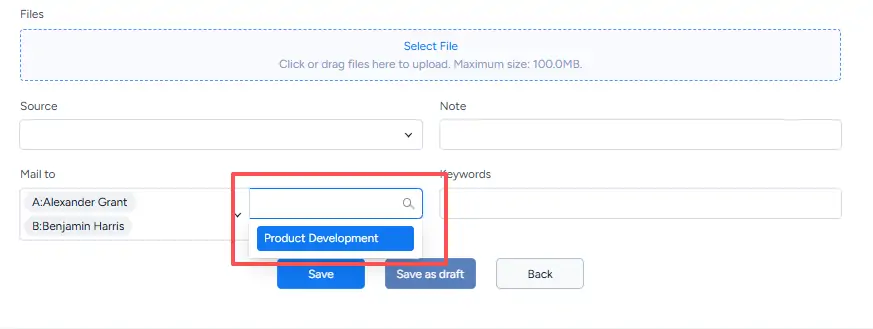
Mail to field showing a saved contact list that can be used to add multiple users.]


Write a Comment
Comment will be posted after it is reviewed.
