
Testing
1. Introduction of Sanplex features
1.1. Core Management Framework
1.1.1 Program
1.1.2 Project
1.1.3 Product
1.1.4 Execution
1.1.5 Management Models
1.2. Dashboard
1.2.1 Getting Started with Tutorials
1.2.2 Quick Add
1.2.3 Notification Center
1.2.4 Effort Tracking
1.2.5 Dashboard - Project and Execution
1.2.6 Dashboard - My Work, Contribution, and Recents
1.2.7 Dashboard - Approval
1.2.8 Contacts
1.3. Program
1.3.1 Program List
1.3.2 Program Kanban
1.3.3 Create Program
1.3.4 Create Sub-Programs
1.3.5 Project Charter Management
1.4. Product
1.4.1 Create Product
1.4.2 Manage Modules
1.4.3 Multi-Branch and Multi-Platform Management
1.4.4 Manage Plans
1.4.5 Manage Requirements
1.4.6 Requirement Reviews
1.4.7 Requirement Status and Phase
1.4.8 Create Releases
1.4.9 Track Progress
1.4.10 Business Requirements and Multi-Level Requirements
1.5. Project
1.5.1 Scrum Project
1.5.2. Waterfall Project
1.5.2.1 Manage Project Phases
1.5.2.2 Project Design
1.5.2.3 Project Matrix
1.5.2.4 Project Reports and Earned Value Management
1.5.2.5 Project Baselines
1.5.2.6 Project Change
1.5.3. Kanban Project
1.5.3.1 Set Up Kanban Projects
1.5.3.2 Configure Kanban Boards
1.5.3.3 Use Kanban Boards
1.5.4 Hybrid Agile Project
1.5.5 Hybrid Waterfall Project
1.5.6. Project Settings
1.5.6.1 Project Setup
1.5.6.2 Project Executions
1.5.6.3 Project Requirements
1.5.6.4 Project Builds
1.5.6.5 Project Tests
1.5.6.6 Project Docs
1.5.6.7 Project Releases
1.5.6.8 Project Reports
1.5.6.9 Project Risks
1.5.6.10 Project Issues
1.5.6.11 Project Opportunities
1.5.6.12 Project Deliverables
1.5.6.13 Project Reviews
1.5.6.14 Project Process
1.5.6.15 Deliverables
1.5.6.16 Quality Assurance
1.5.6.17 Project-specific Workflow Management
1.5.7 Project Templates
1.6. Execution
1.6.1 Product Planning and Task Breakdown
1.6.2 Task Assignment and Daily Tracking
1.6.3 Build Creation and Test Requests
1.6.4 Bug Confirmation and Resolution
1.6.5 Execution Kanban Boards
1.7. Admin Settings
1.7.1. System Settings
1.7.1.1 Mode
1.7.1.2 Backup
1.7.1.3 Trash
1.7.1.4 License
1.7.1.5 Security
1.7.1.6 Cron Job
1.7.1.7 Time Zone
1.7.1.8 Rebuild Index
1.7.1.9 LDAP
1.7.1.10 Table Engine
1.7.2 Feature Options
1.7.3. Permission Management and Access Control
1.7.4. Agent Configuration
1.8. Asset Library (Premium)
1.8.1 Asset Library Management (Premium)

Test Report

2026-09-28 01:12:06
Sanplex Content
457
Last edited by Jing WANG on 2026-09-28 09:36:05
Share links
Summary: Learn how to generate a test report from a Sanplex Test Request, define the reporting period and report information, review report sections such as test scope, test rounds, linked cases, and remaining bugs, and export the completed report.

Feature Overview

A Test Report summarizes the testing activities and results associated with a Test Request. It provides the project team with a consolidated view of the testing scope, execution results, linked test cases, remaining bugs, and other report information.

Sanplex organizes test report information into dedicated sections, including Report Detail, Test Scope, Test Rounds, Linked Cases, Left Bugs, and Report, helping teams review testing progress and quality status from different perspectives.

Test reports can also be exported for further communication and reporting.

Typical Use Scenarios

  • Decision Support: Test reports provide testing and defect information that can support release and delivery discussions.
  • Quality Assessment: Project Managers, testers, and other stakeholders can review test scope, execution results, linked cases, and remaining bugs to understand the current quality status.
  • Communication and Reporting: A consolidated report makes it easier to communicate testing progress and results with project stakeholders.
  • Bug Tracking: The Left Bugs section helps teams review bugs that remain within the report scope and continue follow-up activities.

I. Generate a Test Report

Go to Test > Test Request. In the Actions column, click Test Report for the corresponding test request.
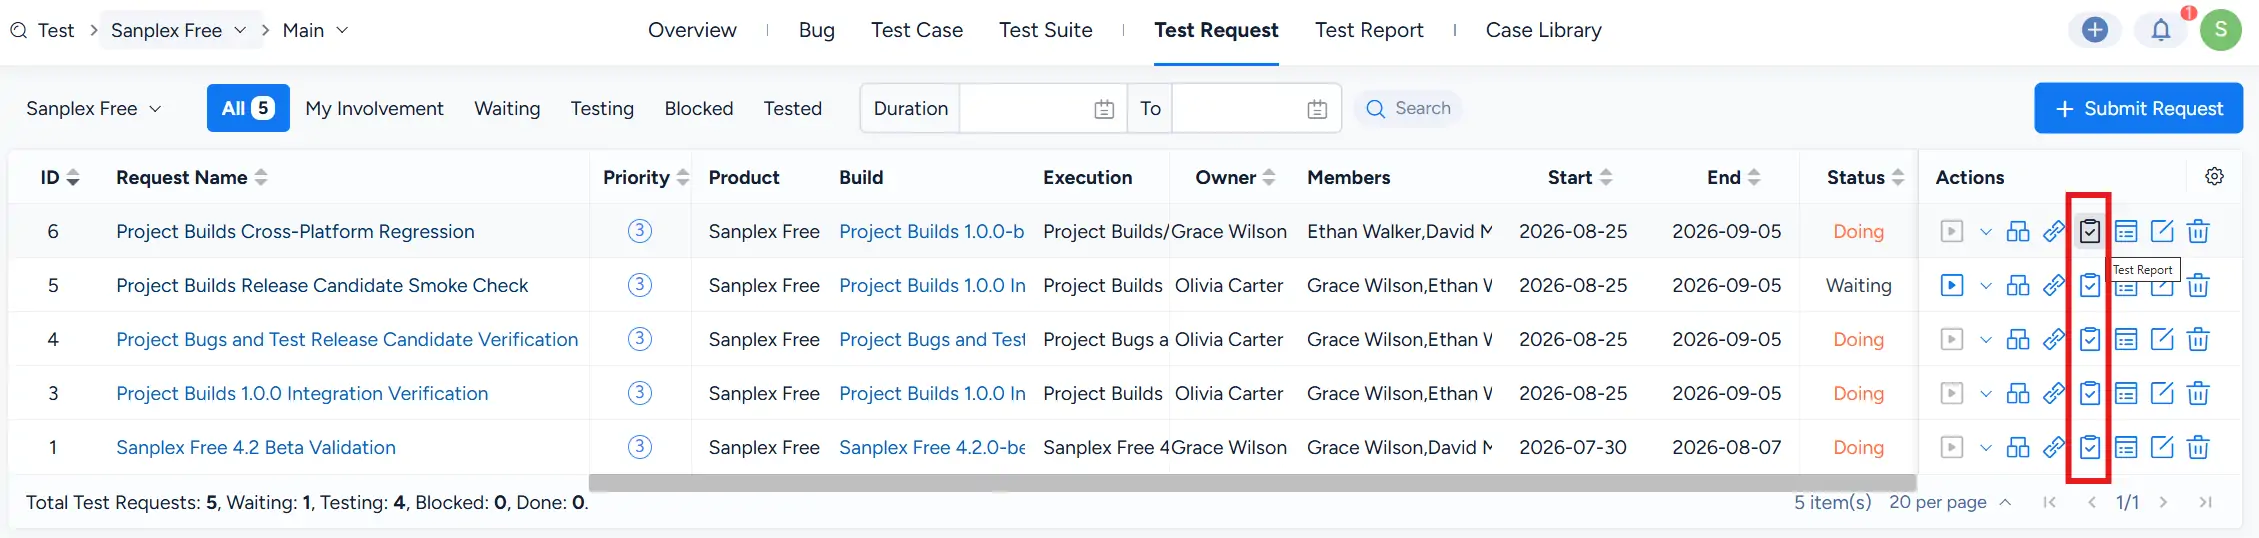
Test Request list showing the Test Report action in the Actions column for each test request.

On the Create Report page, select or review the associated Request and configure the report information, including Begin&End, Owner, Users, Report Title, Project Goal, and Summary. You can also add attachments as needed.

The Begin&End fields define the reporting period. Review these dates before saving the report to ensure the intended testing period is covered.
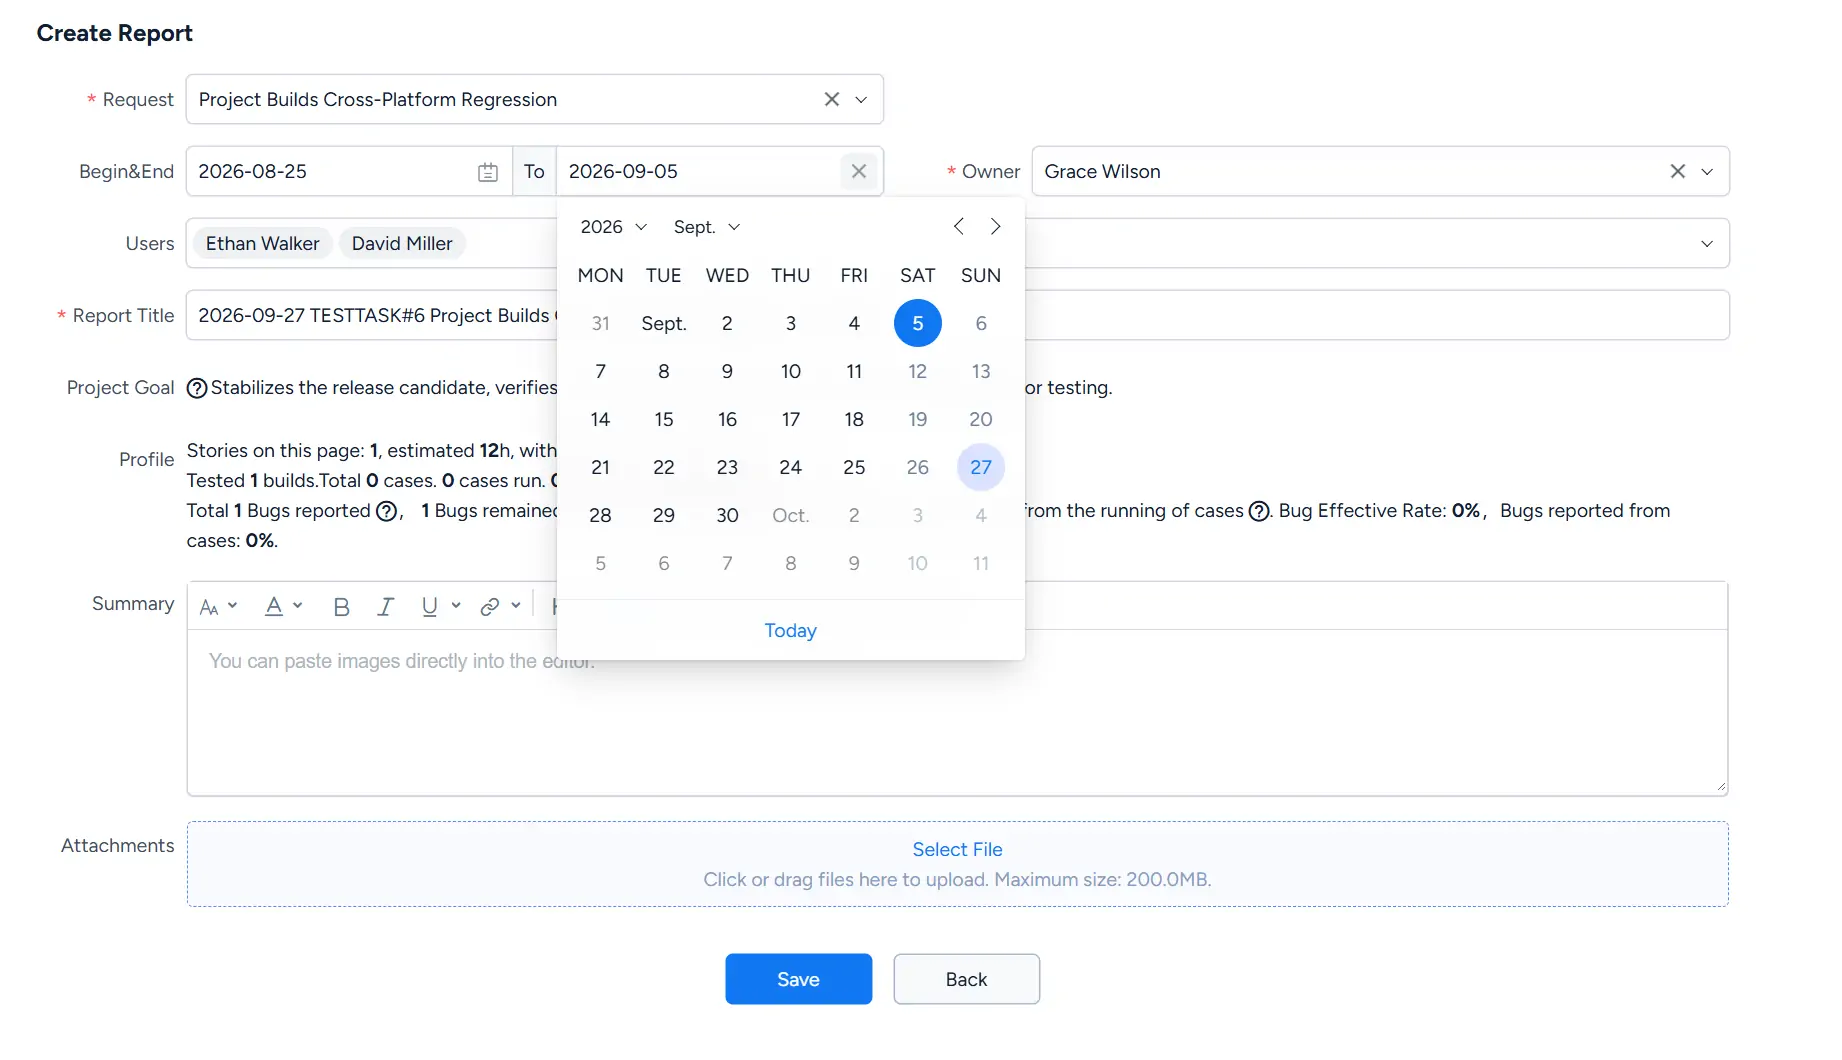
Create Report page showing the selected test request, Begin&End dates, Owner, Users, Report Title, Project Goal, Profile, Summary, attachments, and Save button.

Click Save to create the test report.

II. Review and Export the Test Report

After the report is created, open it to review its contents. The report page provides the following sections:

  • Report Detail
  • Test Scope
  • Test Rounds
  • Linked Cases
  • Left Bugs
  • Report
  • More

The Report Detail section displays basic report information such as the reporting period, owner, users, project goal, profile, and summary.

Use Export in the upper-right corner to export the generated report.
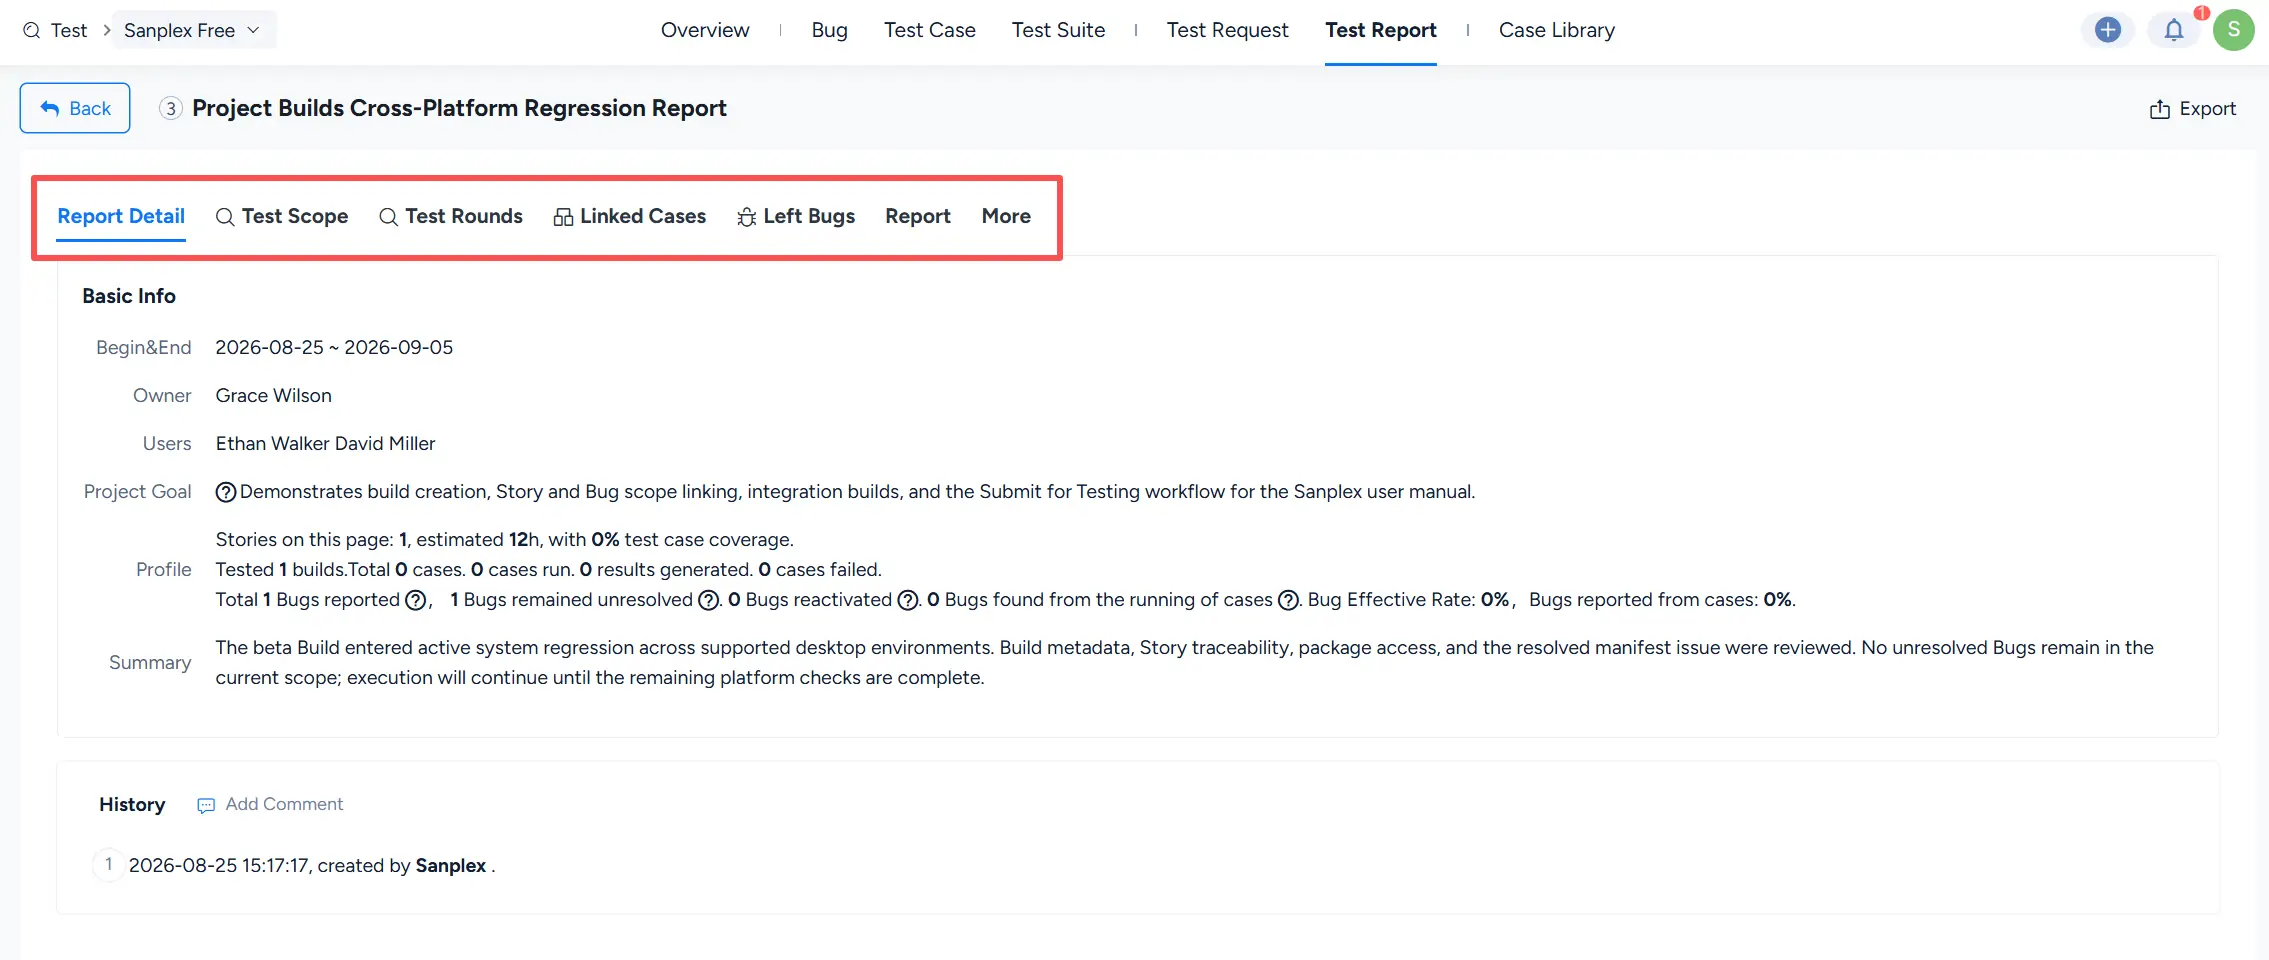
Generated test report showing the Report Detail, Test Scope, Test Rounds, Linked Cases, Left Bugs, Report, and More tabs, together with basic report information and the Export action.

Write a Comment
Comment will be posted after it is reviewed.
