

Catalog
For security reasons, the migration feature is only available to the Super Admin.
I. Jira Data Preparation
Supported versions for migration:
- Data migration from Jira Software Server/Data Center and Jira Software Cloud is supported.
- Data migration from Jira 7.x, 8.x, 9.x and 10.x (Server) to Sanplex is supported.
1. Organizing Jira Data
- Before migrating, we recommend deleting the accounts that are no longer used in Jira. If a user already has an account in Sanplex, make sure the Jira account matches the Sanplex account and the email address.
- Delete the issue types, attributes and other data that have never been used in Jira. This makes the migration configuration more efficient and reduces the time the migration takes.
- Assess the status of your projects. We recommend archiving the projects that are already completed and moving the projects that you do not want to import into Sanplex to the Recycle Bin. After a project is imported into Sanplex, an archived project becomes Closed, a project in the Recycle Bin is not imported, and all other projects become Active.
2. Exporting Jira Data
2.1 Backing Up the Jira Database
Ask your Jira database administrator to back up and export the Jira database and its attachments.
Note: Jira made major changes to its database in version 8.8, so database import currently only supports version 8.8 and later. If you are on an earlier version, we recommend upgrading Jira first and then backing up the database.
2.2 Exporting Jira Local Files
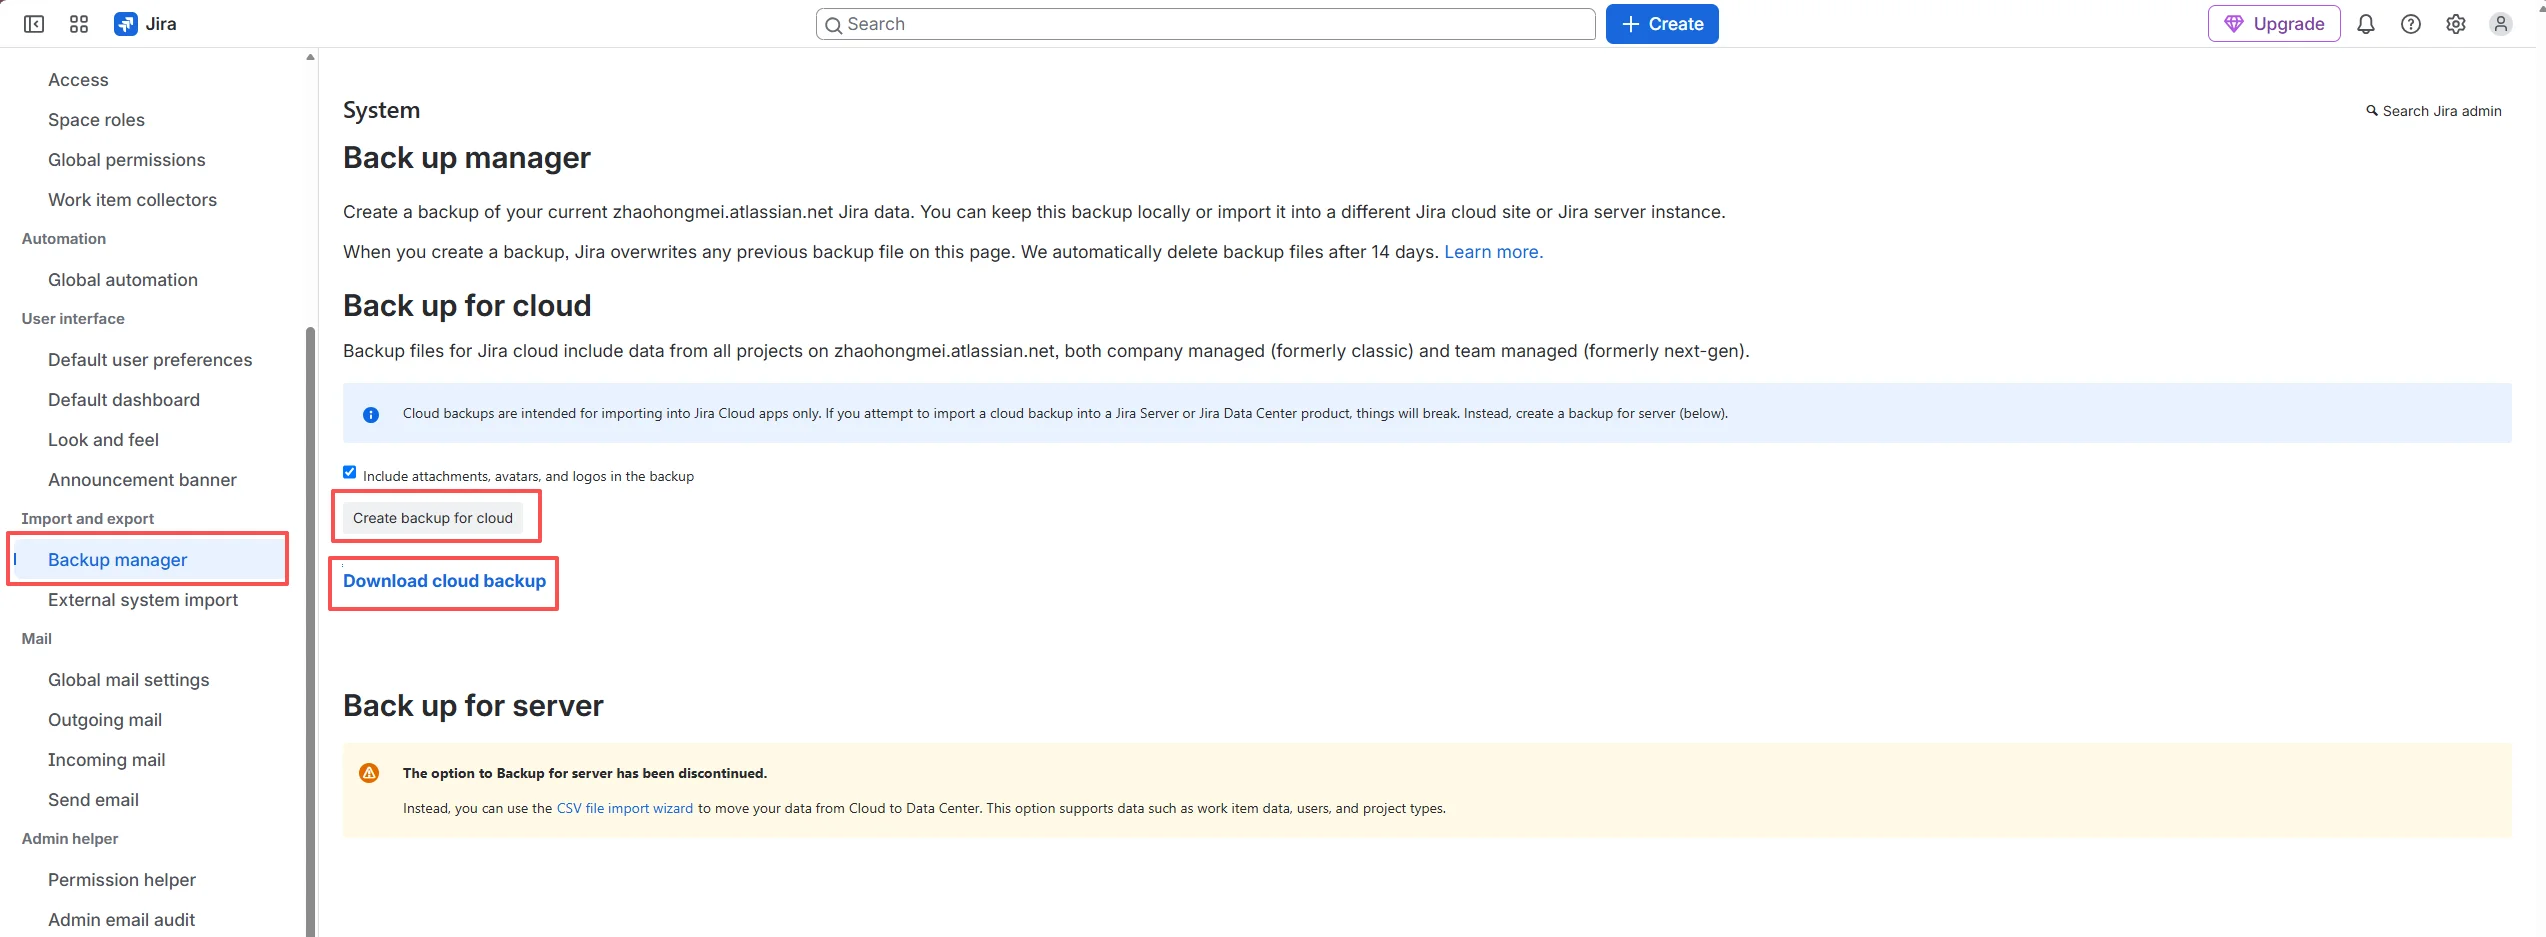
Path for exporting local files: Jira Settings > System > Backup manager > Create backup for cloud > Download cloud backup
II. Sanplex Preparation
1. Preparing the Sanplex Environment
Install Sanplex Free 3.0 or later, or upgrade to it. If you want to import the issue types, custom fields and workflows that were newly added in Jira, install or upgrade to Sanplex Standard 3.0 or later.
2. Backing Up Sanplex Data
If you are already using Sanplex, be sure to back up the Sanplex database before you import data.
While backing up Sanplex data and importing Jira data, we recommend that no one use Sanplex, so that the data in use is not lost.
III. Importing Data
1. Entry Point
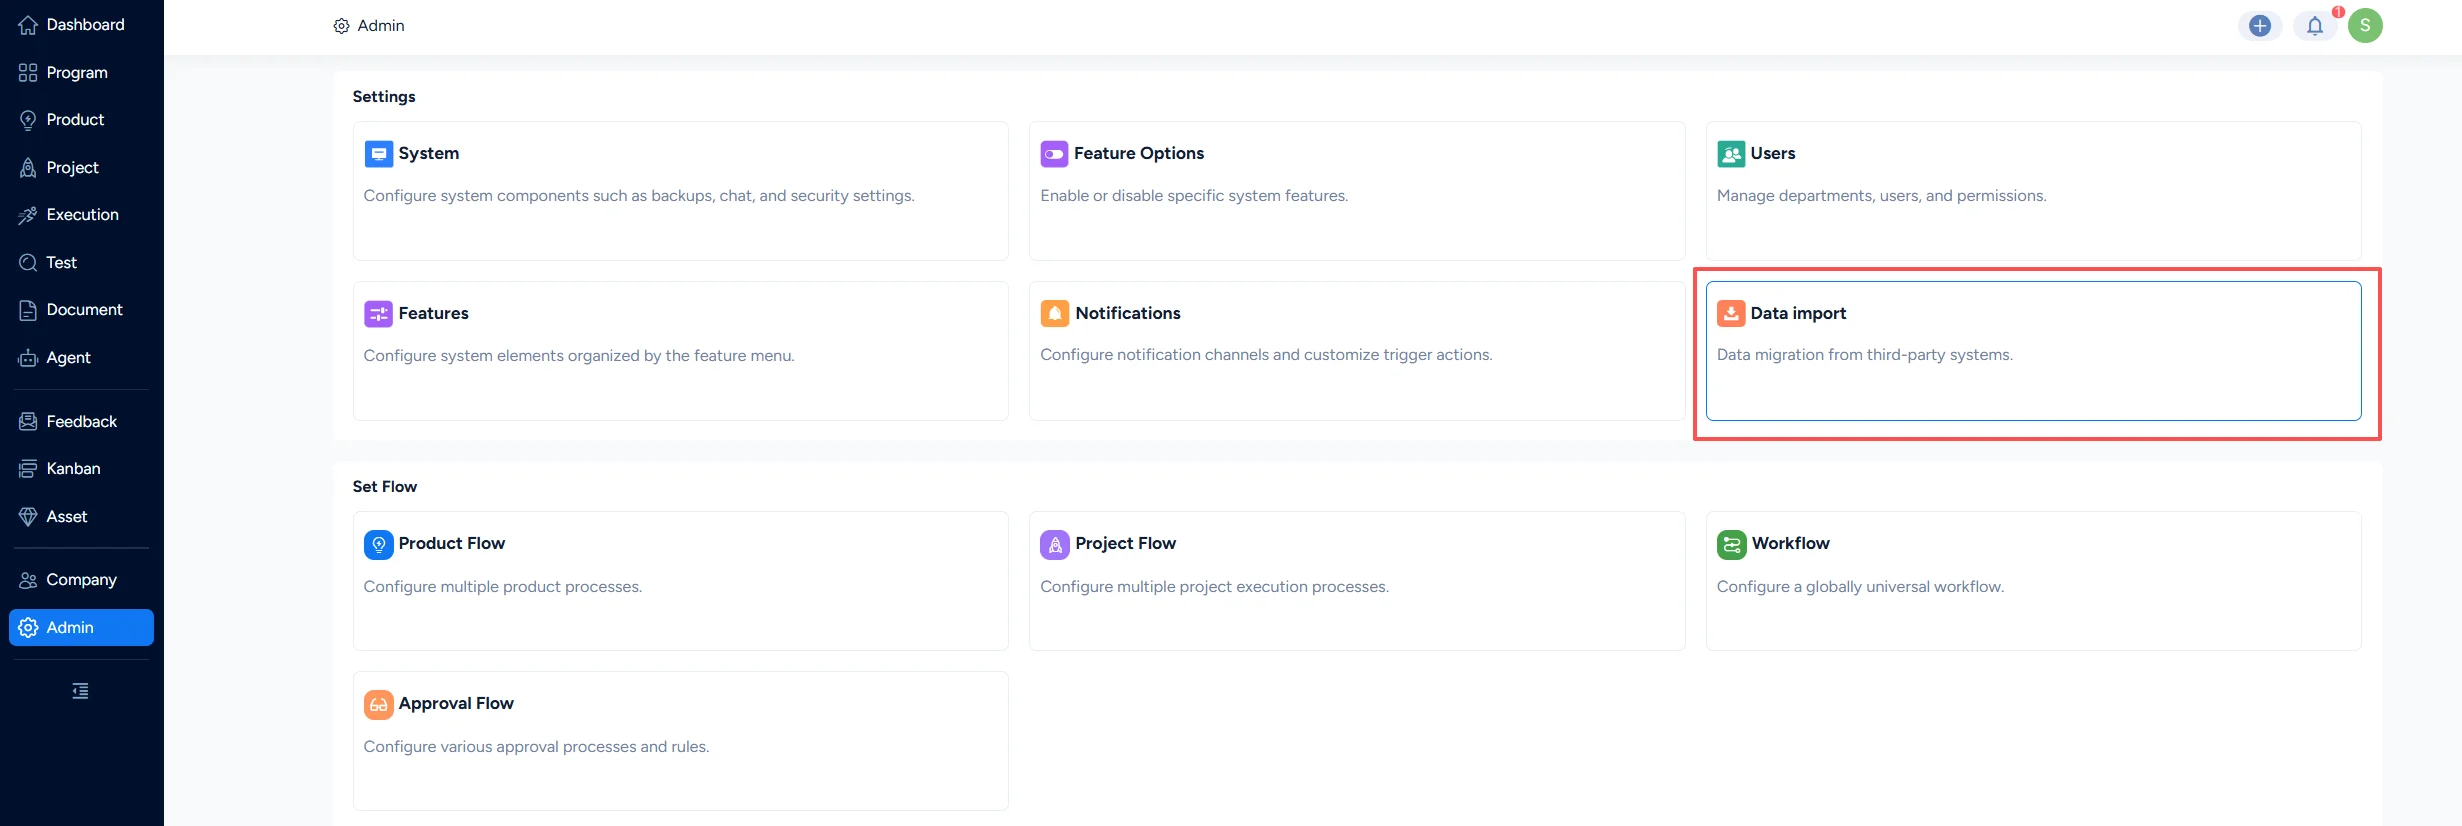
Go to Admin > Data Import.
2. Choosing an Import Method
As you can see, there are three ways to import Jira data:
- Database Import (choose this if your Jira is a self-hosted deployment)
- File Import (choose this if your Jira is a cloud version, or if it is inconvenient to get the database)
- API Import (choose this if your Jira is a cloud version and it is inconvenient to get the database)
Note: Because of the request limits of the Jira API, importing through the API may be slower than the other two methods. Choose the method that suits you.
2.1 Importing from a Database
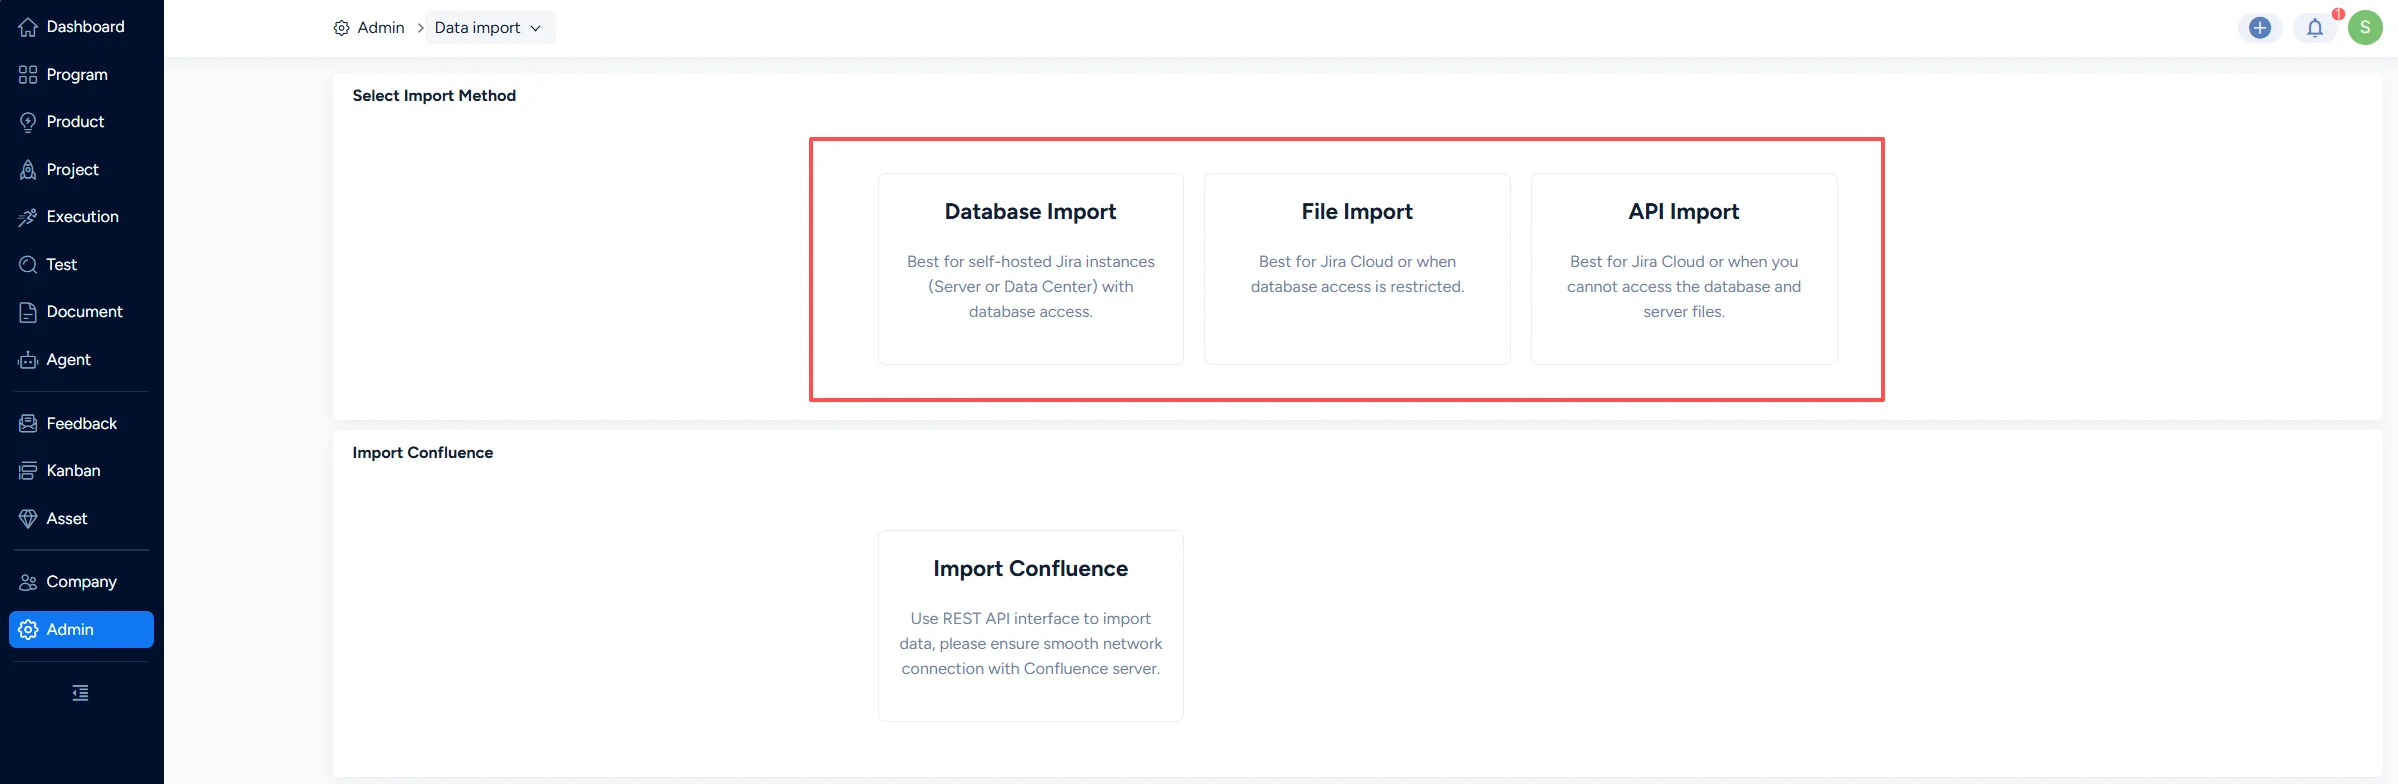
To import data from a database, go to Admin > Data Import > Database Import.
You will arrive at the pre-import page. Follow the on-screen instructions and place the files and attachments in the specified location.
After you enter the Jira database, click Next to match the data.
2.2 Importing from a File
To import data from a file, go to Admin > Data Import > File Import.
Create a jirafile folder under the tmp directory of Sanplex and make sure the jirafile folder is readable and writable.
Once you have done that, click Next to match the data.
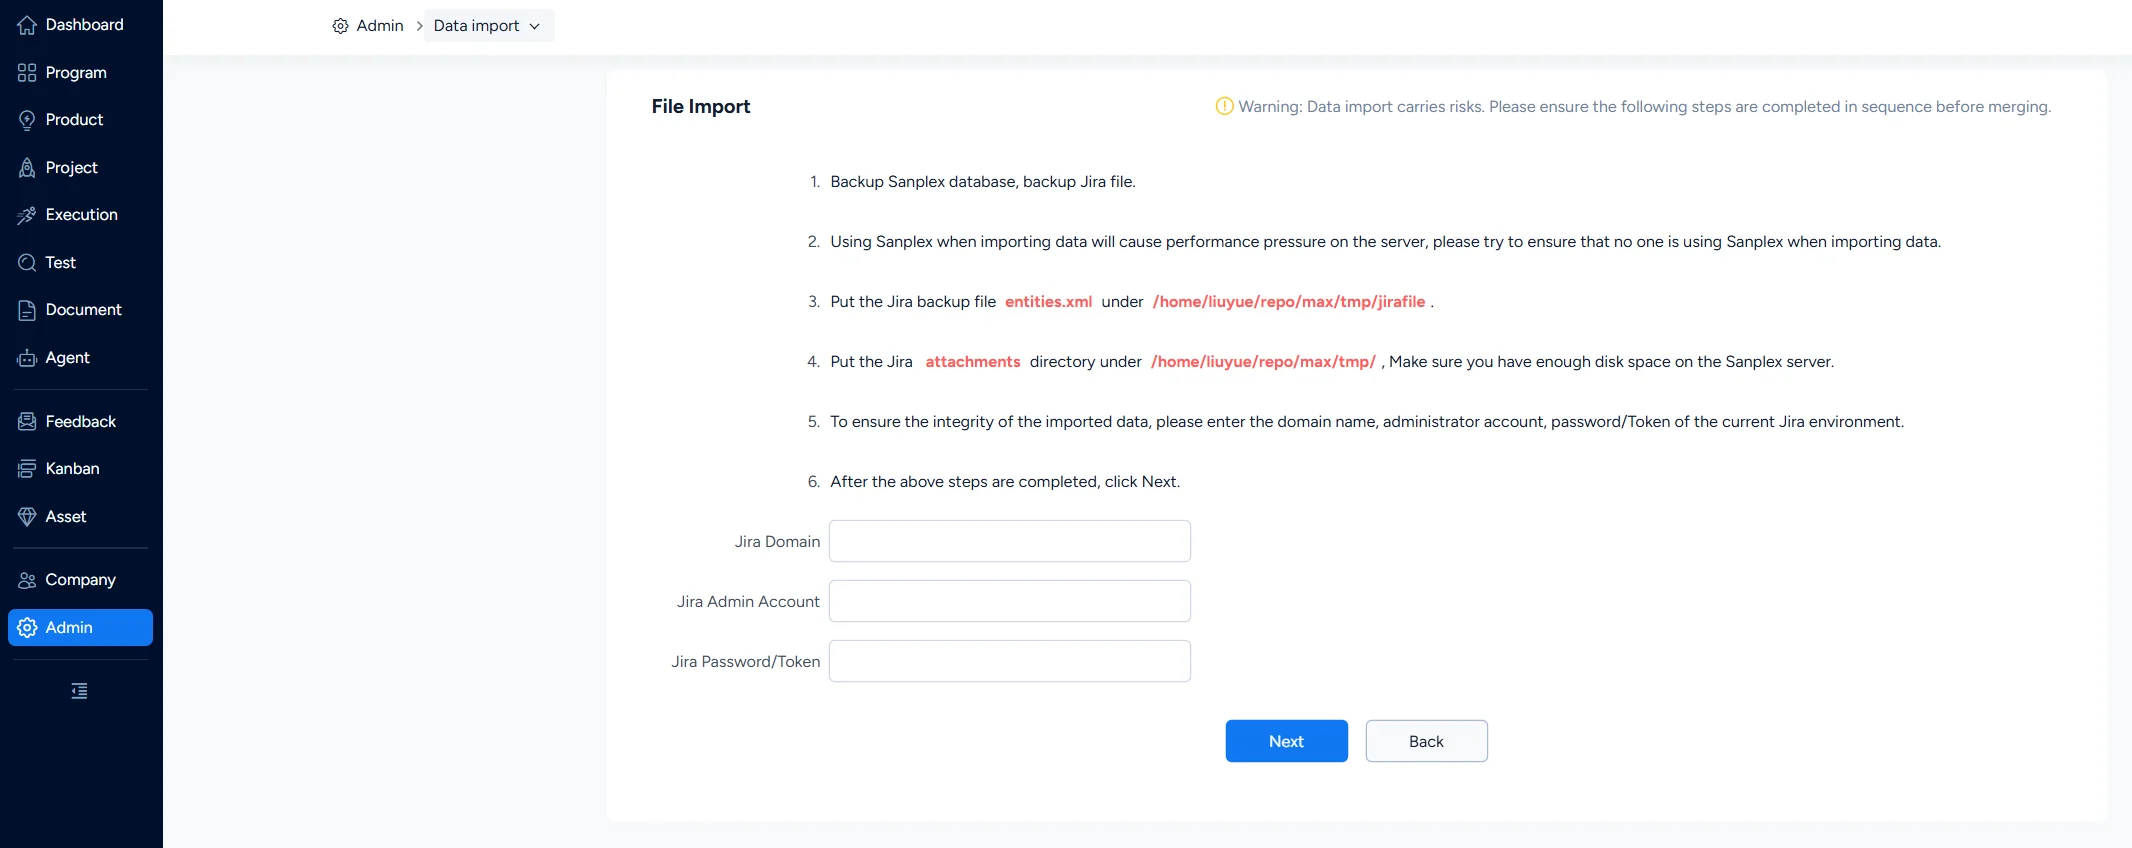
Note: If you want to import iteration information, enter the domain, administrator account and password/Token of the Jira environment.
When entering the domain, be careful not to include too much URL information. Correct examples: https://ABC.atlassian.net/ or http://11.1.1.118:8/. Incorrect example: https://ABC.atlassian.net/jira/settings/issues/issue-types.
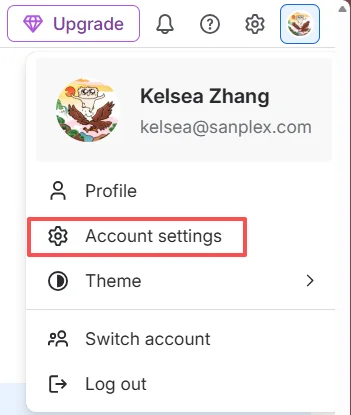
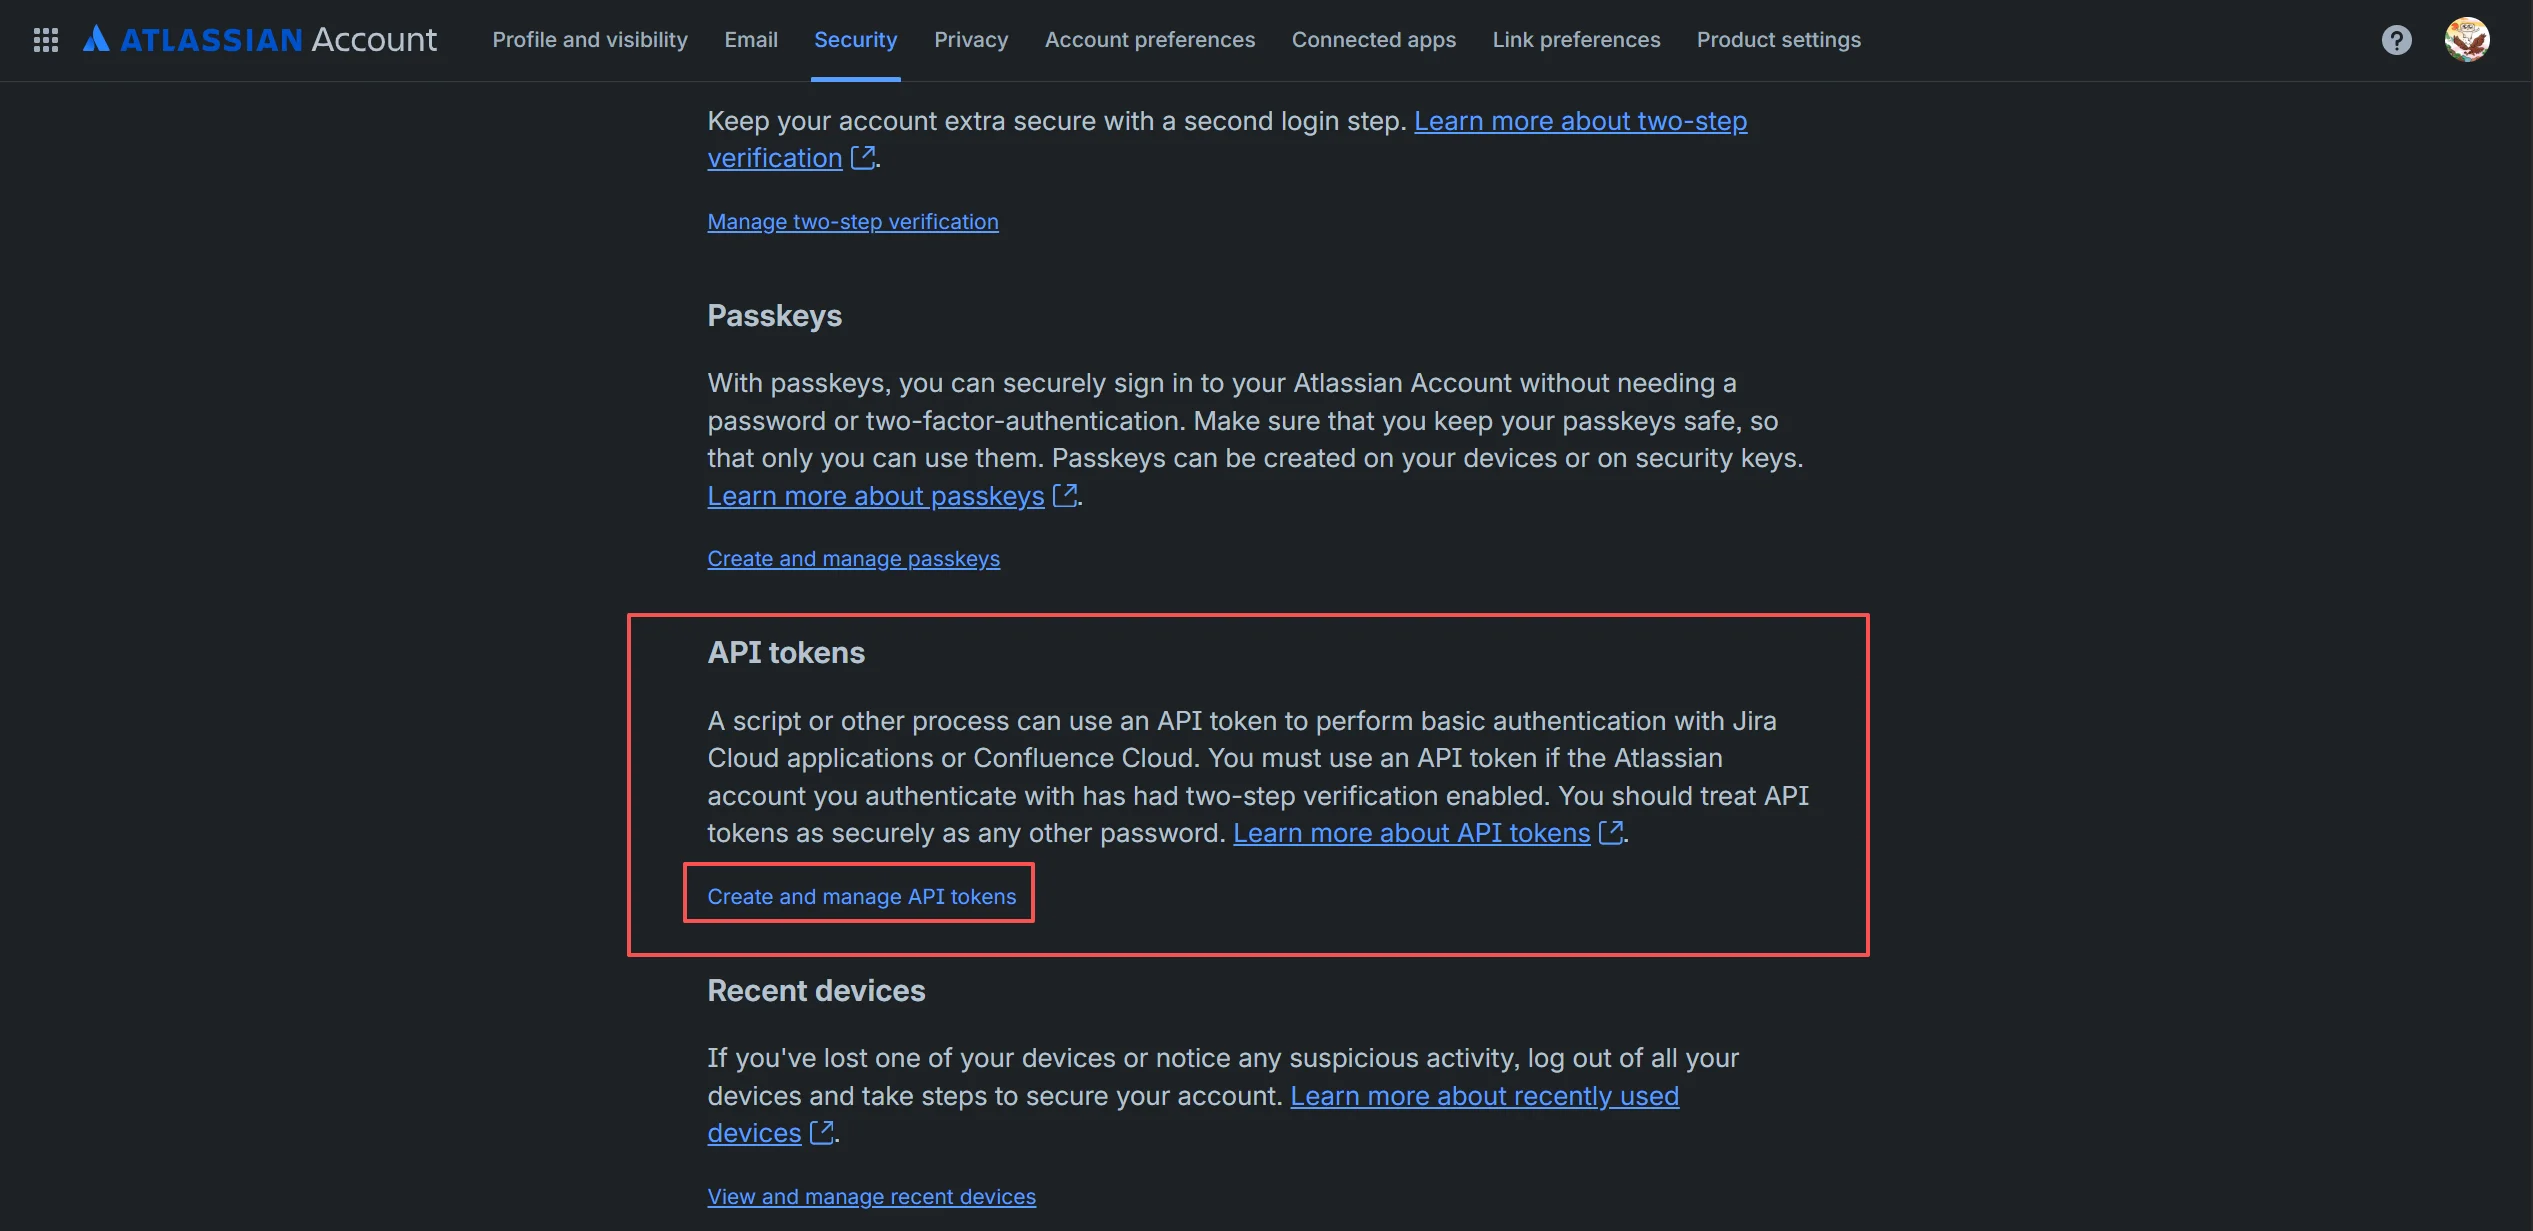
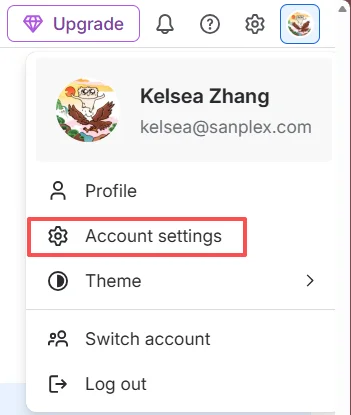
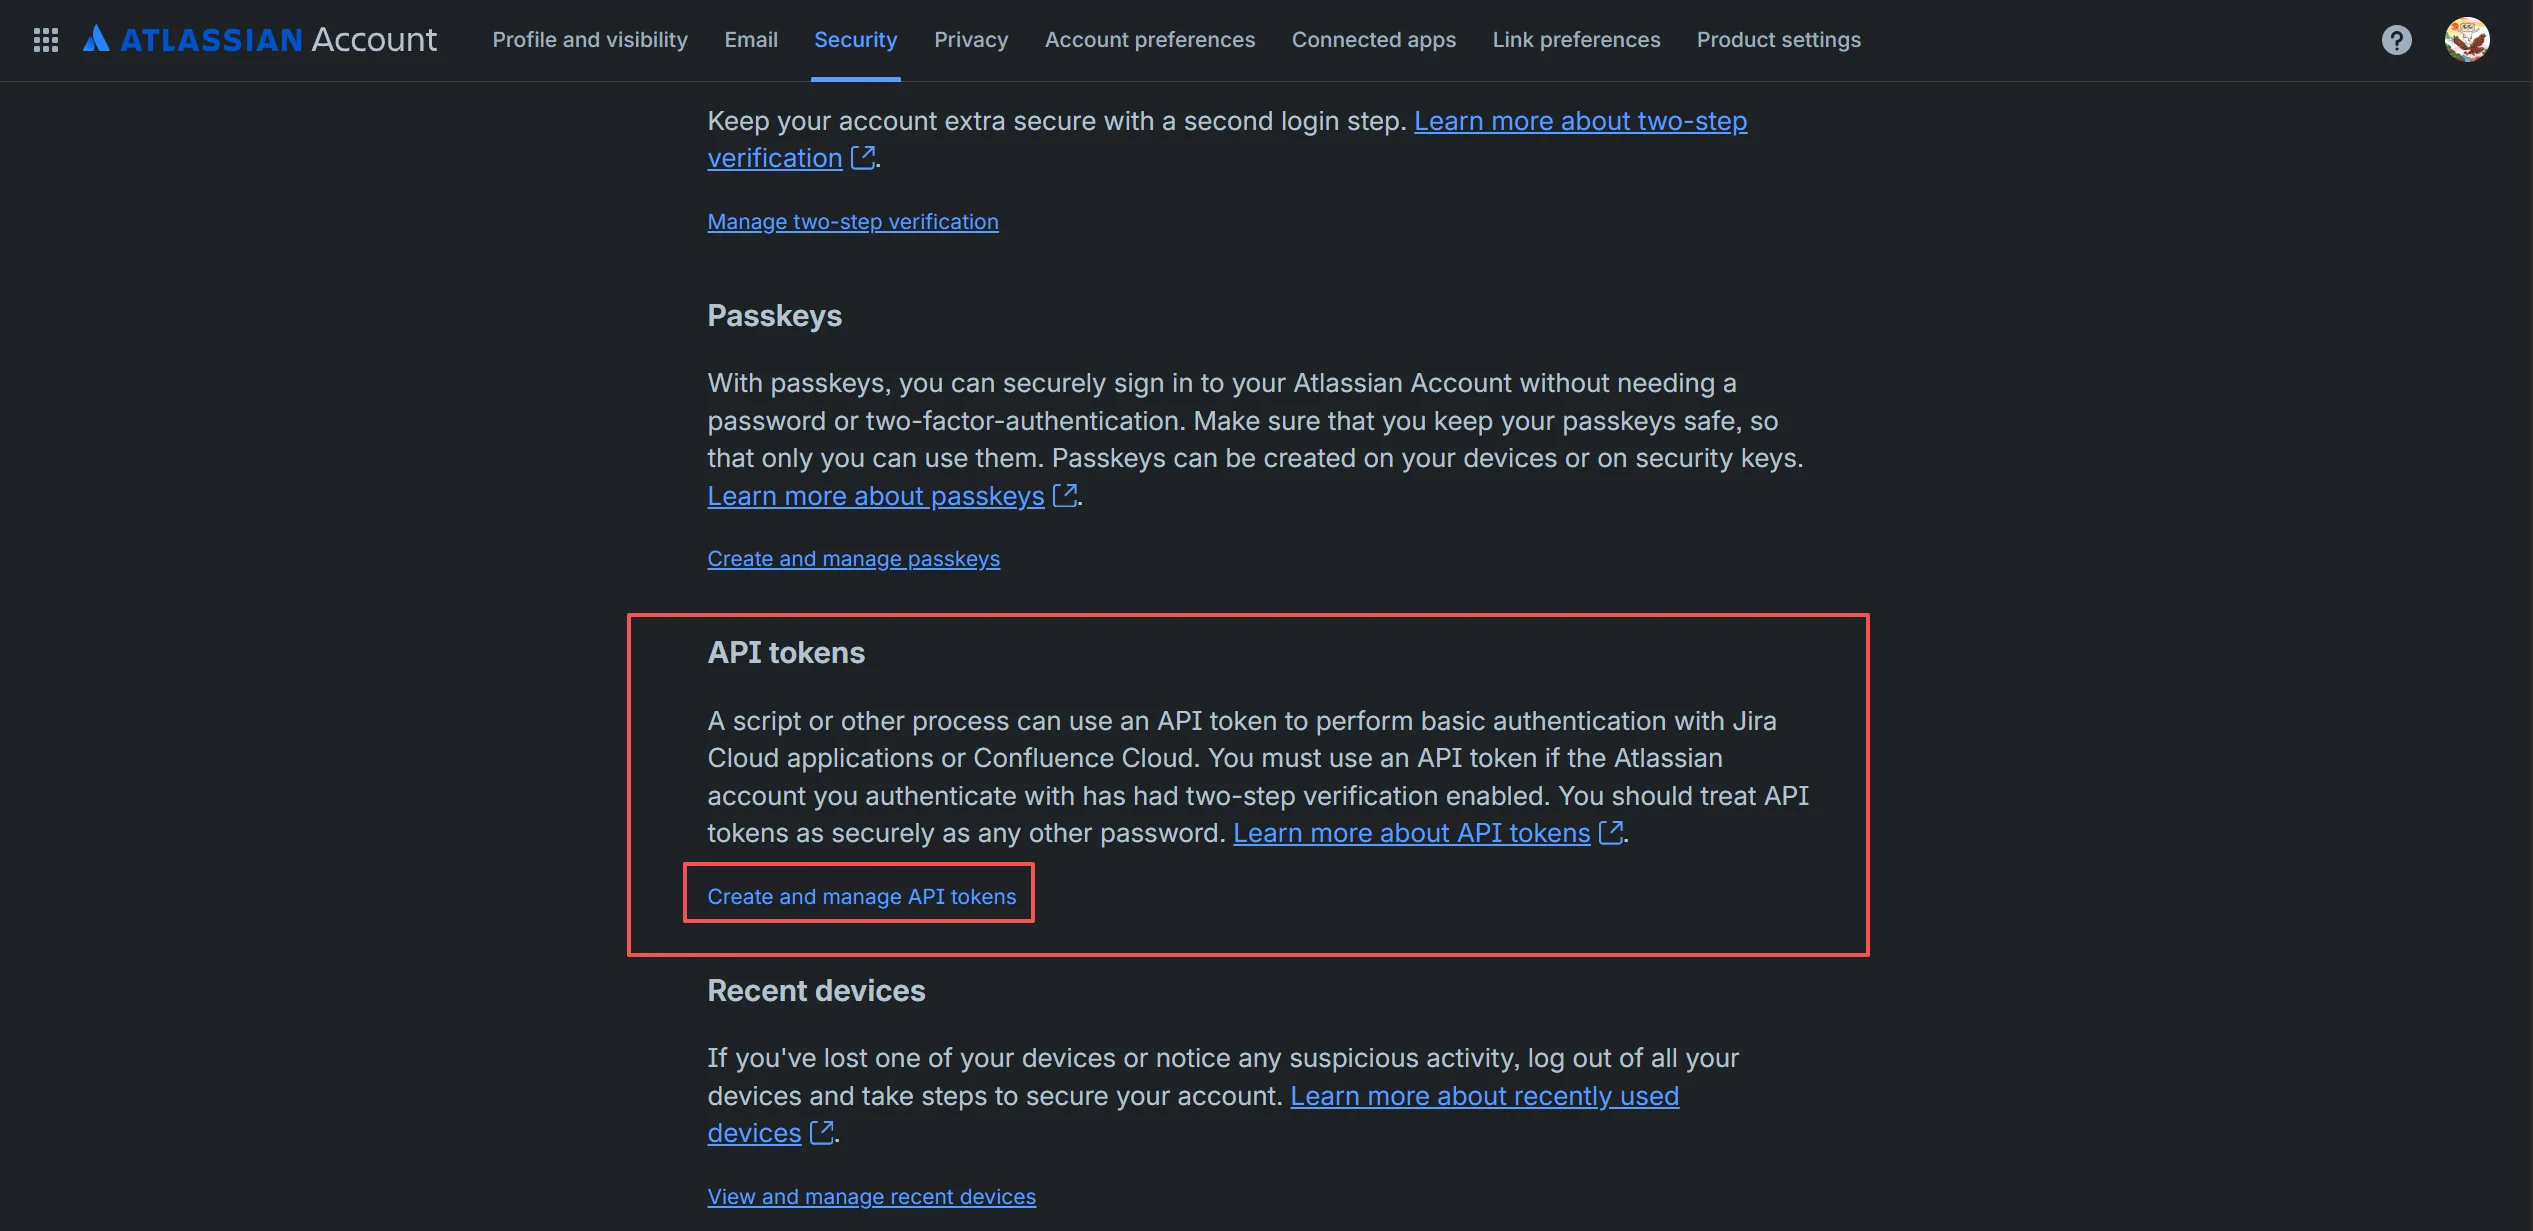
Jira Cloud uses a Token. To get the Token, go to the Jira administrator’s Account settings > Security > API tokens > Create and manage API tokens. Other versions can simply use the password.
2.2 Importing through the API
To import data through the API, go to Admin > Data Import > API Import.
Create a jirafile folder under the tmp directory of Sanplex and make sure the jirafile folder is readable and writable.
Importing data puts a performance load on the Sanplex server, so please try to make sure that no one is using Sanplex while the import runs.
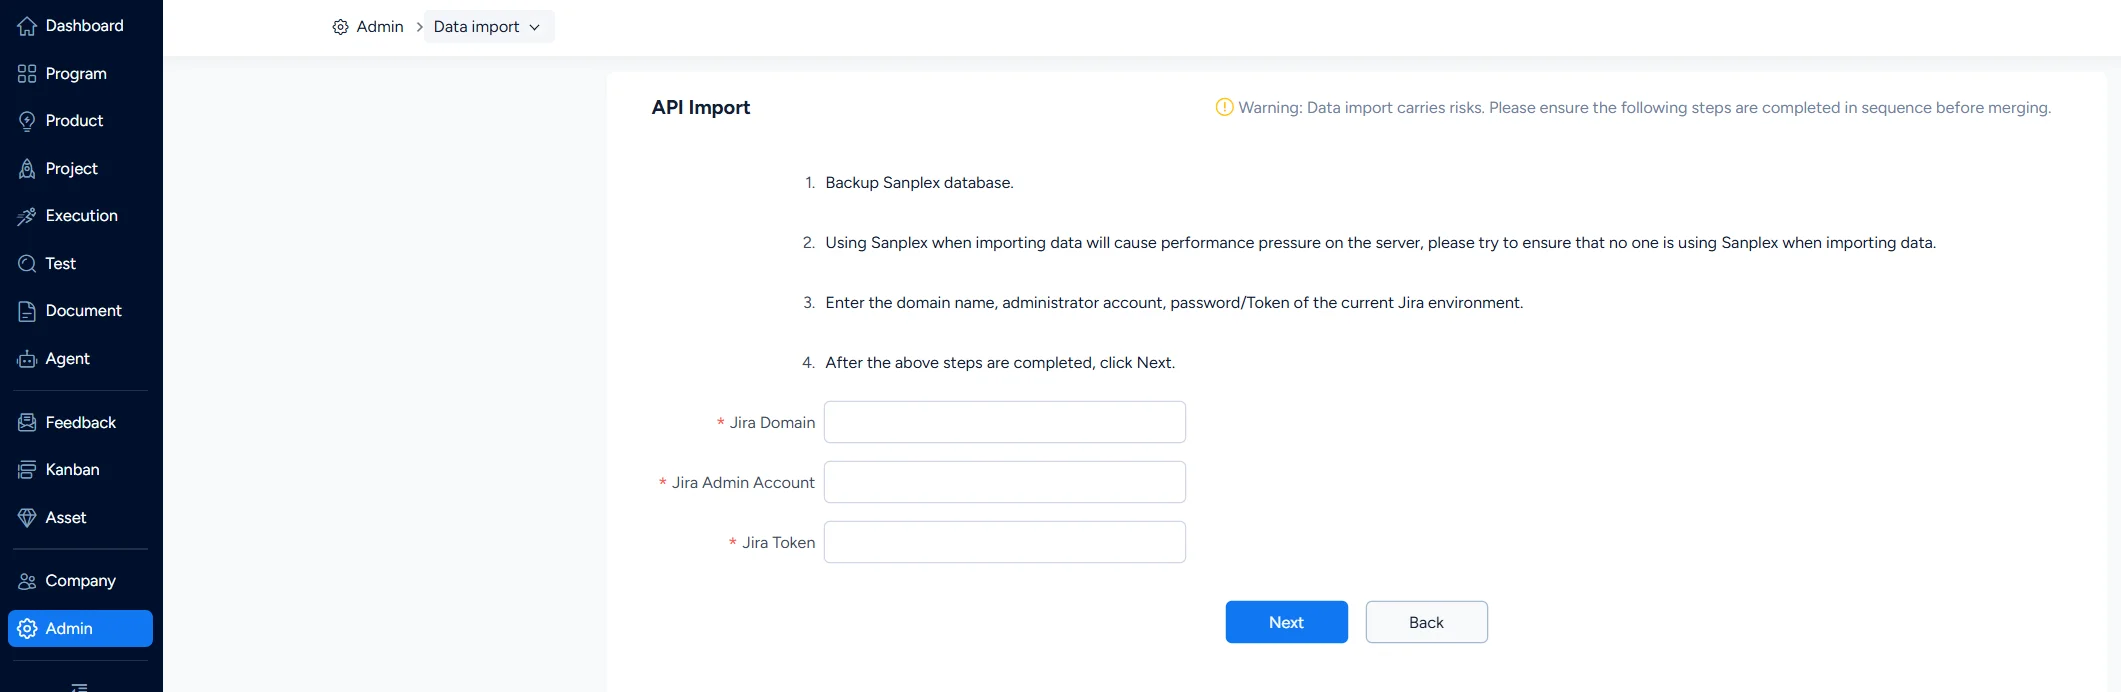
Note: To import more data, it is best to use an administrator account with higher privileges. You need to enter the domain, administrator account and token.
When entering the domain, be careful not to include too much URL information. Correct examples: https://ABC.atlassian.net/ or http://11.1.1.118:8/. Incorrect example: https://ABC.atlassian.net/jira/settings/issues/issue-types.
Jira Cloud uses a Token. To get the Token, go to the Jira administrator’s Account settings > Security > API tokens > Create and manage API tokens.
3. Setting the Jira and Sanplex Objects
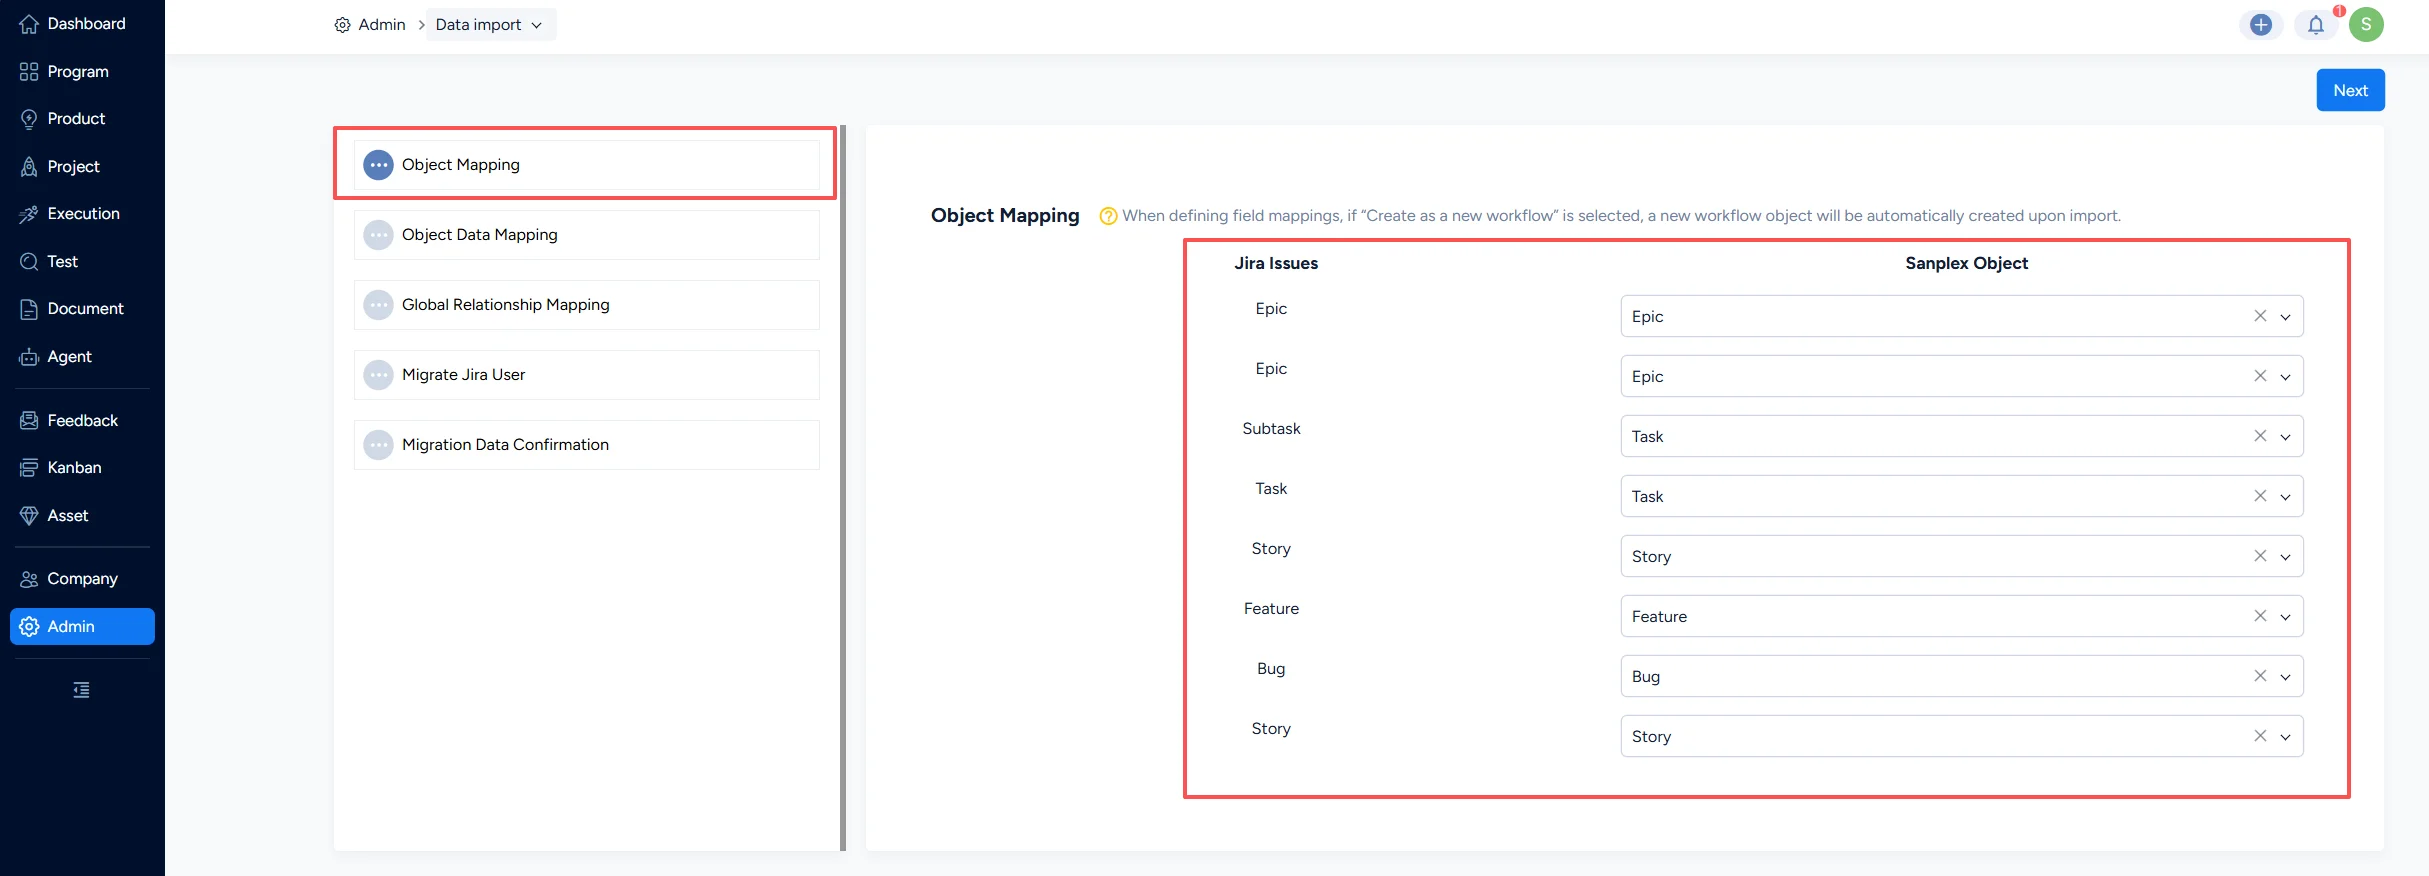
Because the object types, fields, object statuses, resolutions and relationships in Jira can all be customized, you need to set up a mapping before importing them into Sanplex.
- The first step is to set which Sanplex object each Jira Issue corresponds to. The Sanplex objects are mainly Feature, Story, Task and Bug. The Standard edition adds Feedback, Ticket, the published workflow objects in Sanplex, and creating a new workflow.
- When choosing a mapping, if you choose to create a new workflow, a new object is created automatically in the workflow after import, and you do not need to map fields, statuses or resolutions – the system handles it automatically.
- To help you import quickly, we have processed the data with default values. You can change the default values and choose the object you want to match. For objects that have no default value, you can choose an existing Sanplex object or choose to create a new workflow.
- The system also filters out the Issue types that have never been used, so they are not shown on the page and you do not need to handle them.
4. Setting the Field Mapping between Issue Fields and Sanplex Object Fields
Next, you need to set the field mapping for each Issue separately.
When choosing a mapping, if you choose New, a new field is created automatically after import. Fields that you do not select are not imported.
To help you import quickly, we have processed the built-in data with defaults. Built-in fields are not shown on the page; the page only lists the custom fields that have actually been used, and their default value is New. You can also change them to an existing field in Sanplex.
The mapping of the built-in fields is shown below:
Note: The remaining built-in Jira fields are not imported.
| Jira Field | Sanplex Field | Newly Added | Widget | Description |
|---|---|---|---|---|
| ID | ID | No | ||
| REPORTER | Reporter | Yes | Single-select dropdown | System user |
| ASSIGNEE | Assigned To | No | ||
| CREATOR | Created By | No | ||
| SUMMARY | Title | No | ||
| DESCRIPTION | Description | No | ||
| ENVIRONMENT | Environment | Yes | Multi-line text | |
| PRIORITY | Priority | Yes | Single-select dropdown | |
| RESOLUTION | Resolution | Yes | Single-select dropdown | |
| STATUS | Status | No | ||
| CREATED | Created on | No | ||
| DUEDATE | Deadline | Yes | Date picker | |
| RESOLUTIONDATE | Resolved Date | Yes | Date picker | |
| VOTES | Votes | Yes | Integer | |
| TIMEORIGINALESTIMATE | Estimated Hours | Yes | Decimal | |
| TIMESPENT | Consumed Hours | Yes | Decimal | |
| FIXFOR | Linked Release | No | Supported for requirements, sub-requirements and bugs |
5. Setting the Mapping between Issue Statuses and Sanplex Object Statuses
This mainly sets which Sanplex story status, story phase, task status, bug status, feedback status and ticket status each Jira Issue status corresponds to.
You need to set the status mapping for each Issue separately.
To help you import quickly, we have provided default mappings for the built-in statuses, and you can also change them manually.
If you do not choose a mapping, the system matches a default status after the data is imported. For example, the status of a story is Active and its phase is Not Started, and the status of a task is Not Started.
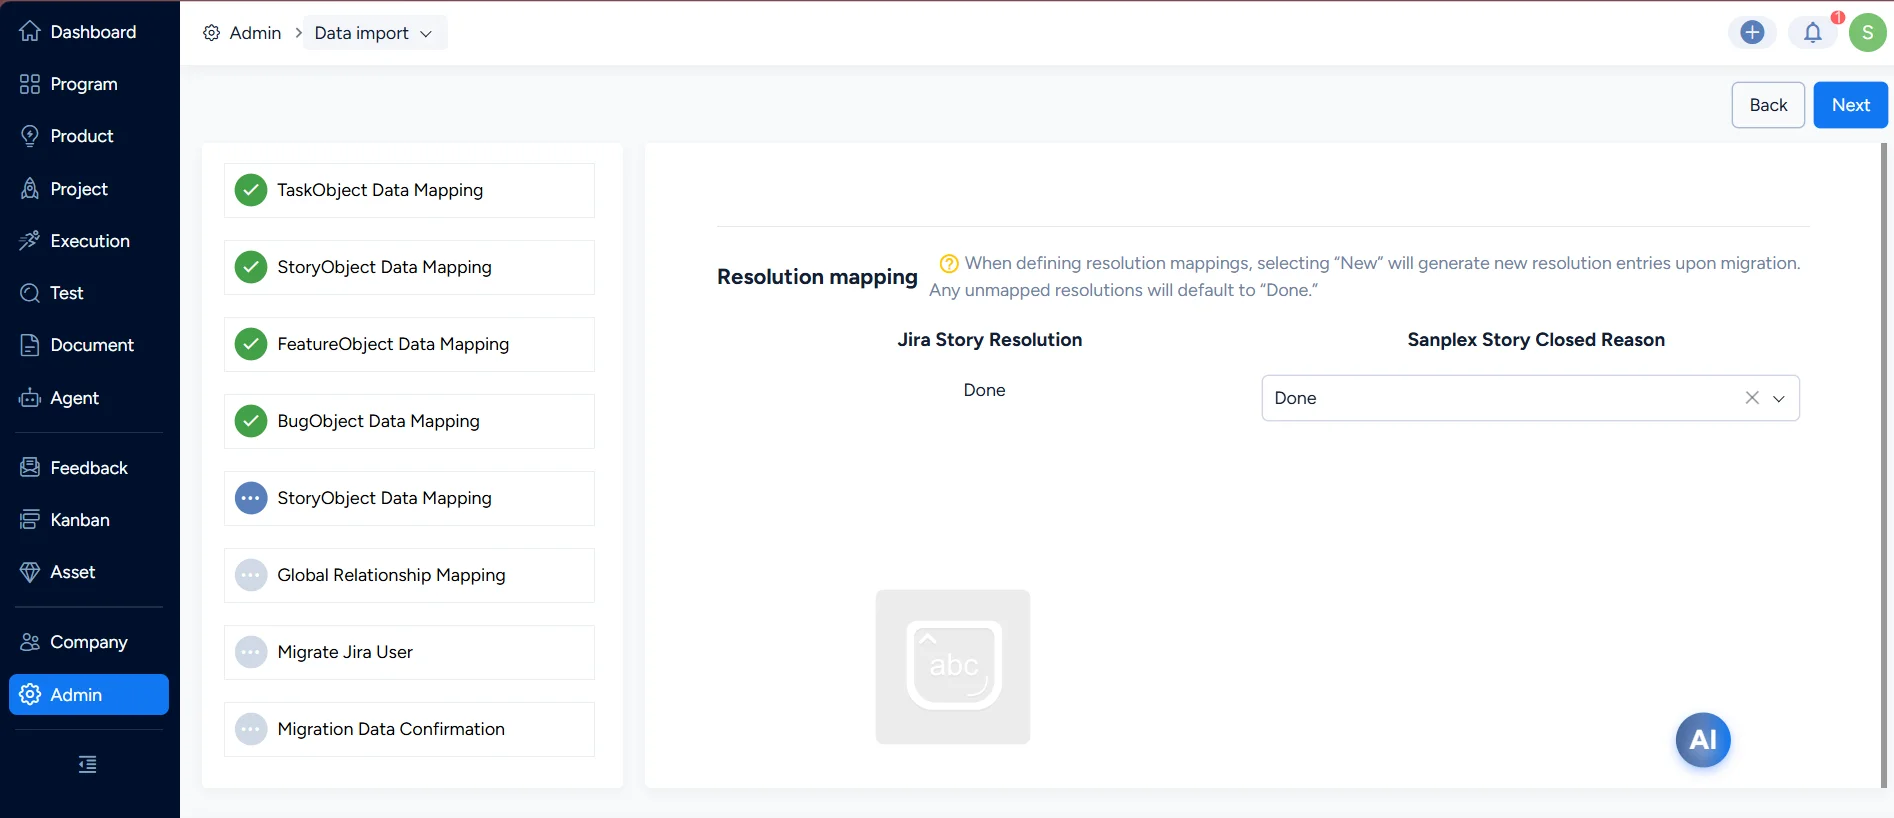
6. Setting the Mapping between Issue Resolutions and Sanplex Object Statuses
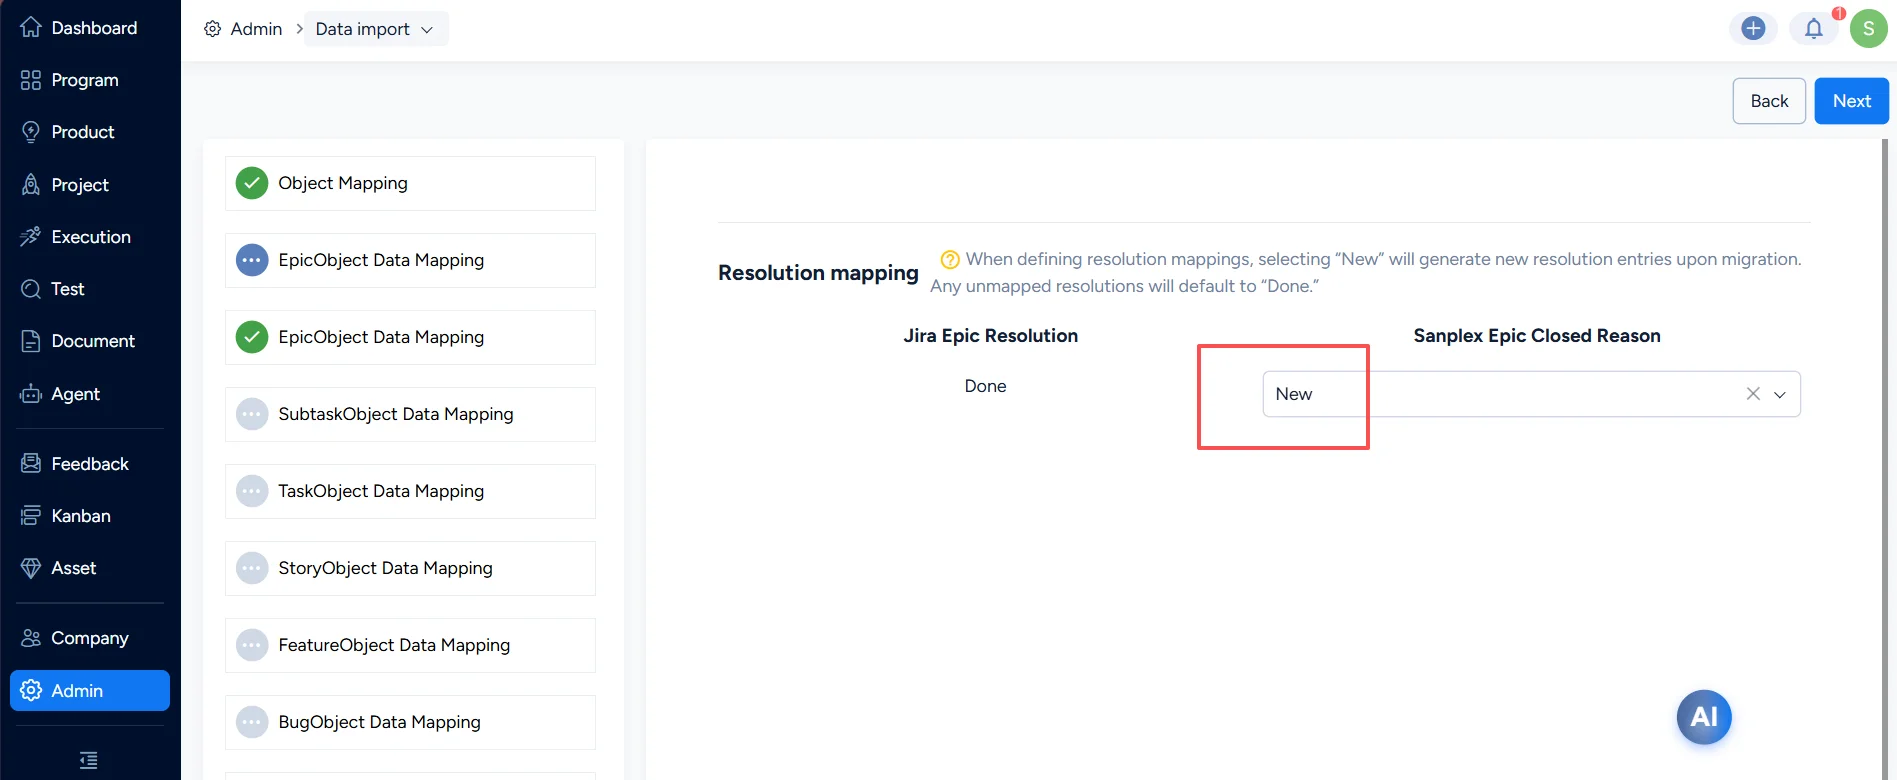
This mainly sets which Sanplex bug resolution, and closure reason for Sanplex stories, tasks, feedback and tickets each Jira resolution corresponds to.
You need to set the status mapping for each Issue separately.
Again, to help you import quickly, we have provided default mappings for the built-in resolutions, and you can also change them manually.
If you choose New, a new resolution is created automatically after import. Resolutions that you do not select are matched to Done by default after import.
7. Setting Global Mappings
This mainly sets which Sanplex relationship each Jira issue link type corresponds to.
When choosing a mapping, you can choose an existing relationship in the system or create a new one. If you choose New, the relationship is created automatically after import. Relationships that you do not select are not imported.
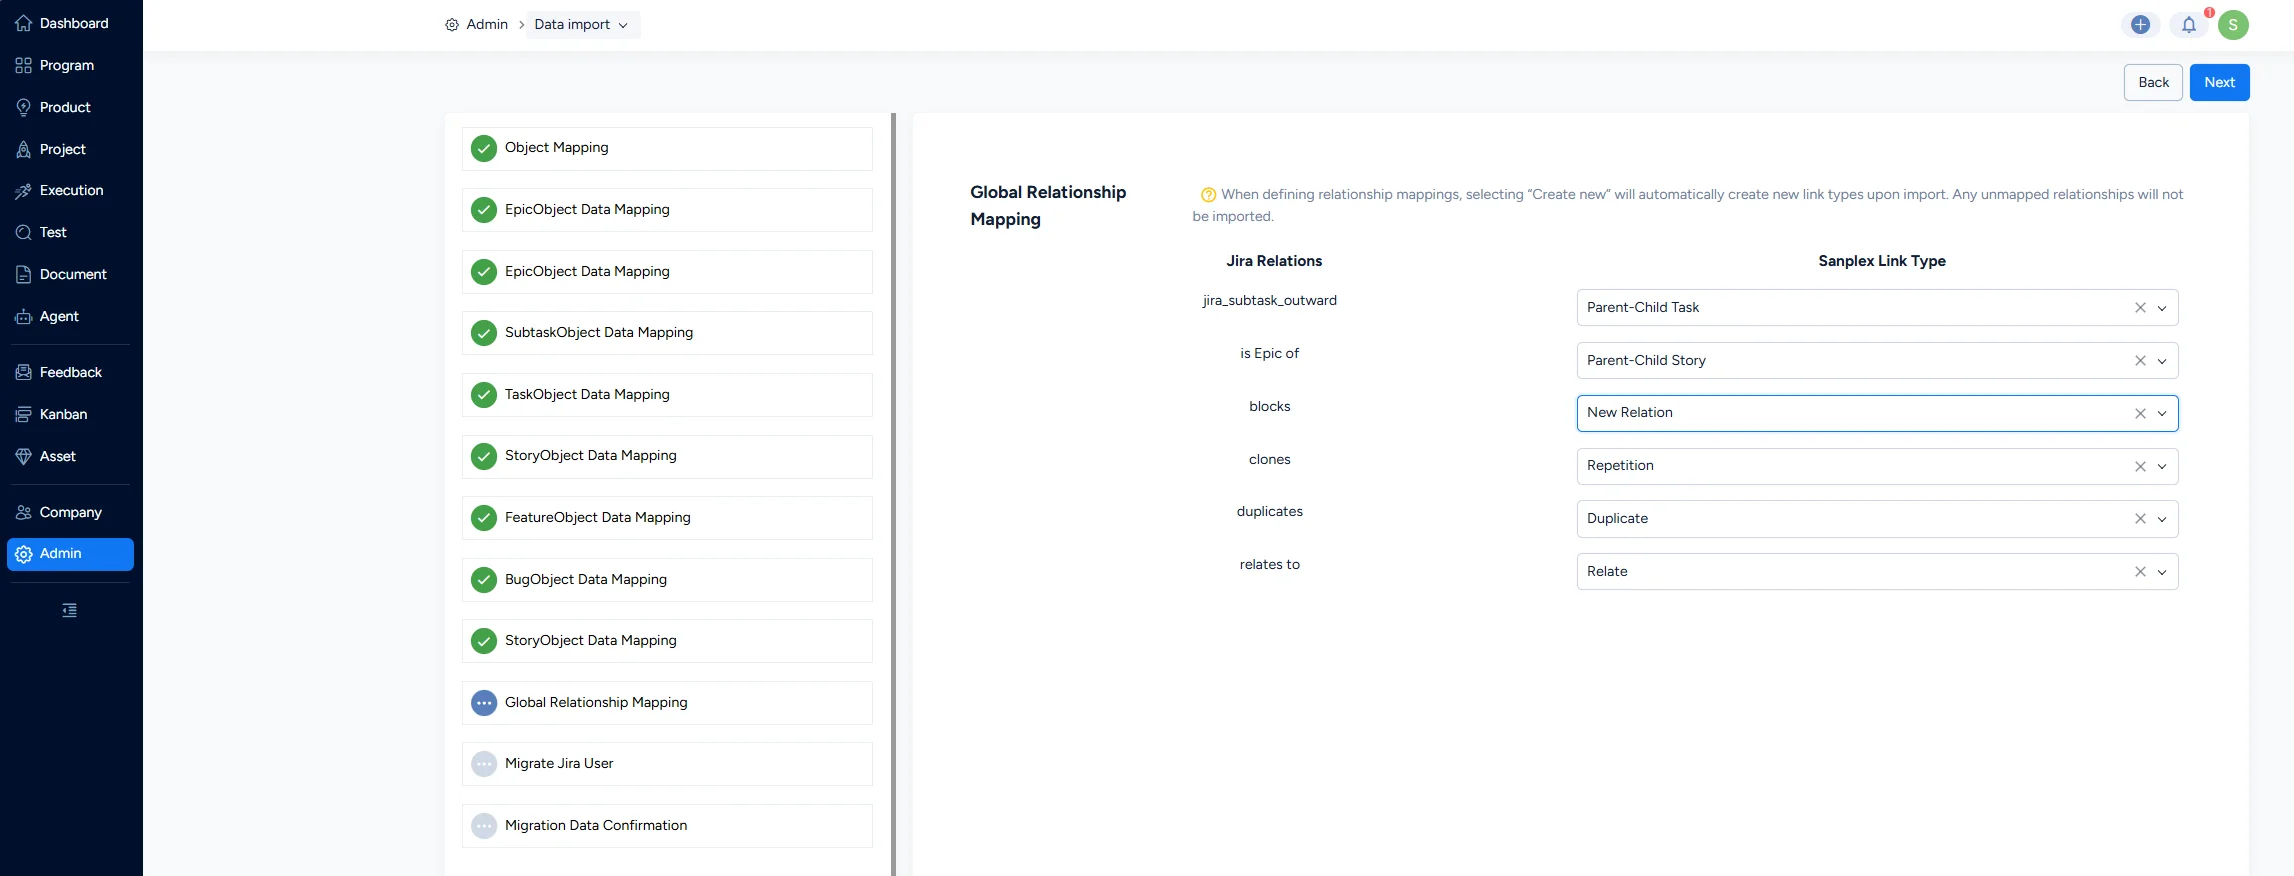
We recommend the mappings shown below. The remaining relationships can be matched or created according to your situation:
| Jira Relationship | Sanplex Relationship |
|---|---|
| jira subtask link | Parent-child task |
| Epic-Story Link | Parent-child story |
| Cloners | Repetition |
| Relates | Relate |
8. Setting Jira Users
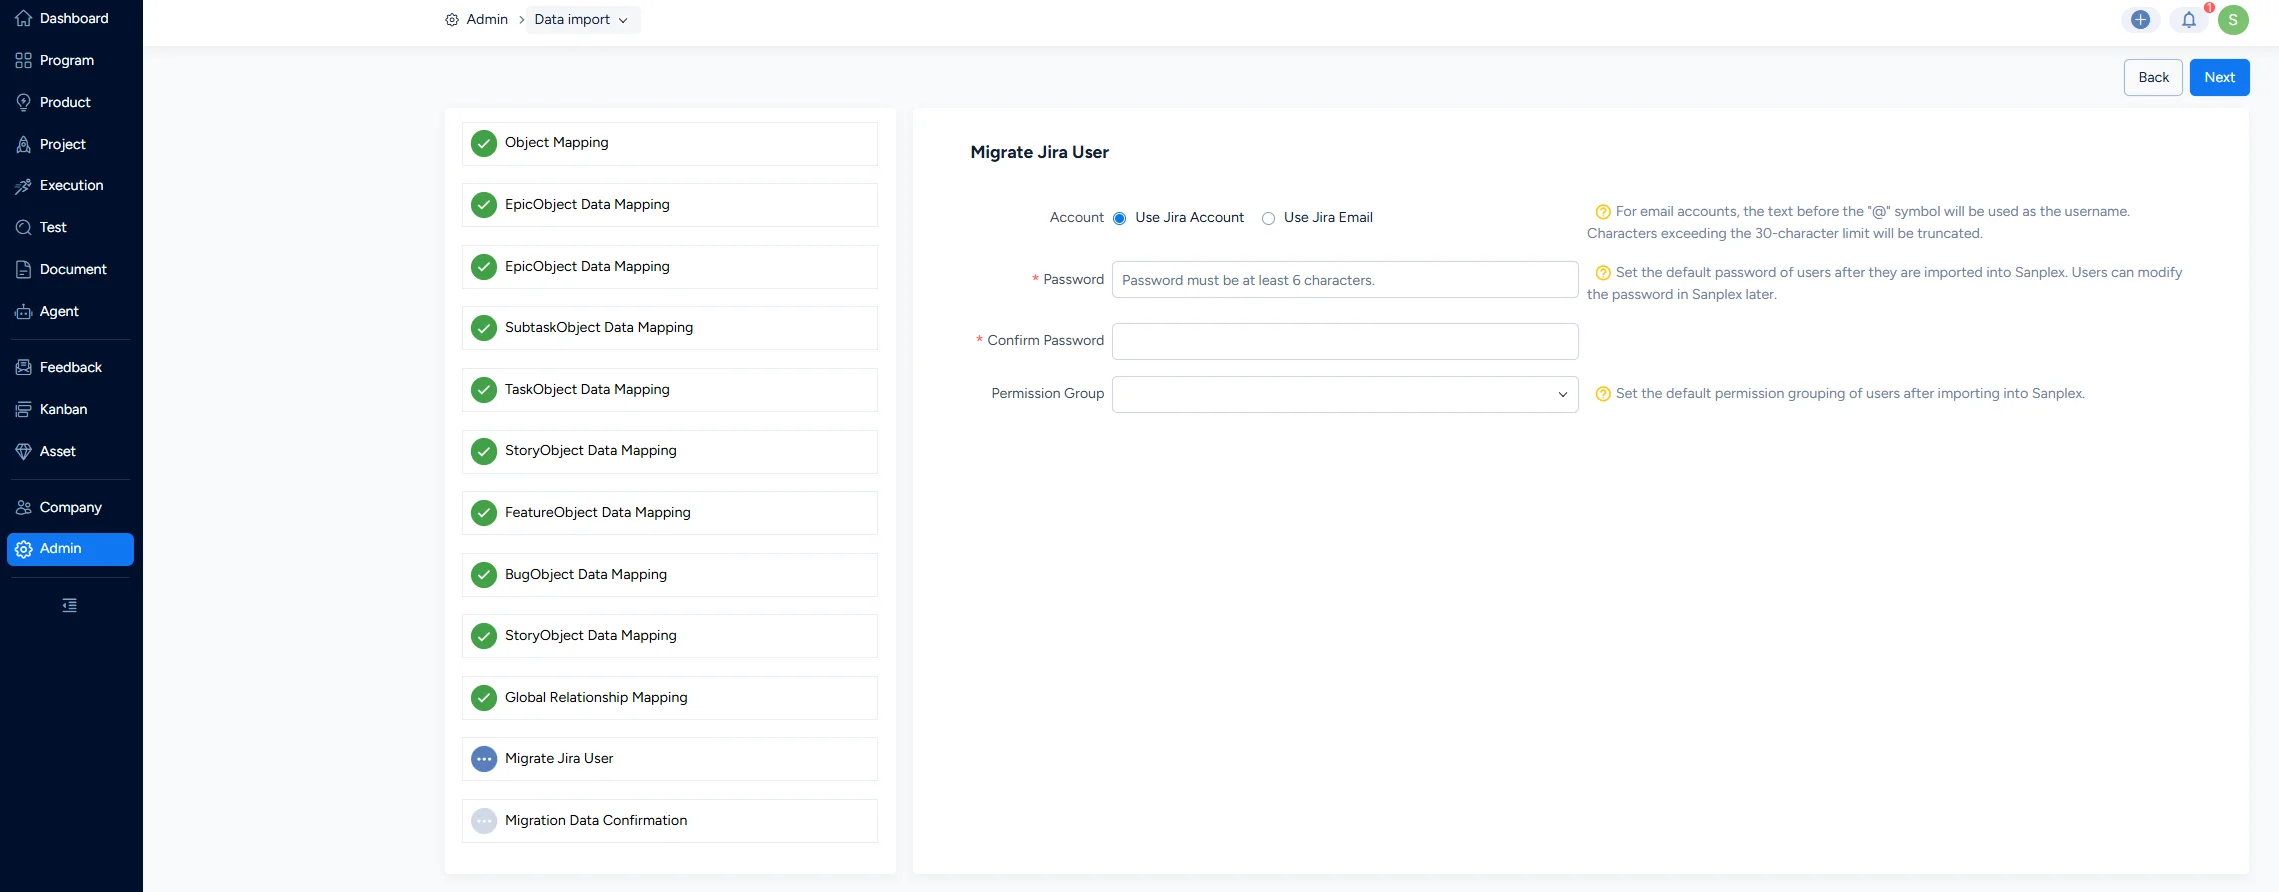
This mainly sets the password and permission group that Jira users will use to log in to Sanplex.
- When importing users, you can choose to use the Jira account or the Jira email as the username. Using the Jira account is recommended.
- If an imported username matches an existing username in the system, the system merges them into the same user. Check your username data before importing to avoid different users having the same name.
- Because Sanplex encrypts user passwords with a different algorithm than Jira, you need to set the default password and privilege group for the imported users. After the Jira users are imported, they all use the password set on this page.
9. Starting the Jira Data Migration
Once the password and privilege group are set, click Next to go to the final import data page.
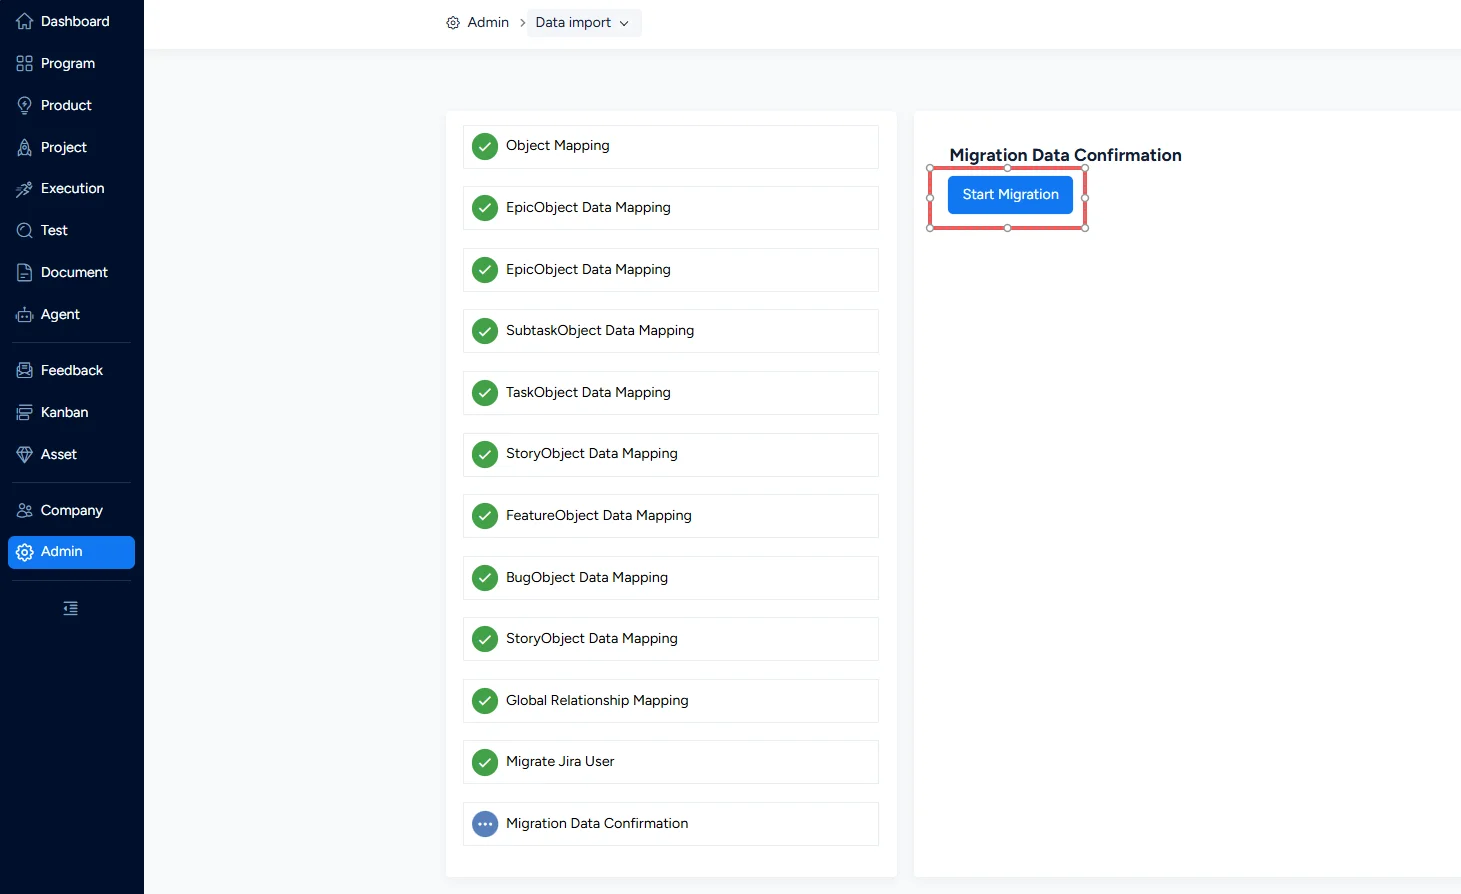
Click Start Migration. Importing data takes some time, so please be patient.
Clicking Start Migration runs the actual import program:
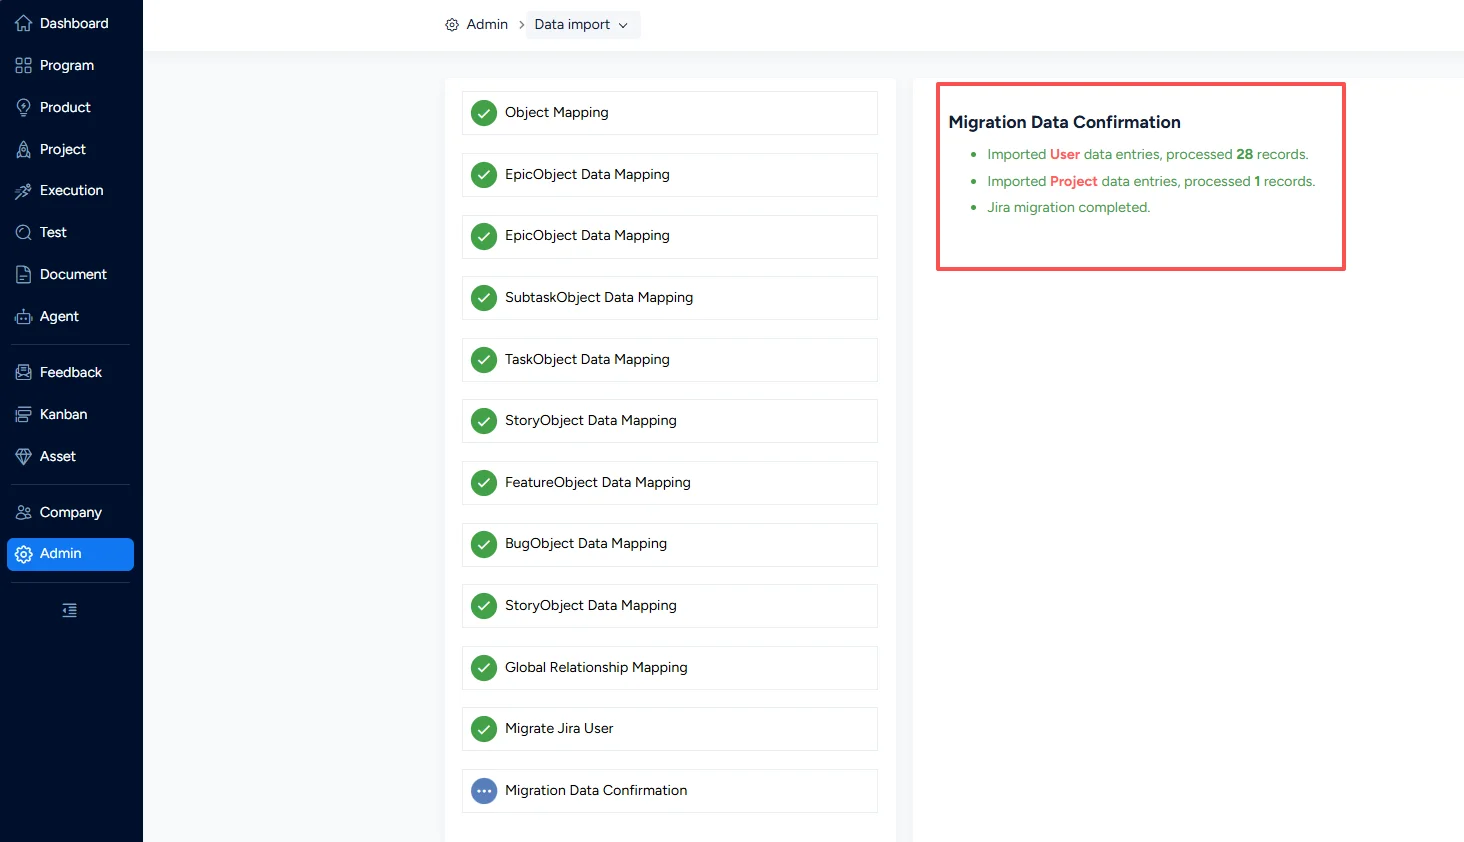
When all the objects have been imported successfully, the program displays “Jira migration completed”.
IV. Feature Comparison
The feature comparison is shown below. Click the manual links to read the details.
| Jira | Sanplex | Sanplex User Guides | |
|---|---|---|---|
| Jira project features | Project | Project | https://www.sanplex.com/book/sanplexguides/scrum-project-1407 |
| Jira project features | Sprint | Execution | https://www.sanplex.com/book/sanplexguides/product-planning-and-task-breakdown-1286 |
| Jira project features | Release | Release | https://www.sanplex.com/book/sanplexguides/create-releases-1268 |
| Jira project features | Permission Schemes | Project > Settings > Permissions | https://www.sanplex.com/book/sanplexguides/set-permissions-1343 |
| Issue types | Epic | Epic | https://www.sanplex.com/book/sanplexguides/manage-stories-1266 |
| Issue types | Story | Story | https://www.sanplex.com/book/sanplexguides/manage-stories-1266 |
| Issue types | Task | Task | https://www.sanplex.com/book/sanplexguides/task-assignment-and-daily-tracking-1287 |
| Issue types | Bug | Bug | https://www.sanplex.com/book/sanplexguides/bug-submission-and-reports-1293 |
| System features | Users | Admin > Users Management | https://www.sanplex.com/book/sanplexguides/manage-users-1342 |
| System features | Issue Type | Workflow > Objects | https://www.sanplex.com/book/sanplexguides/overview-1585 |
| System features | Field | Workflow > Fields | https://www.sanplex.com/book/sanplexguides/overview-1585 |
| System features | Statuses | Workflow > Statuses | https://www.sanplex.com/book/sanplexguides/overview-1585 |
| System features | Screen Scheme | Workflow > Pages | https://www.sanplex.com/book/sanplexguides/overview-1585 |
| System features | Notification | Admin > Notification Settings | https://www.sanplex.com/book/sanplexguides/email-1495 |
| System features | Priorities | Admin > Features > Priority | https://www.sanplex.com/book/sanplexguides/product-1483 |
| System features | Issue Linking | Admin > Features > Relations | https://www.sanplex.com/book/sanplexguides/relations-standard-version-1493 |
| System features | Resolution | Closure Reasons | https://www.sanplex.com/book/sanplexguides/product-1483 |


