Catalog
Overview
The multi-level requirement hierarchy helps connect higher-level business goals with detailed implementation work. Sanplex organizes requirements through configurable concepts such as Epic, Requirement, and Story, allowing teams to progressively refine requirements while maintaining traceability between different levels.
Organizations can configure the terminology used for these concepts to match their own requirement management practices. For example, Epic, Requirement, and Story can be used to represent different levels of business, user, and development requirements.
This structured hierarchy helps teams clarify requirement scope, improve cross-functional collaboration, and maintain traceability from higher-level objectives through detailed delivery work.
Use Cases
- Translate higher-level goals into executable work: Break broad requirements down into progressively more detailed items so implementation work remains aligned with the original objective.
- Improve requirement understanding across roles: Different teams can work at the requirement level most relevant to them while maintaining a shared hierarchy.
- Structure complex requirements: Parent-child relationships make it easier to organize large requirements, review scope, and identify missing work.
- Trace the impact of changes: Hierarchical and linked relationships help teams identify related upstream and downstream items when requirements change.
I. Product
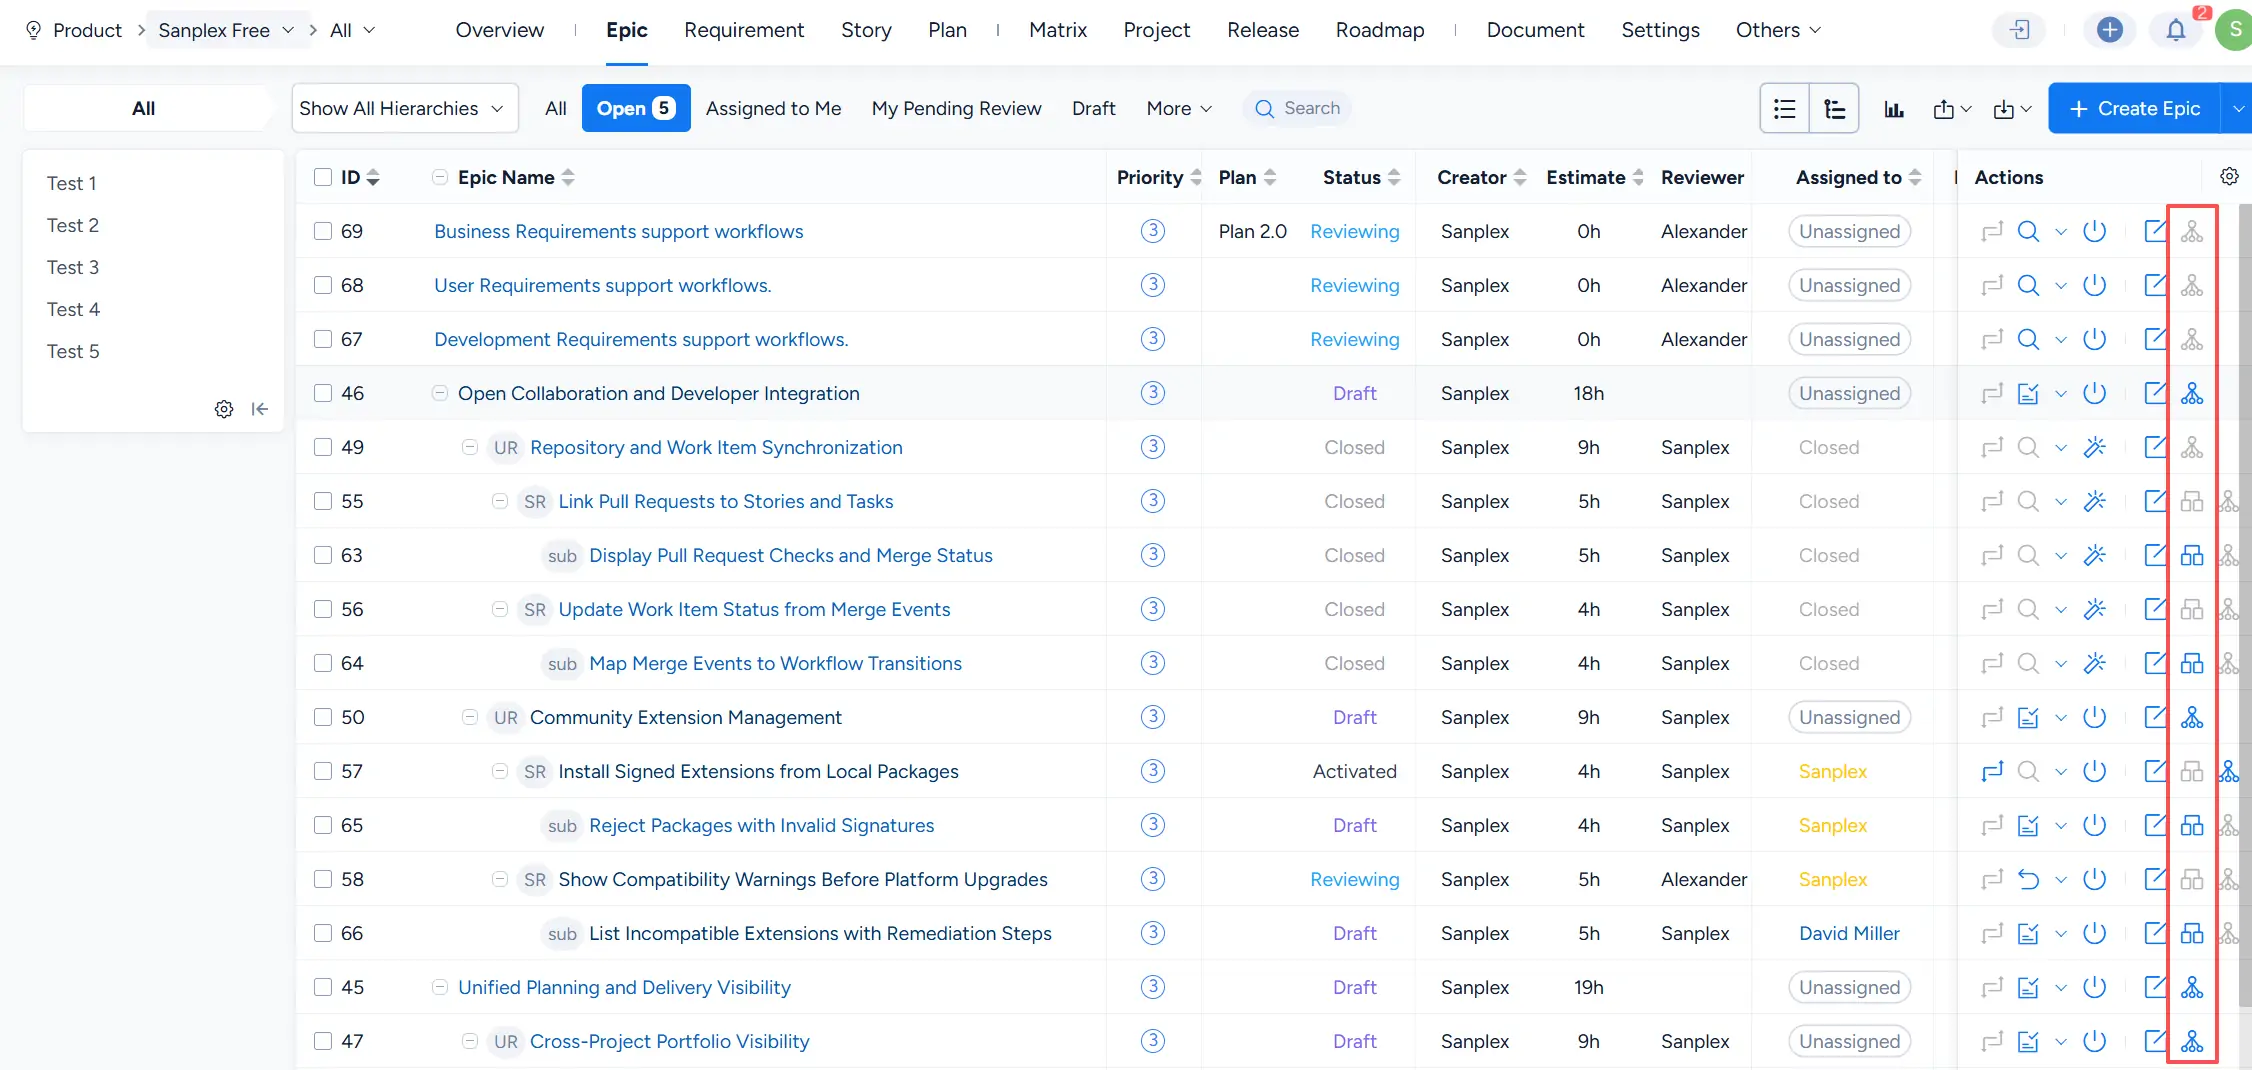
Sanplex supports a multi-level requirement hierarchy through Epic, Requirement, and Story concepts. Stories can also be further organized through parent-child relationships and sub-stories.
This creates a progressive hierarchy from higher-level requirements to detailed implementation items.
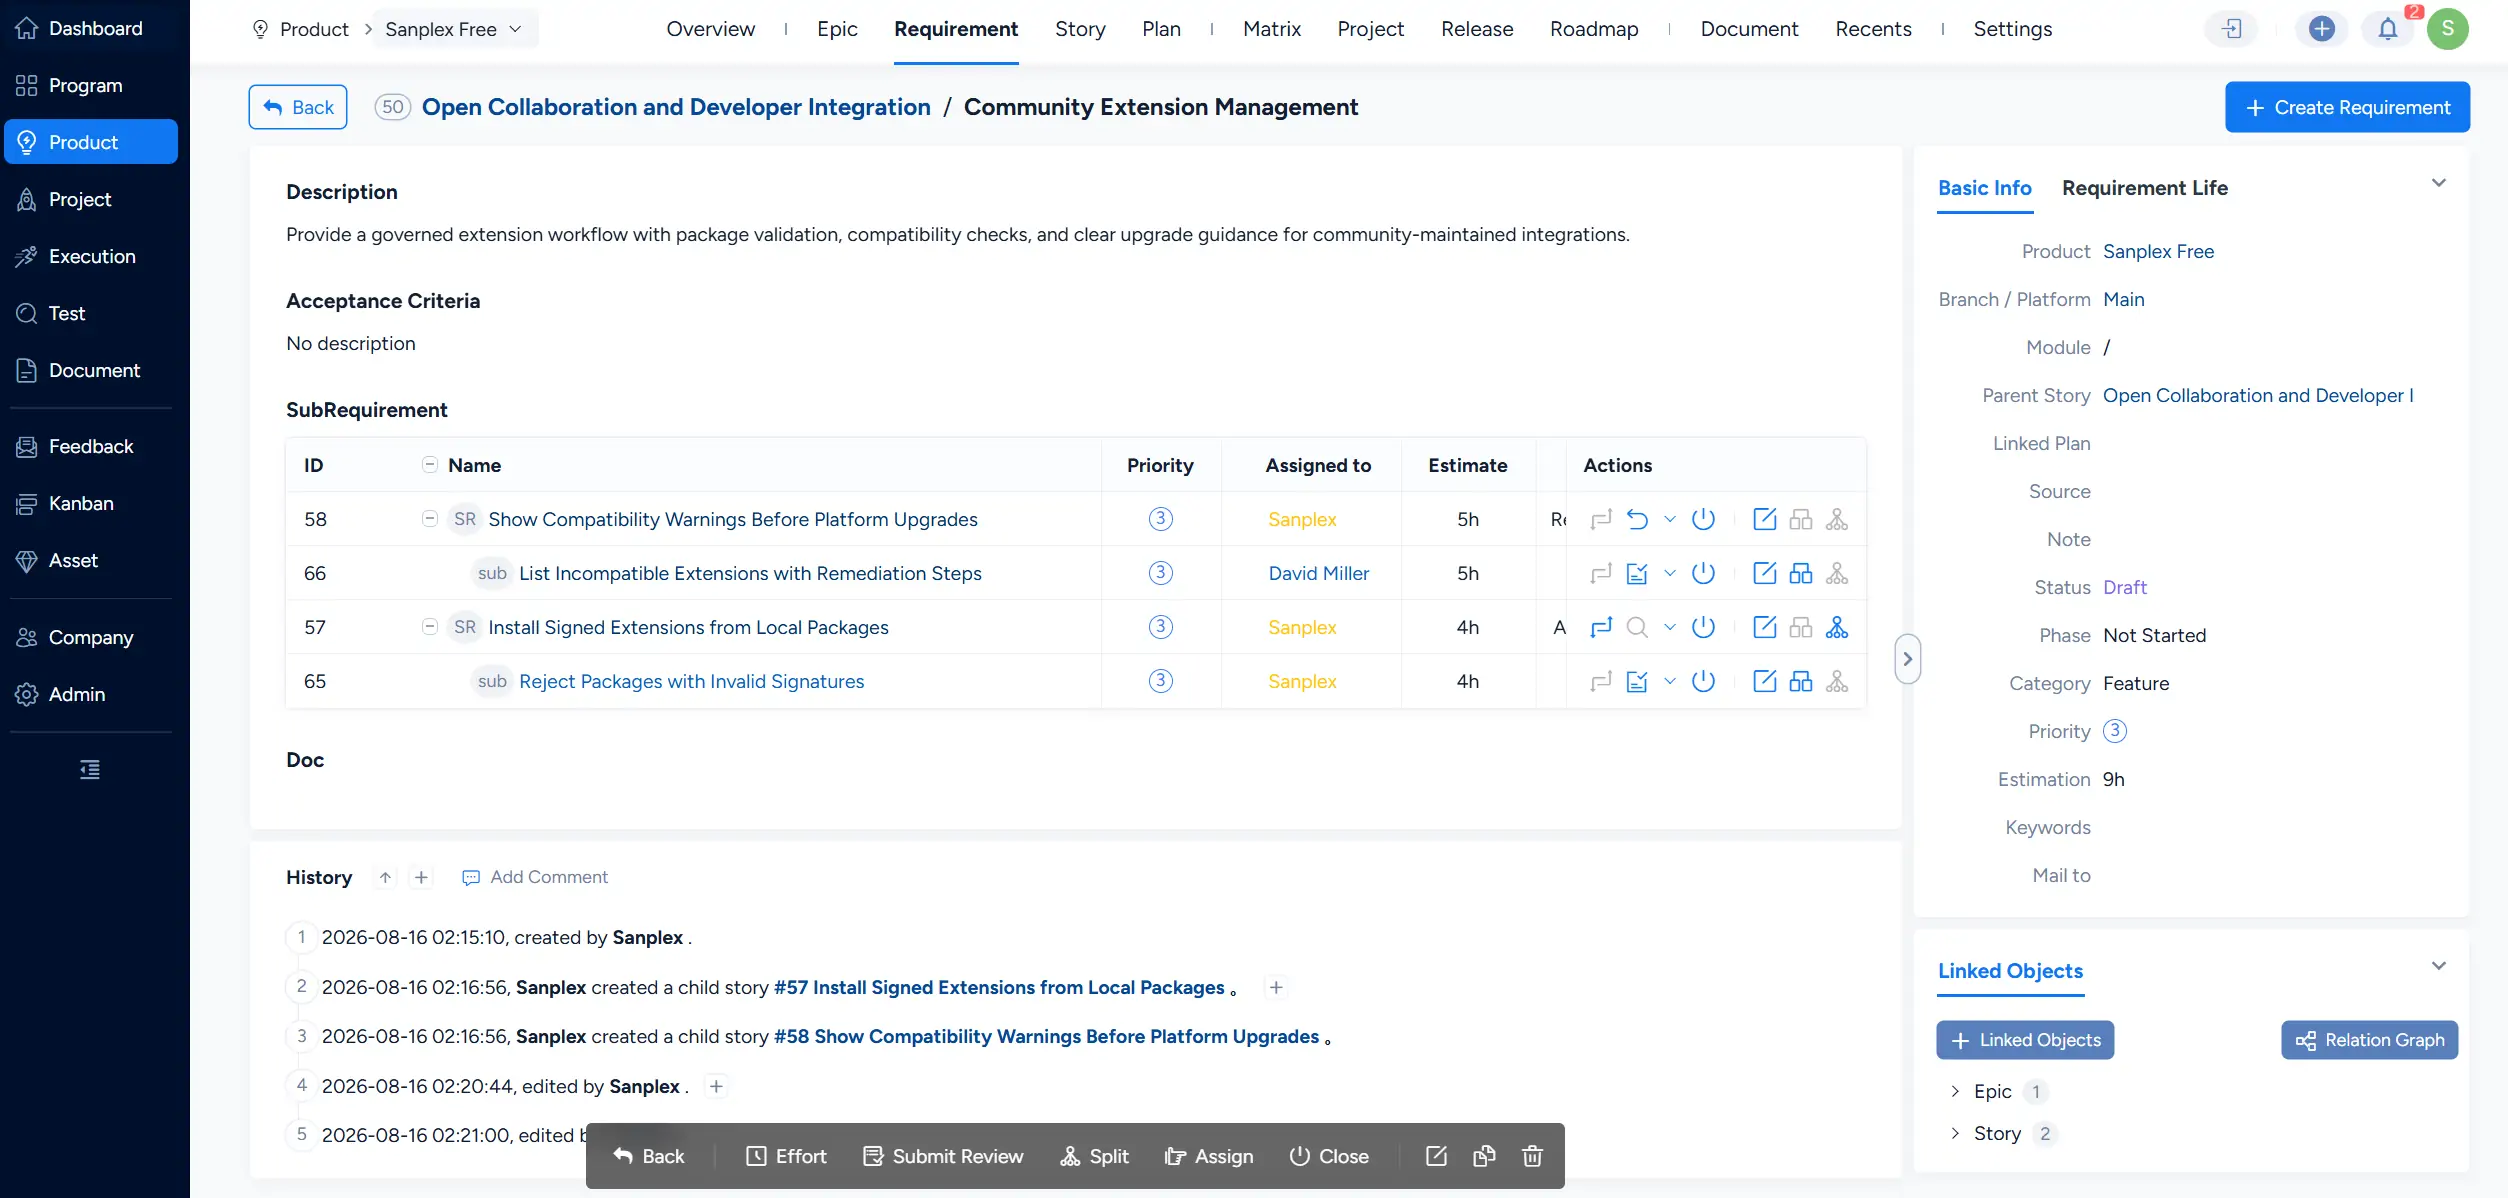
Open a requirement item to view its parent-child structure and related information. The details page can display its parent item, sub-requirements, history, and linked objects.
1. Configure Requirement Concepts
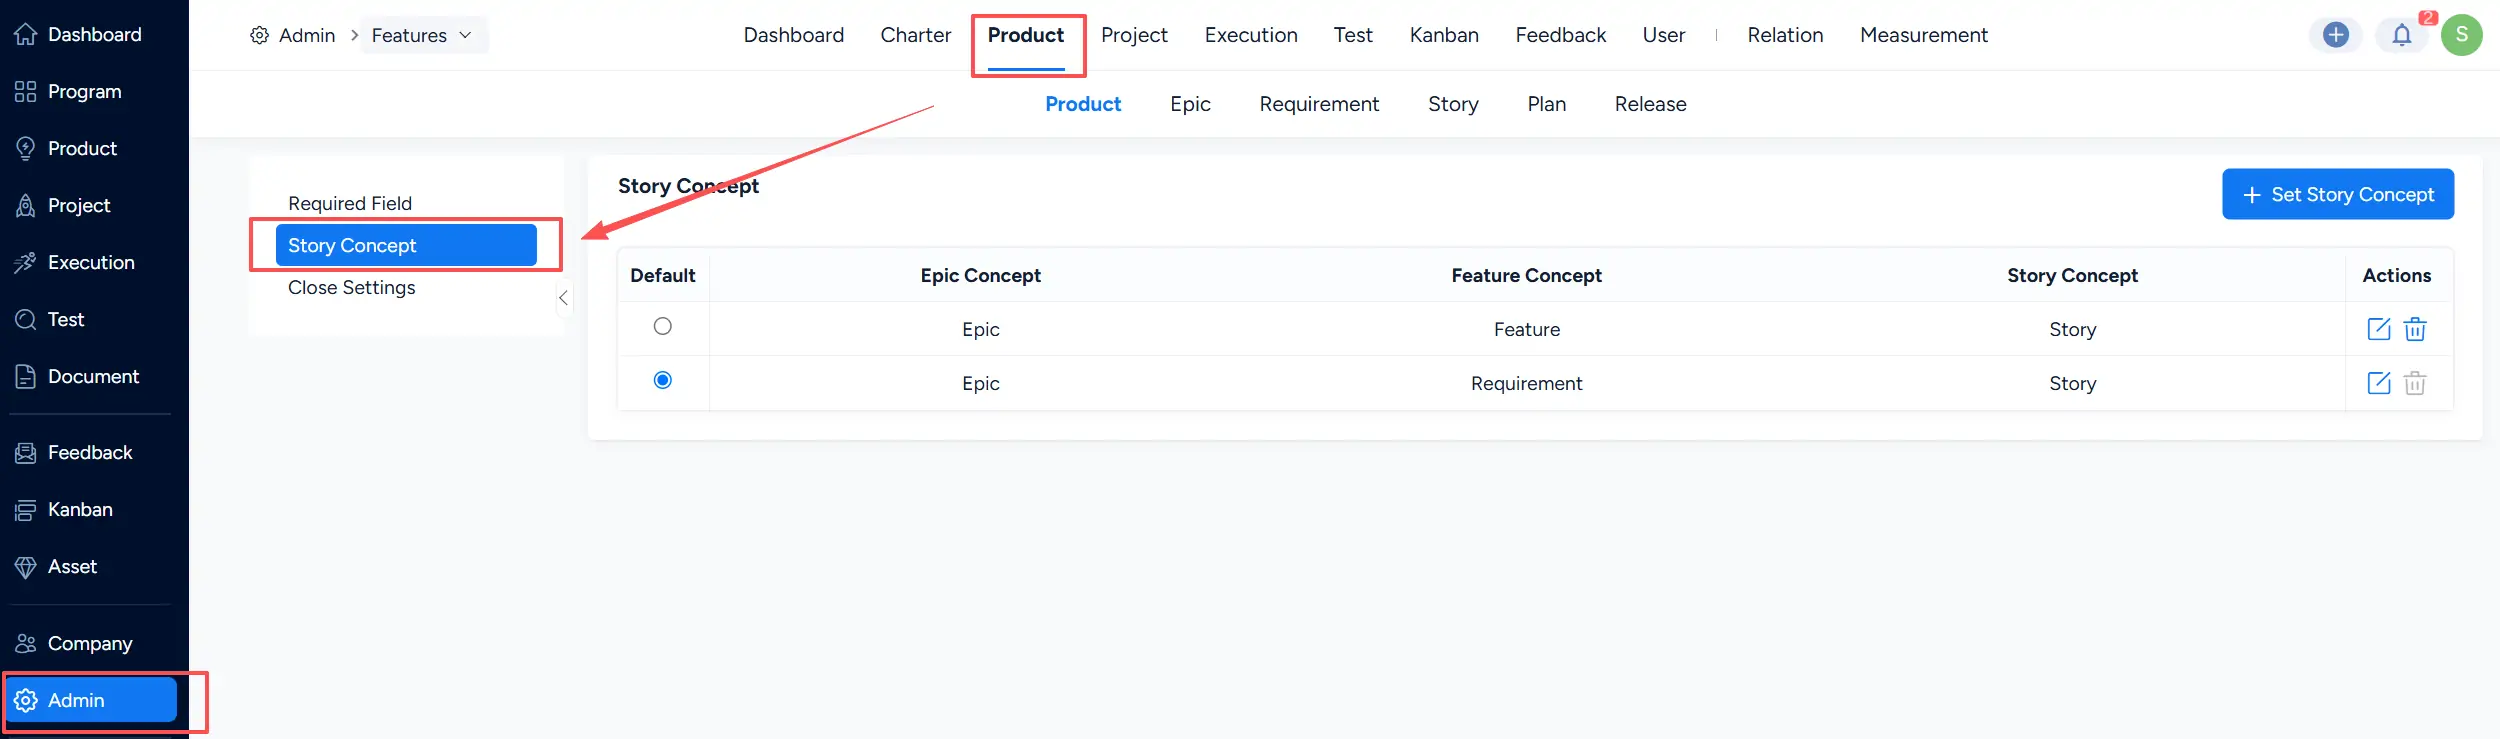
Go to Admin > Features > Product > Story Concept to configure the terminology used for the requirement hierarchy.
The configuration defines the names used for the Epic Concept, Feature Concept, and Story Concept. For example, the Feature Concept can be named Requirement while the Epic and Story concepts remain Epic and Story.
2. Configure Permissions by Requirement Module
Requirement-related permissions can be managed separately by module.
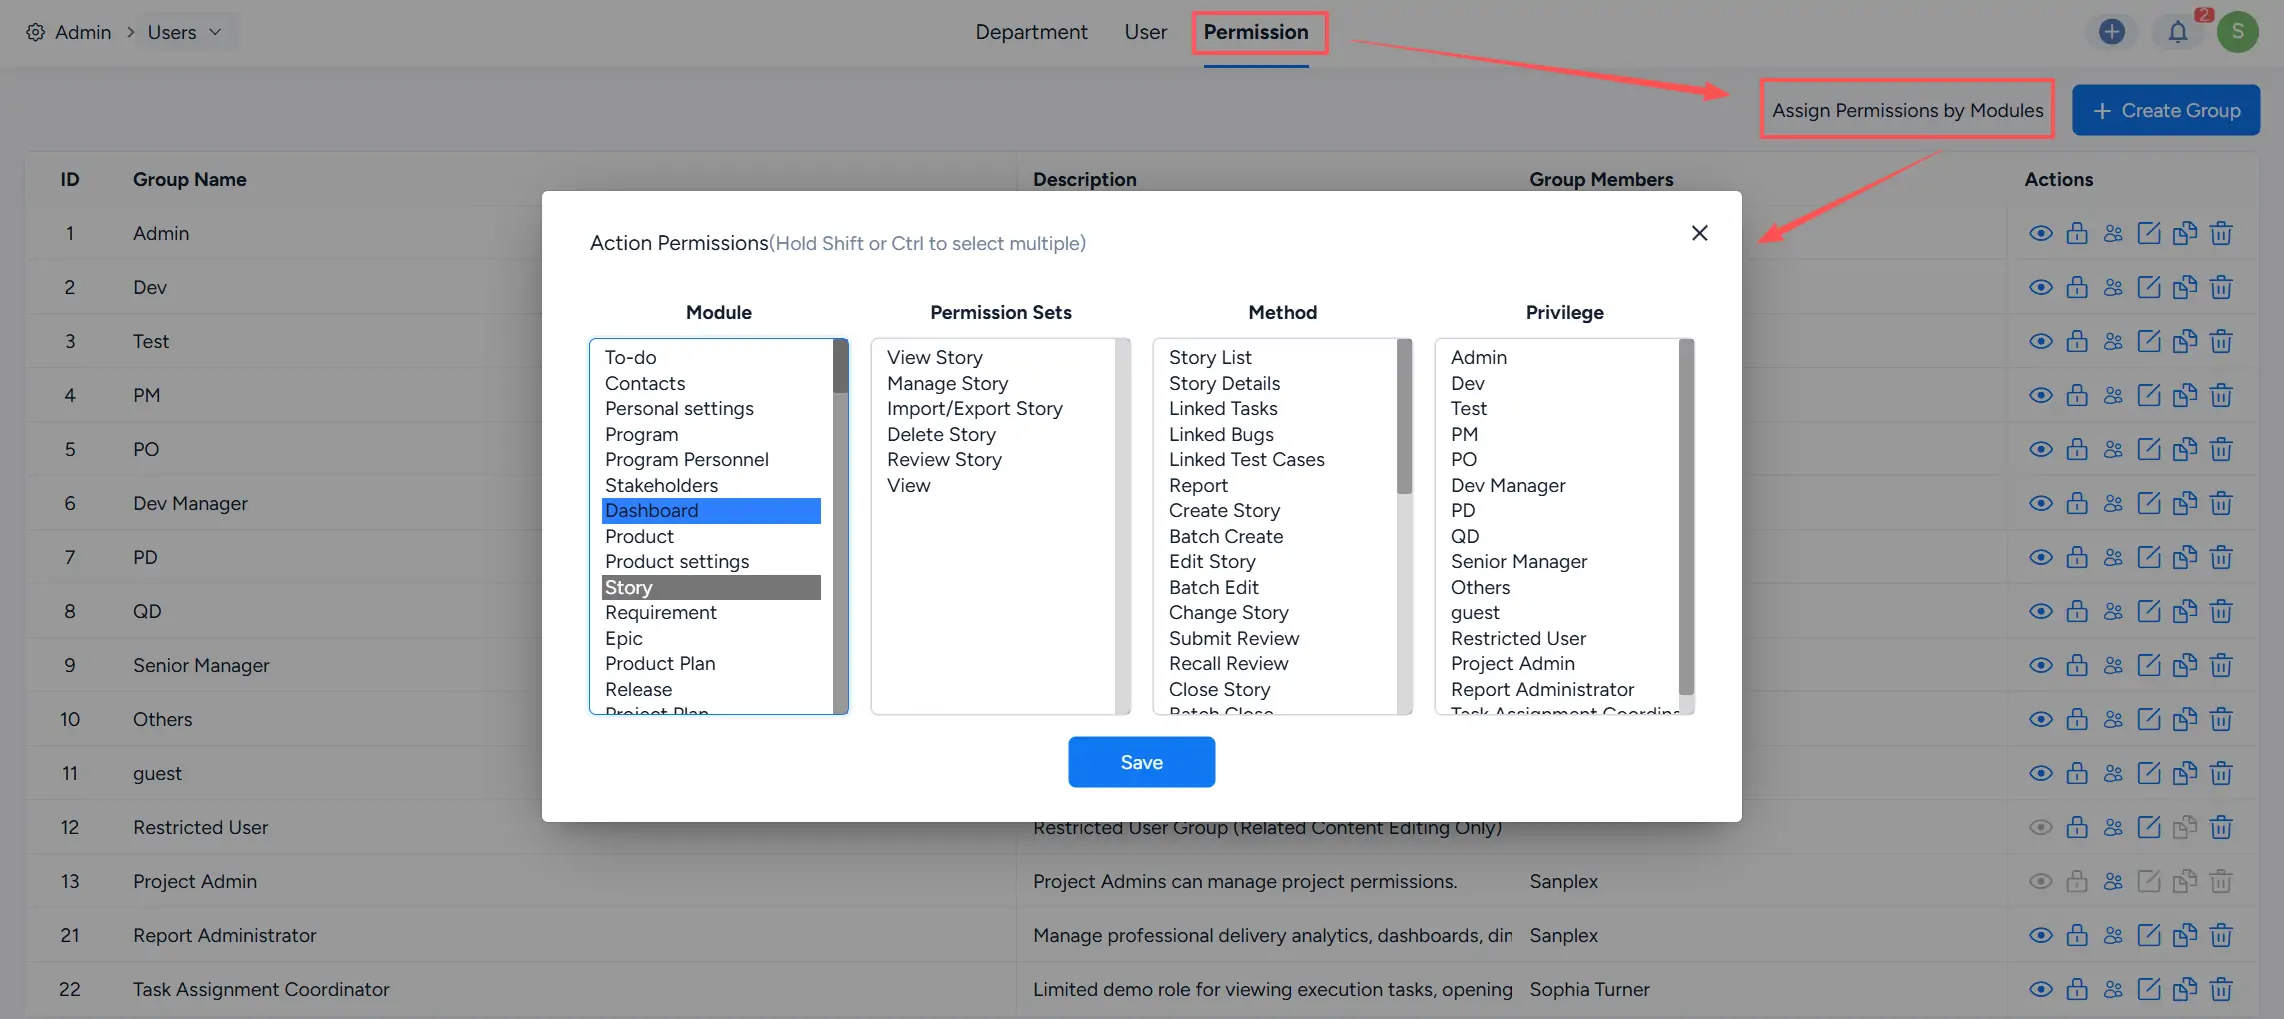
Go to Admin > Users > Permission and click Assign Permissions by Modules. Administrators can select Epic, Requirement, or Story as the Module and then configure the corresponding Permission Sets, Methods, and Privileges for different permission groups.
This allows access and actions for each requirement level to be managed according to users' responsibilities.
3. View the Requirement Hierarchy
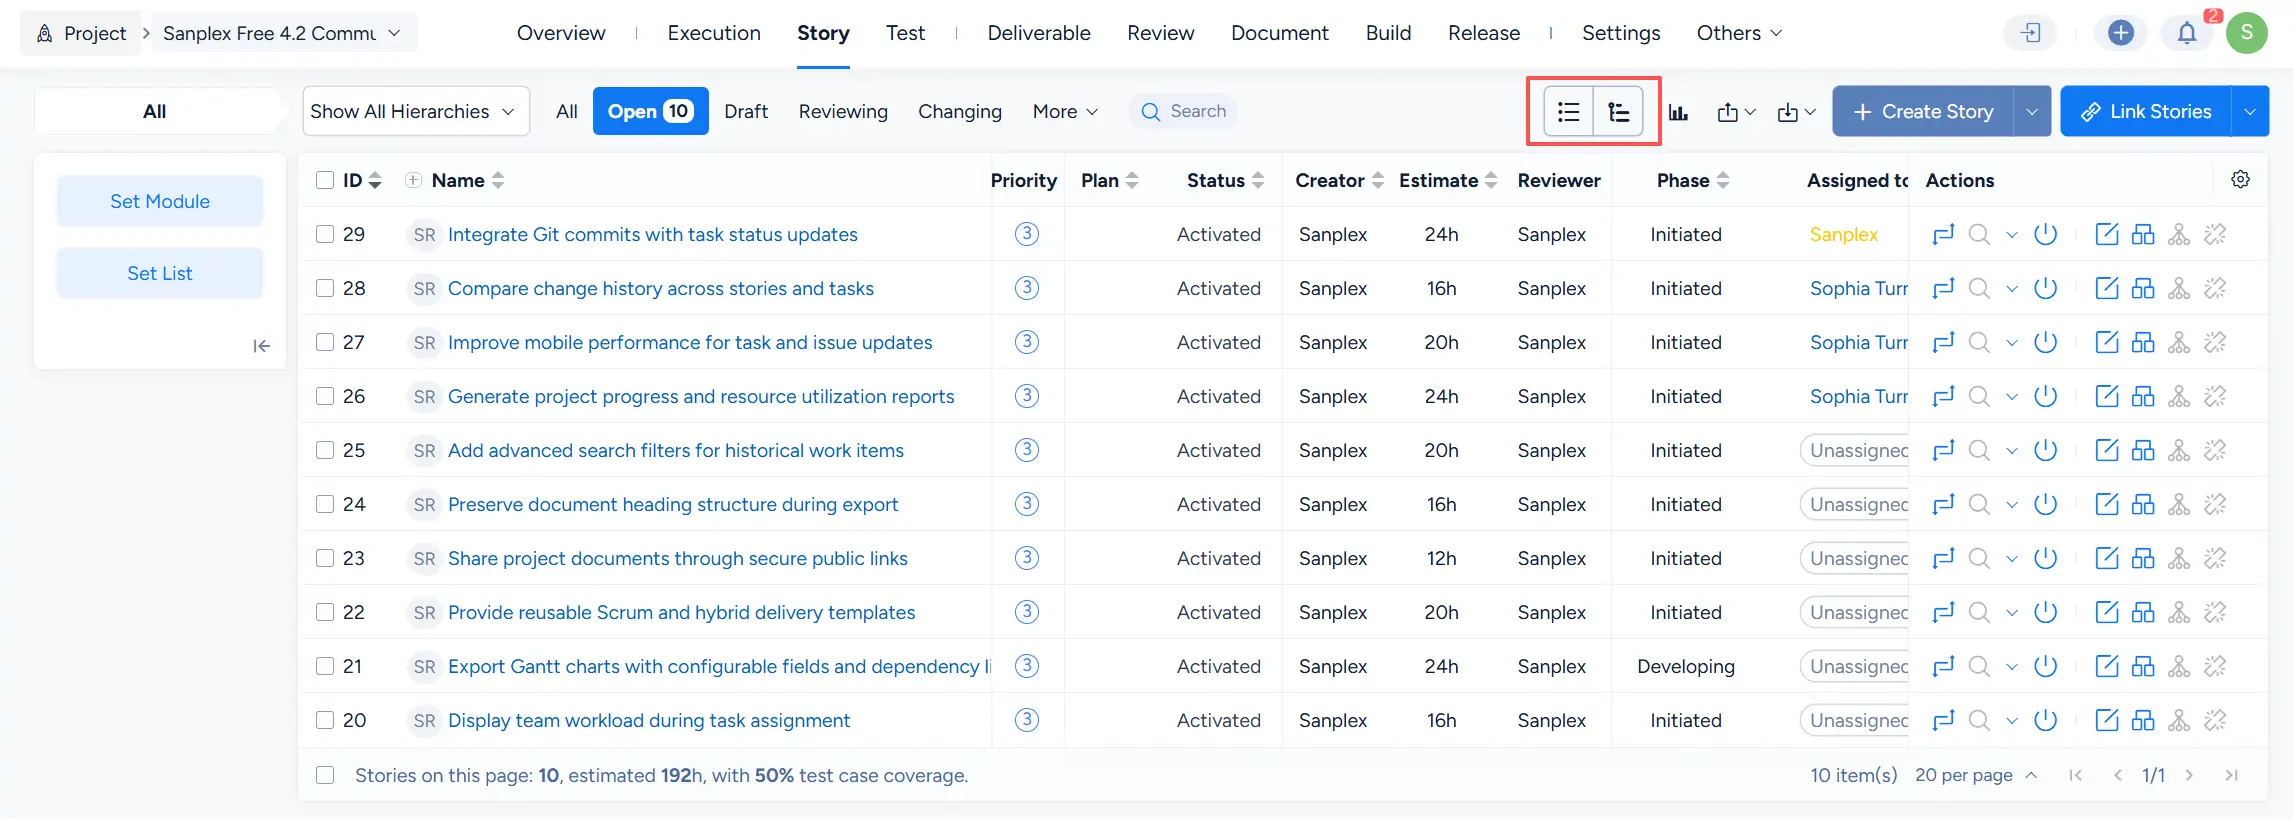
Requirement lists support different display modes for reviewing hierarchical information.
Use the hierarchy controls and view buttons to switch between a hierarchical view and a flatter list-oriented view.
- A hierarchical view makes parent-child relationships easier to follow.
- A flat list is useful when searching, filtering, or comparing requirement attributes across multiple items.
4. Track Subitem Completion
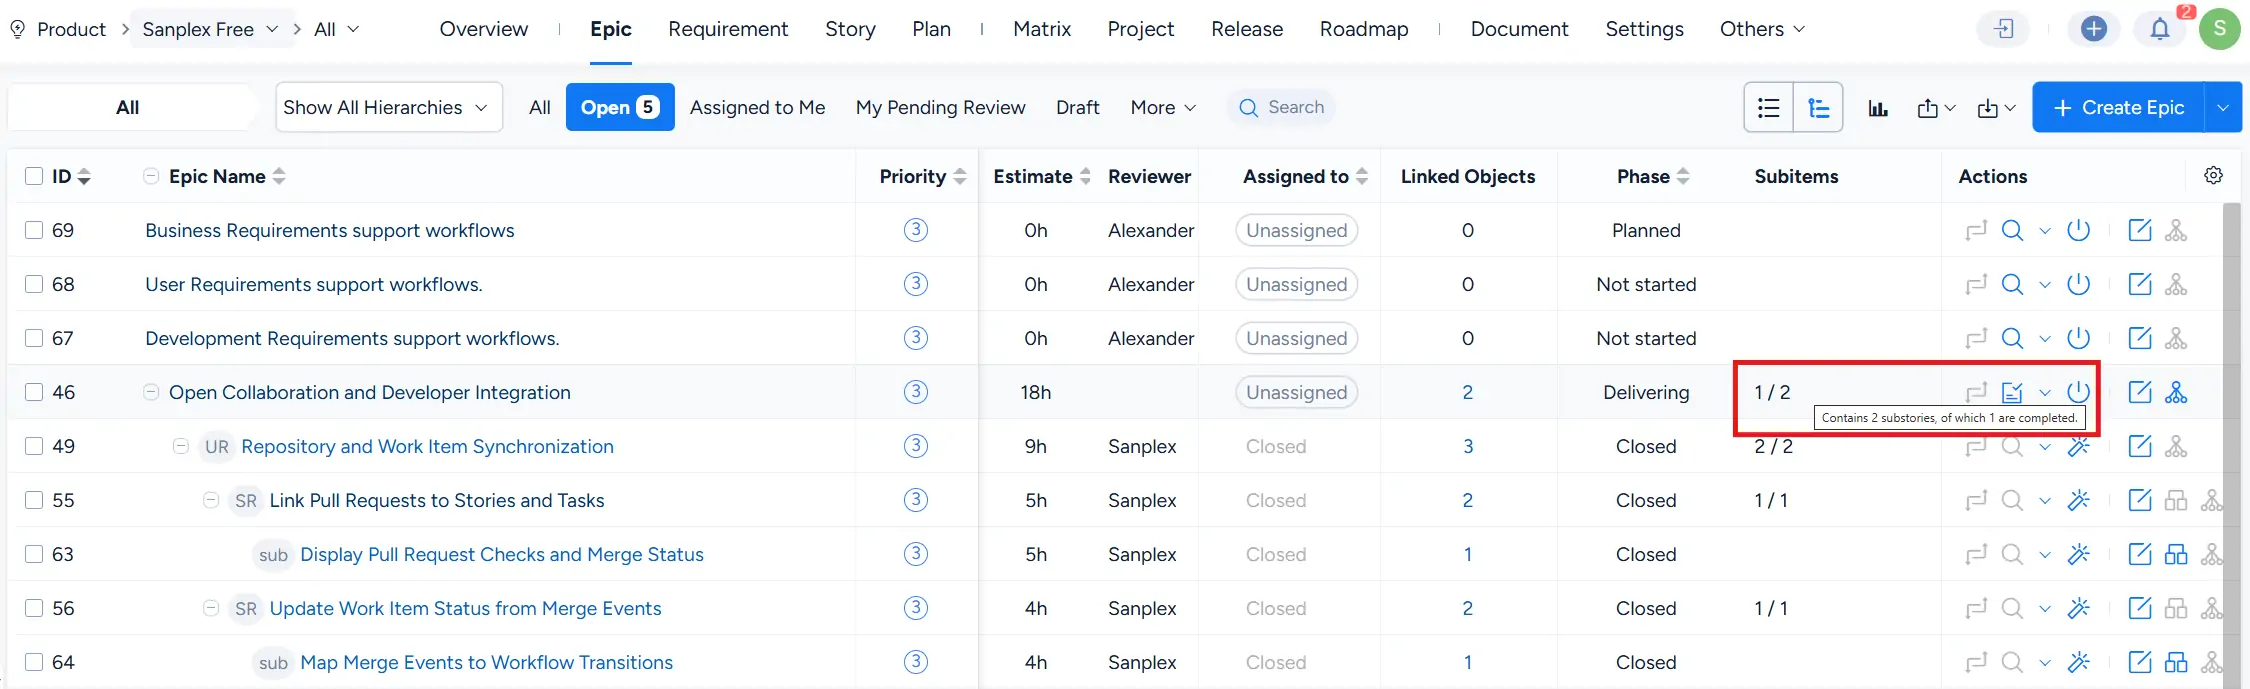
For requirement items that contain child items, the Subitems column shows the completion progress of their direct children.
For example, 1 / 2 indicates that the item contains two direct subitems and one of them is completed.
5. Work with Leaf Stories
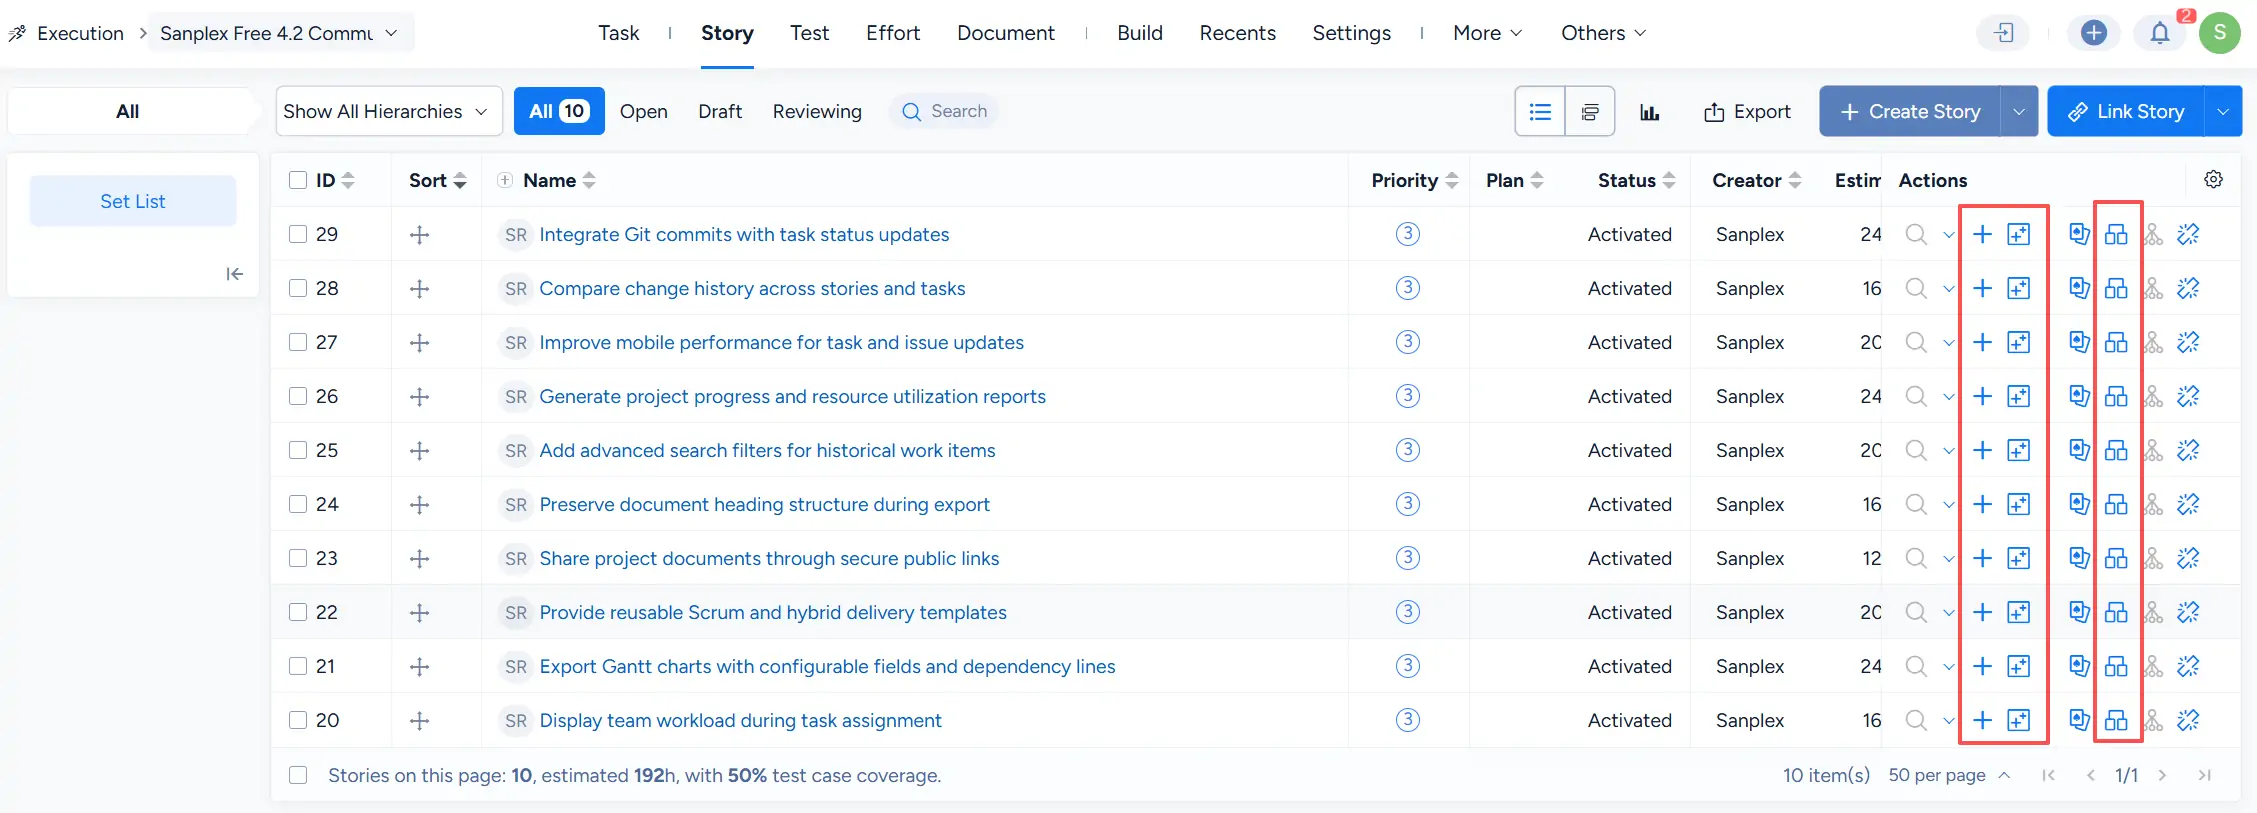
Detailed implementation work is performed through Stories at the lower levels of the hierarchy. Depending on the item and its current state, available actions can include creating child items, linking downstream work, and managing related delivery information.
6. Track Requirement Phases
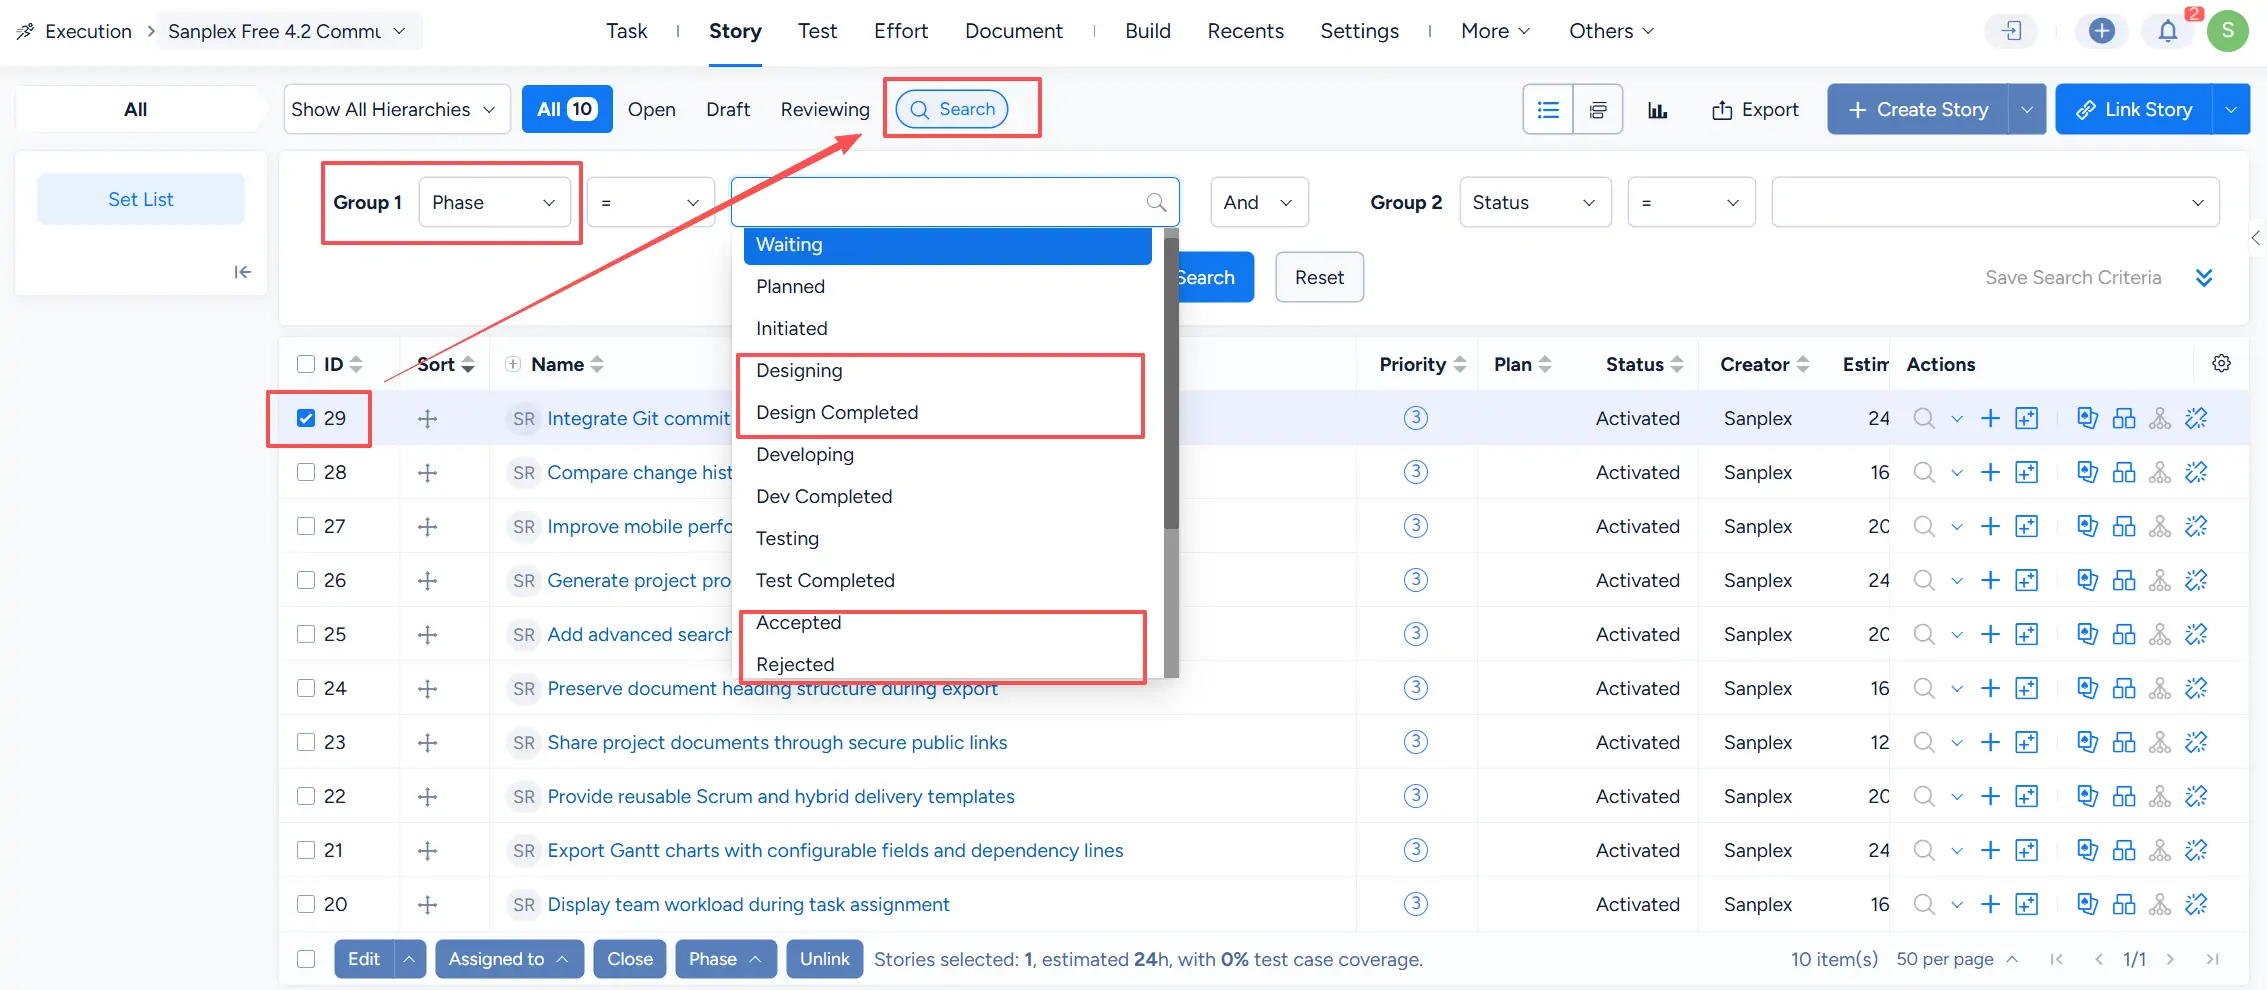
The Phase field reflects the current development or delivery progress of requirement items.
For implementation-level Stories, available phases include values such as:
Waiting, Planned, Initiated, Designing, Design Completed, Developing, Dev Completed, Testing, Test Completed, Accepted, Rejected
Higher-level requirement items use their own progress phases based on their hierarchy and child-item progress.
For detailed Phase rules, see Requirement Status and Phase.
7. Link Related Objects
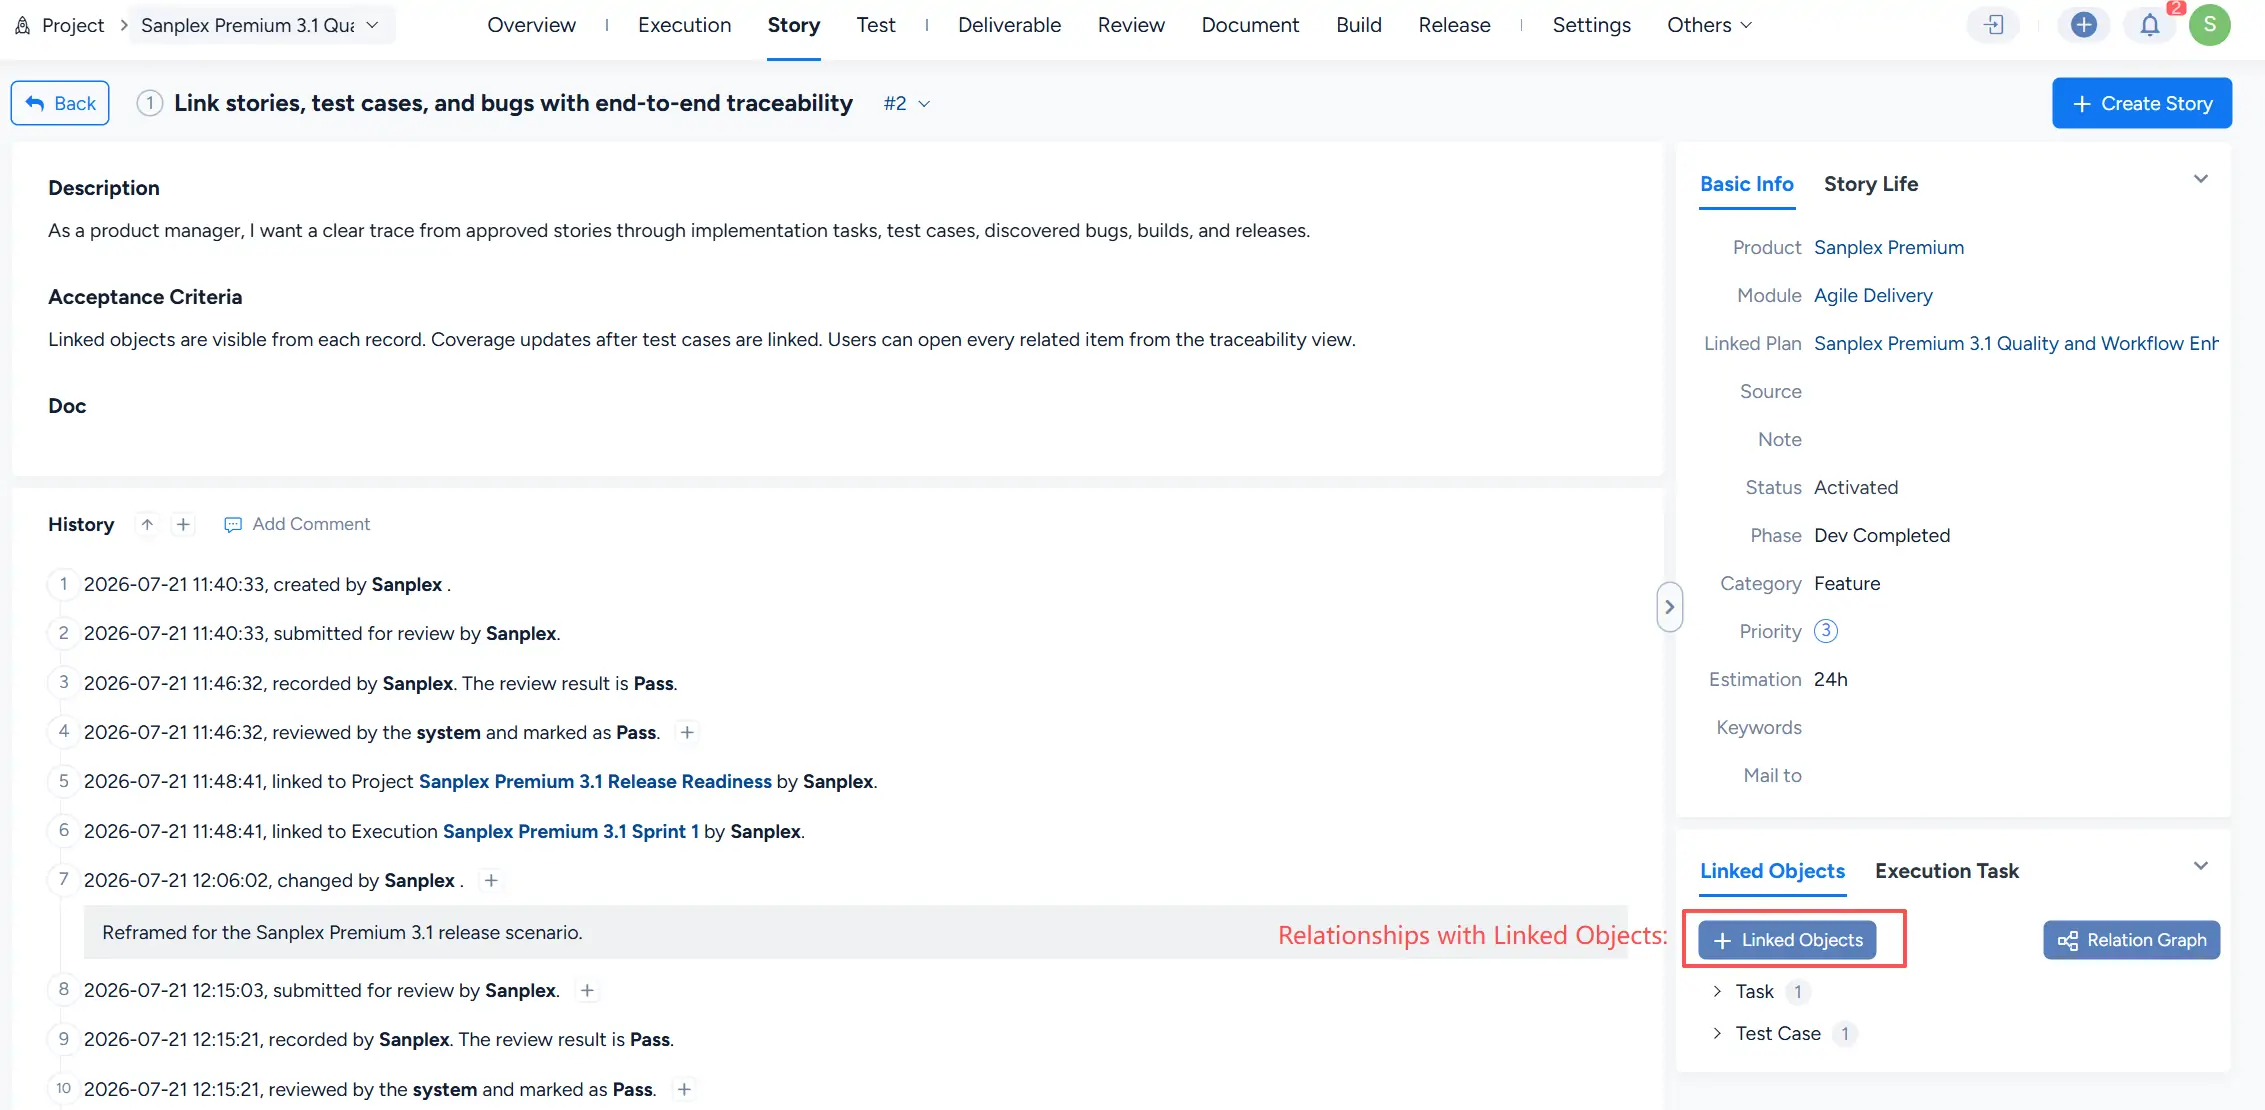
Requirement items can also maintain relationships with related objects outside the parent-child hierarchy.
On the details page, use Linked Objects to view or add related items. The Relation Graph provides another way to review these relationships.
8. Link Requirement Items to Plans
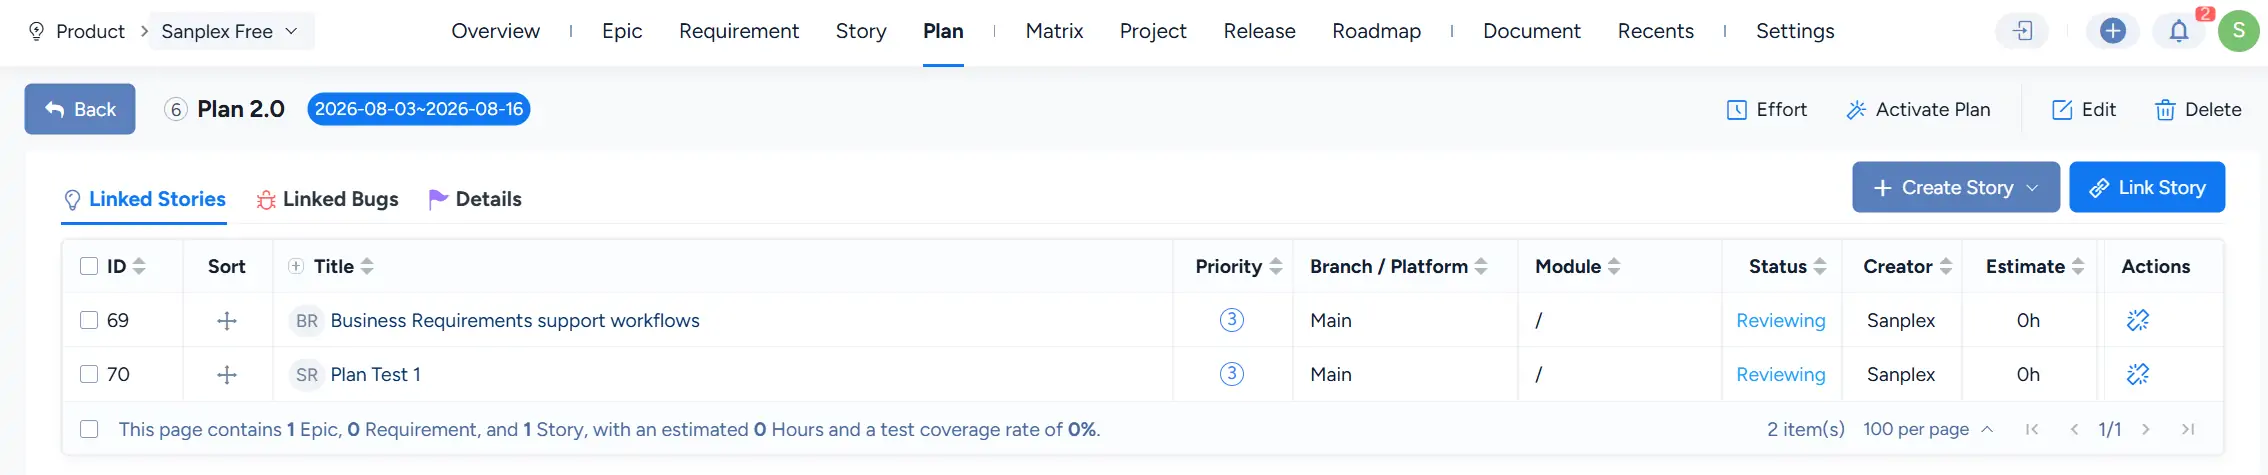
Plans can contain items from different levels of the configured requirement hierarchy.
Open a Plan to view its Linked Stories. The list identifies the linked item types and summarizes the number of Epic, Requirement, and Story items currently included in the Plan.
II. Project
Requirement items can also be linked to Projects so teams can connect Product requirements with delivery work.
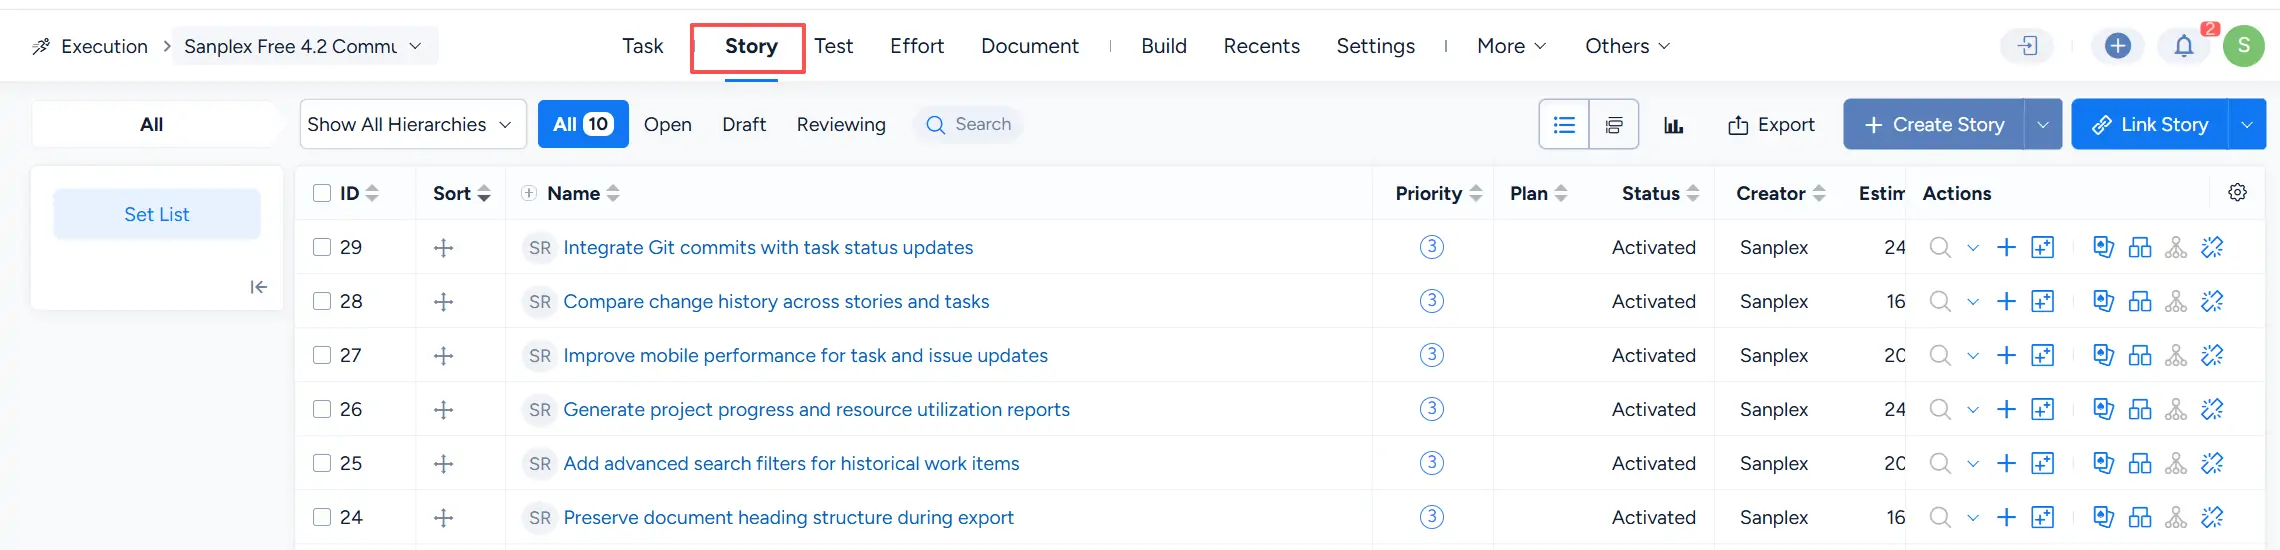
The Project Story page provides a consolidated workspace for viewing linked requirement items and working with Stories.
1. Create and Link Stories
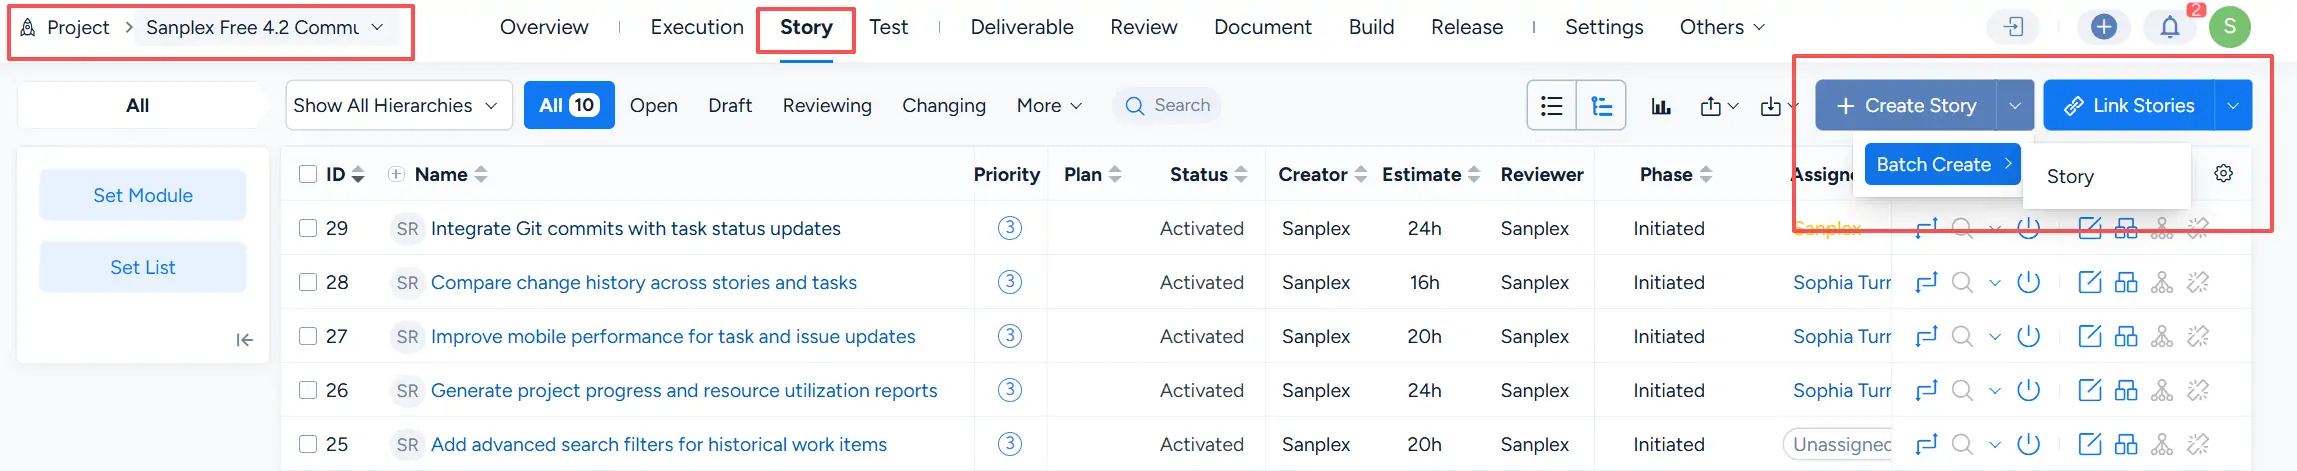
On the Project Story page, use Create Story to create a Story.
To create multiple Stories, open the Create Story menu and select:
Batch Create > Story
Existing requirement items can be added to the Project through Link Stories.
2. Configure Story Concepts for a Project
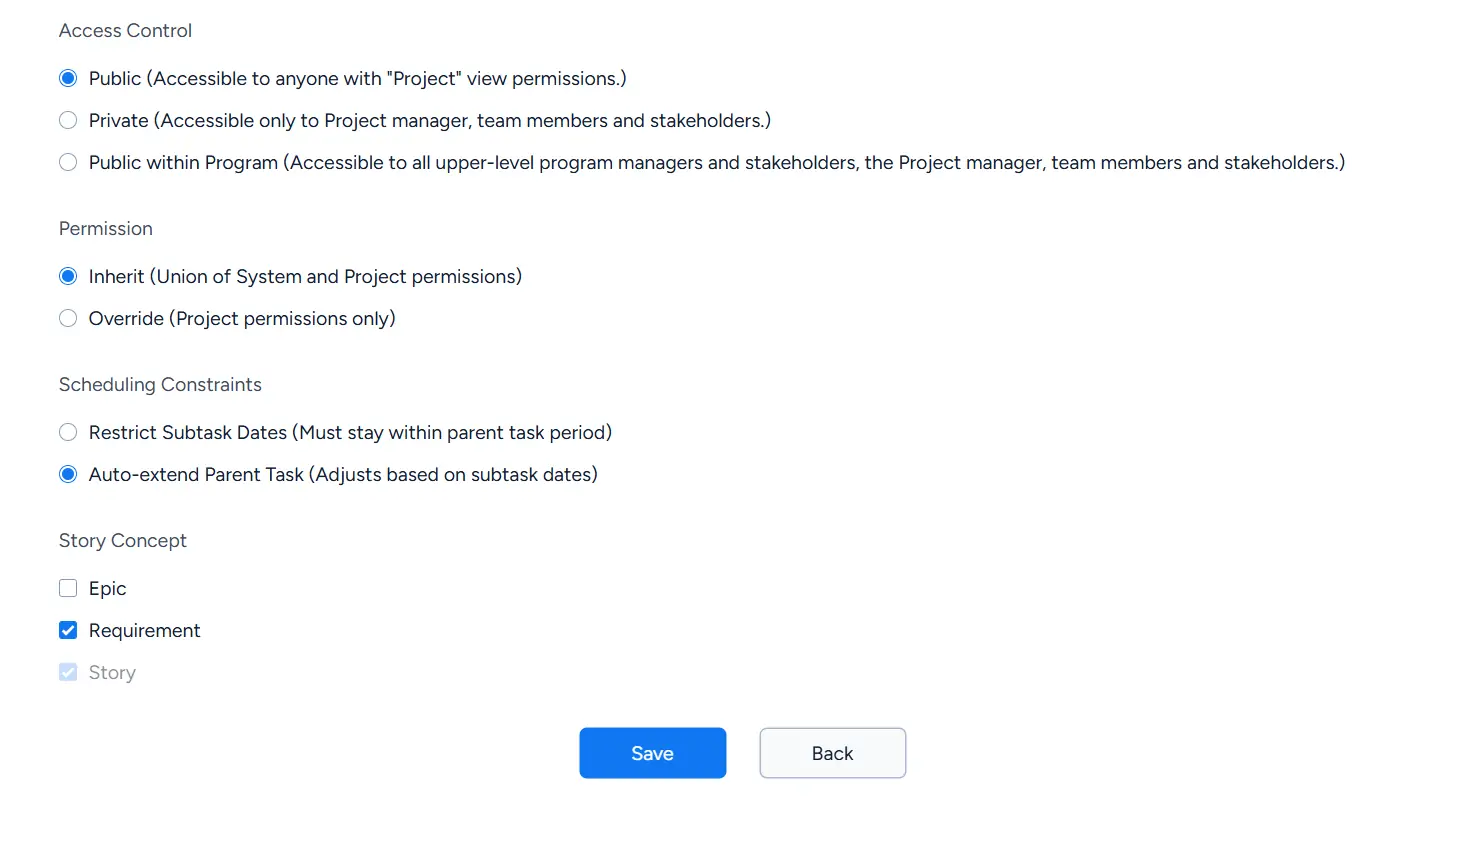
When creating or editing a Project, the Story Concept section determines which requirement concepts are included in the Project.
The available concepts shown in the current configuration include Epic, Requirement, and Story.
3. View Linked Stories in a Project
The Project Story page provides hierarchy controls and display options for reviewing linked Stories and their related requirement structure.
4. Link Stories to an Execution
Within an Execution, open Story and click Link Stories to select existing Stories.
Search criteria can be used to locate the required Stories before linking them to the Execution.

III. Workflow (Standard)
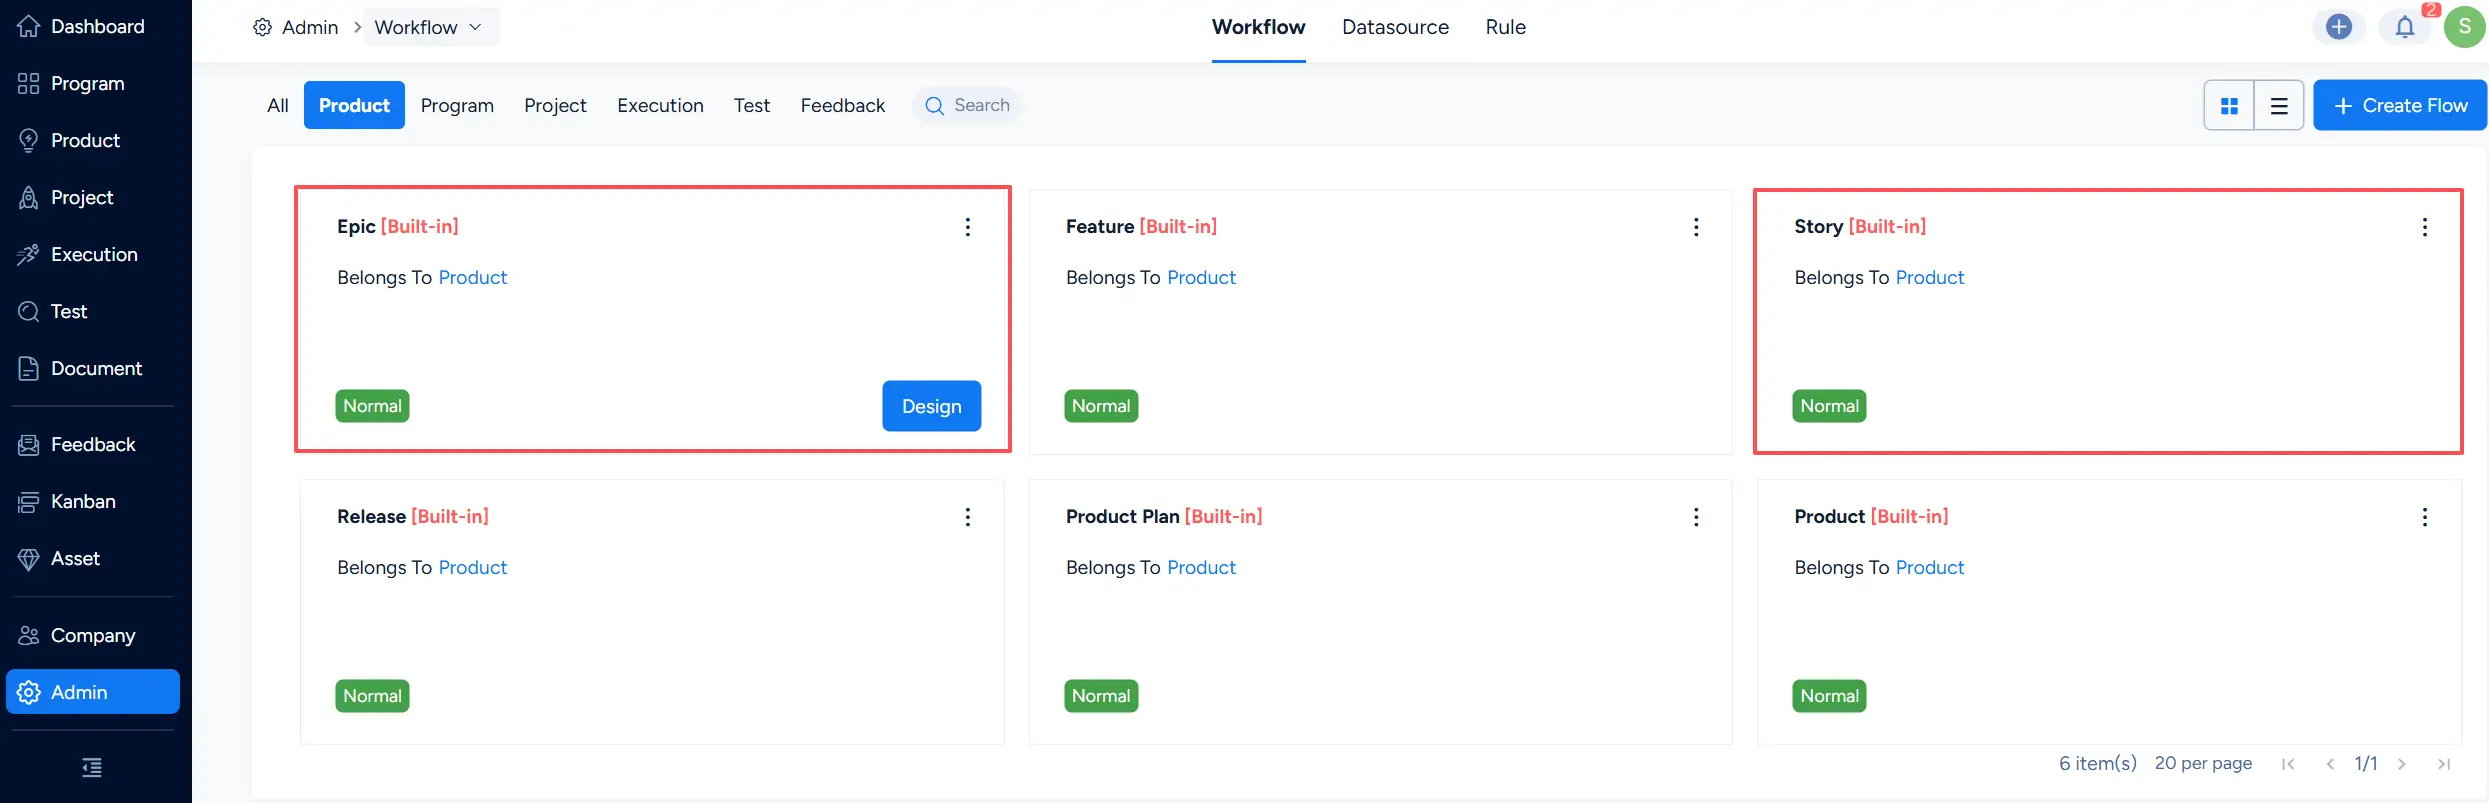
Sanplex provides separate built-in Product workflows for different requirement concepts.
Under Admin > Workflow > Product, built-in workflows can include Epic, Feature/Requirement, and Story, depending on the terminology configured under Story Concept.
This allows the workflow for each requirement concept to be managed independently.
IV. Feedback (Standard)
Feedback can be converted into a requirement item for further Product management.
Use the To Requirement action for the required Feedback item to continue managing it as a Requirement.

V. Admin
1. Configure Requirement Features
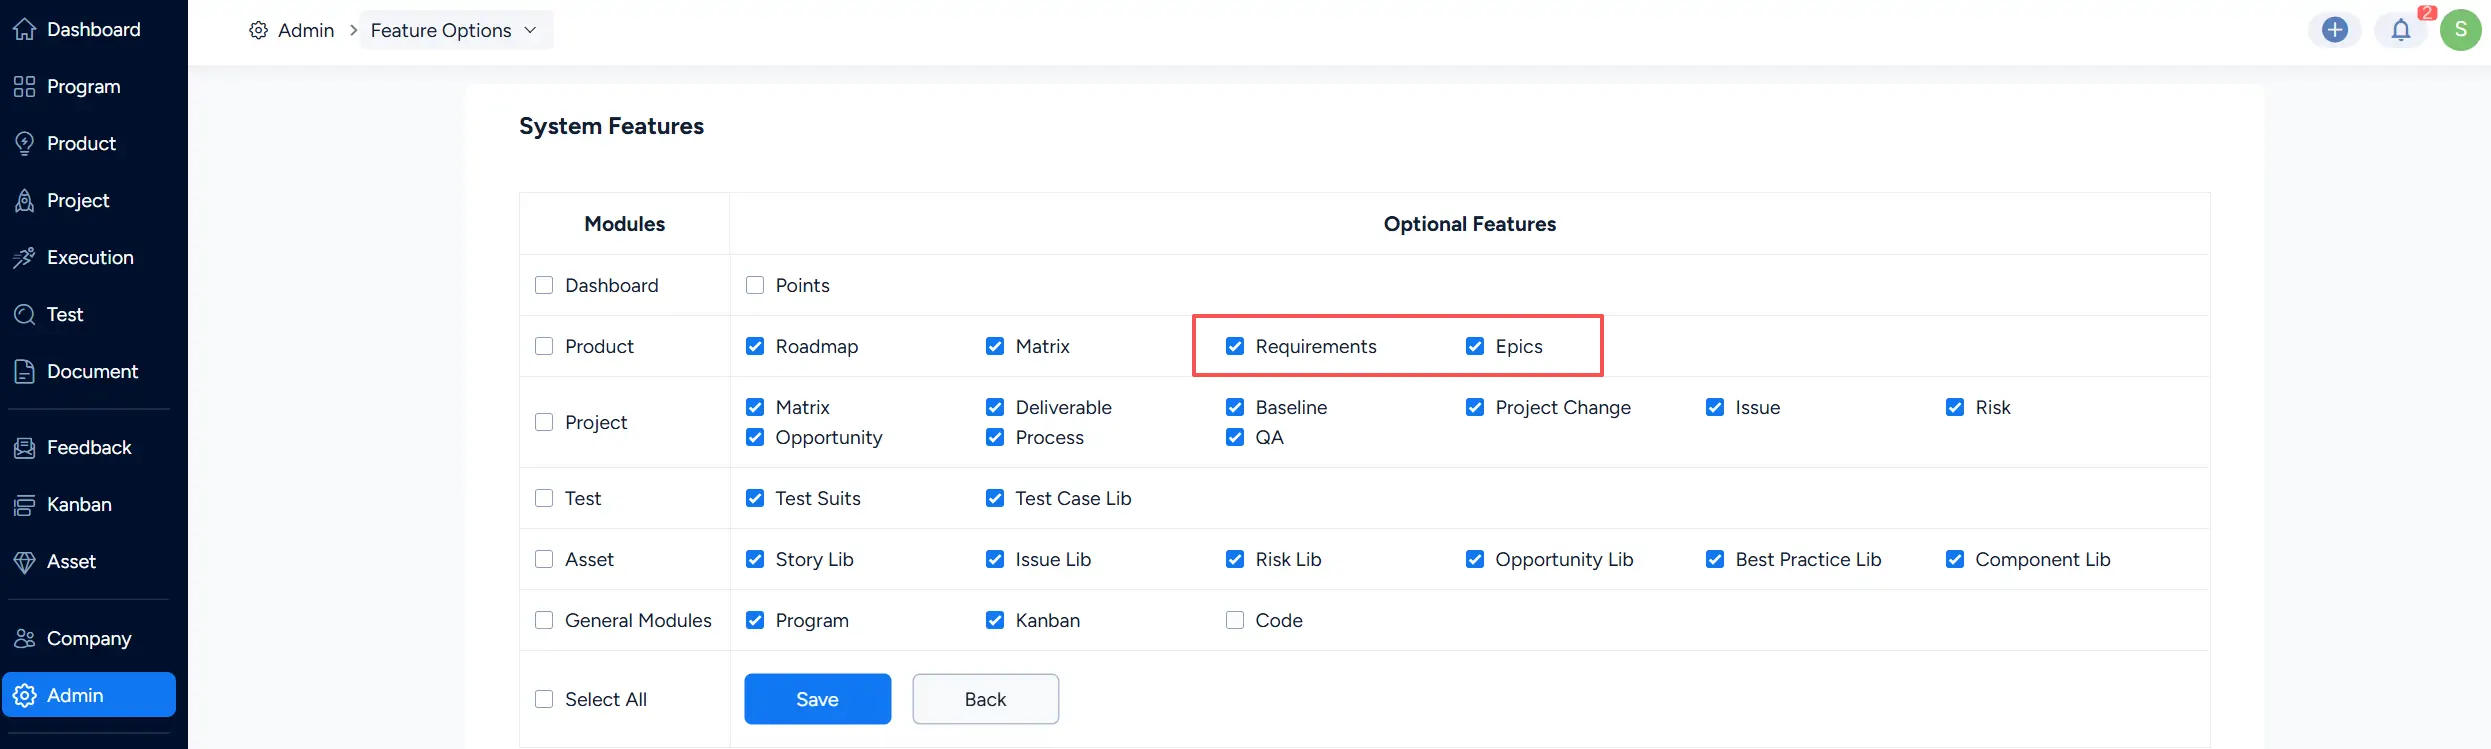
Under Admin > Feature Options, Product-related optional features include Requirements and Epics.
Enable the required Product features and save the configuration.
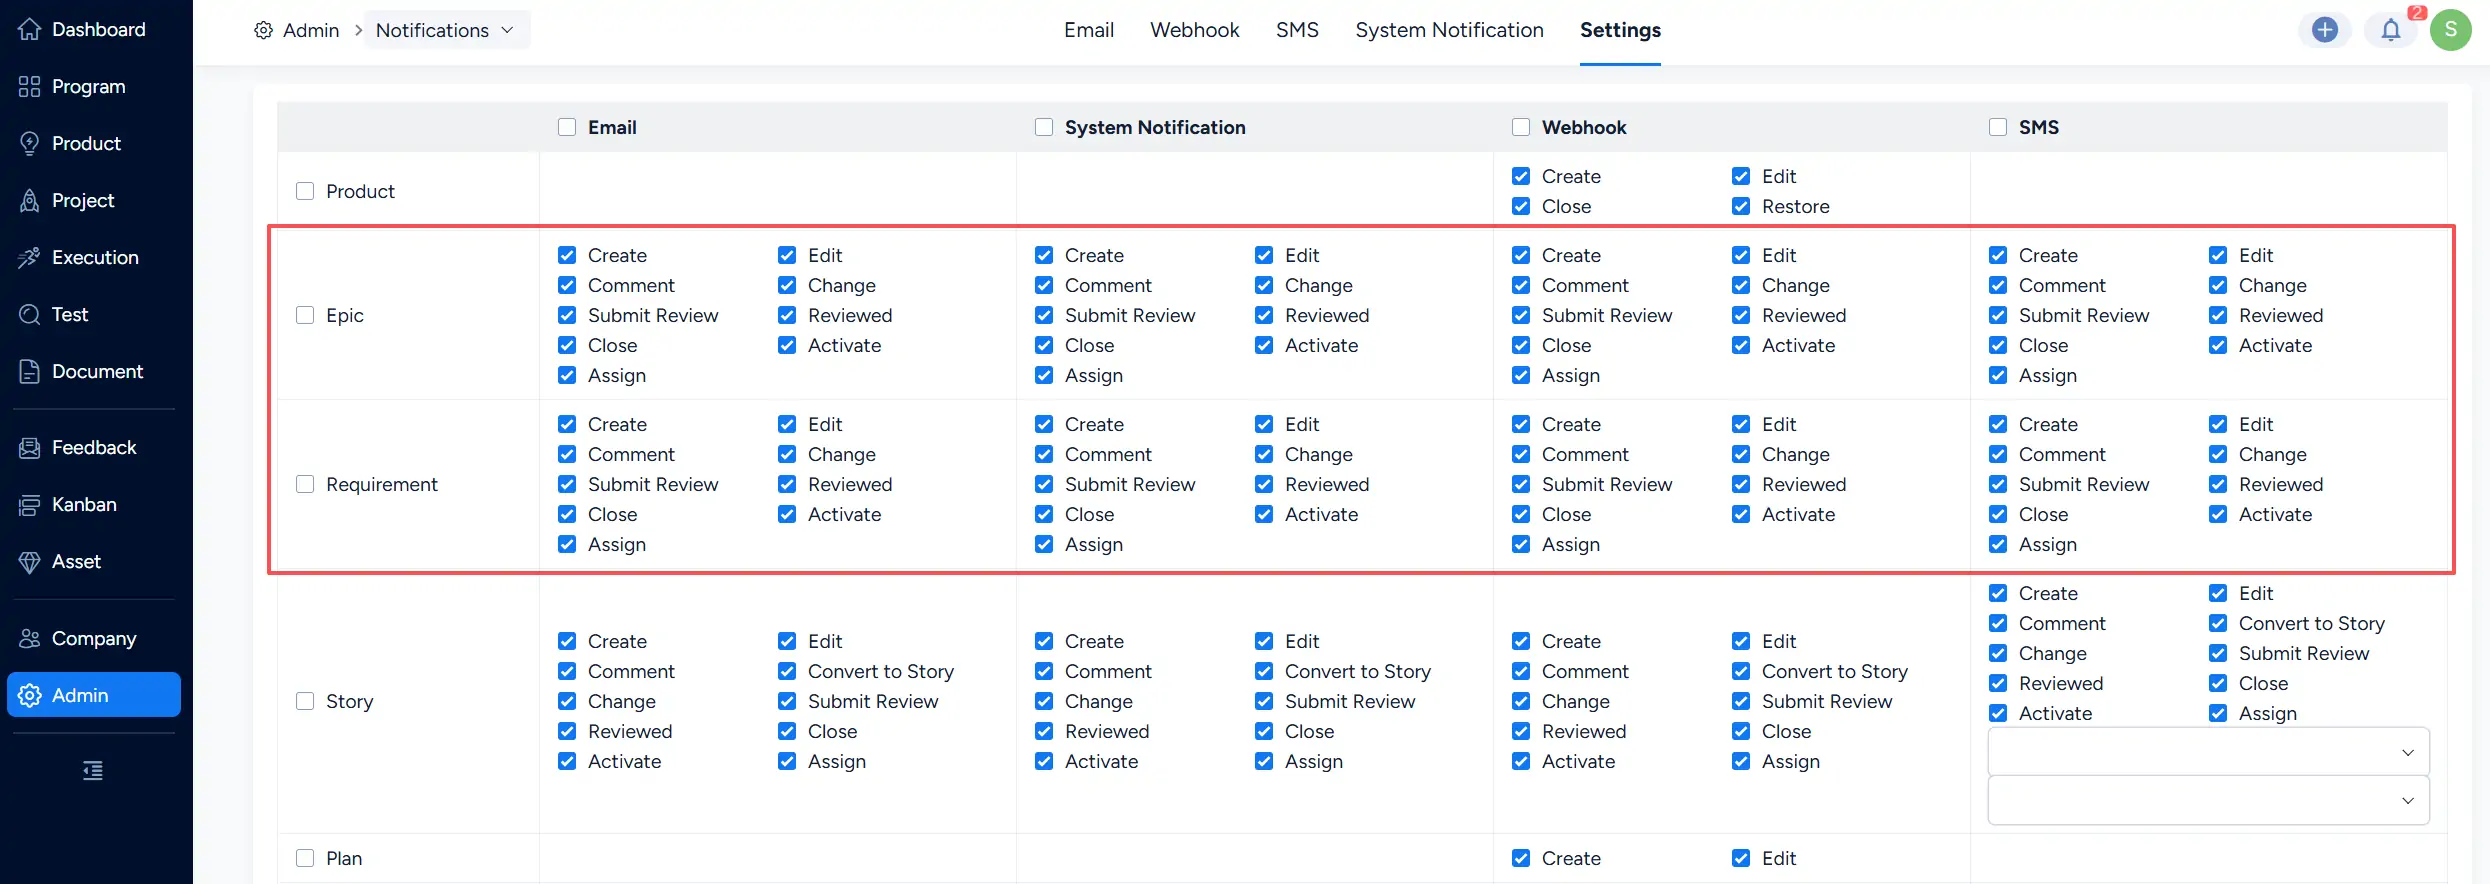
2. Configure Requirement Notifications
Go to Admin > Notifications > Settings to configure notifications for requirement-related objects.
The settings provide separate rows for Epic, Requirement, and Story, with notification options available through channels such as:
- System Notification
- Webhook
- SMS
Available events can include Create, Comment, Submit Review, Close, Assign, Edit, Change, Reviewed, and Activate.
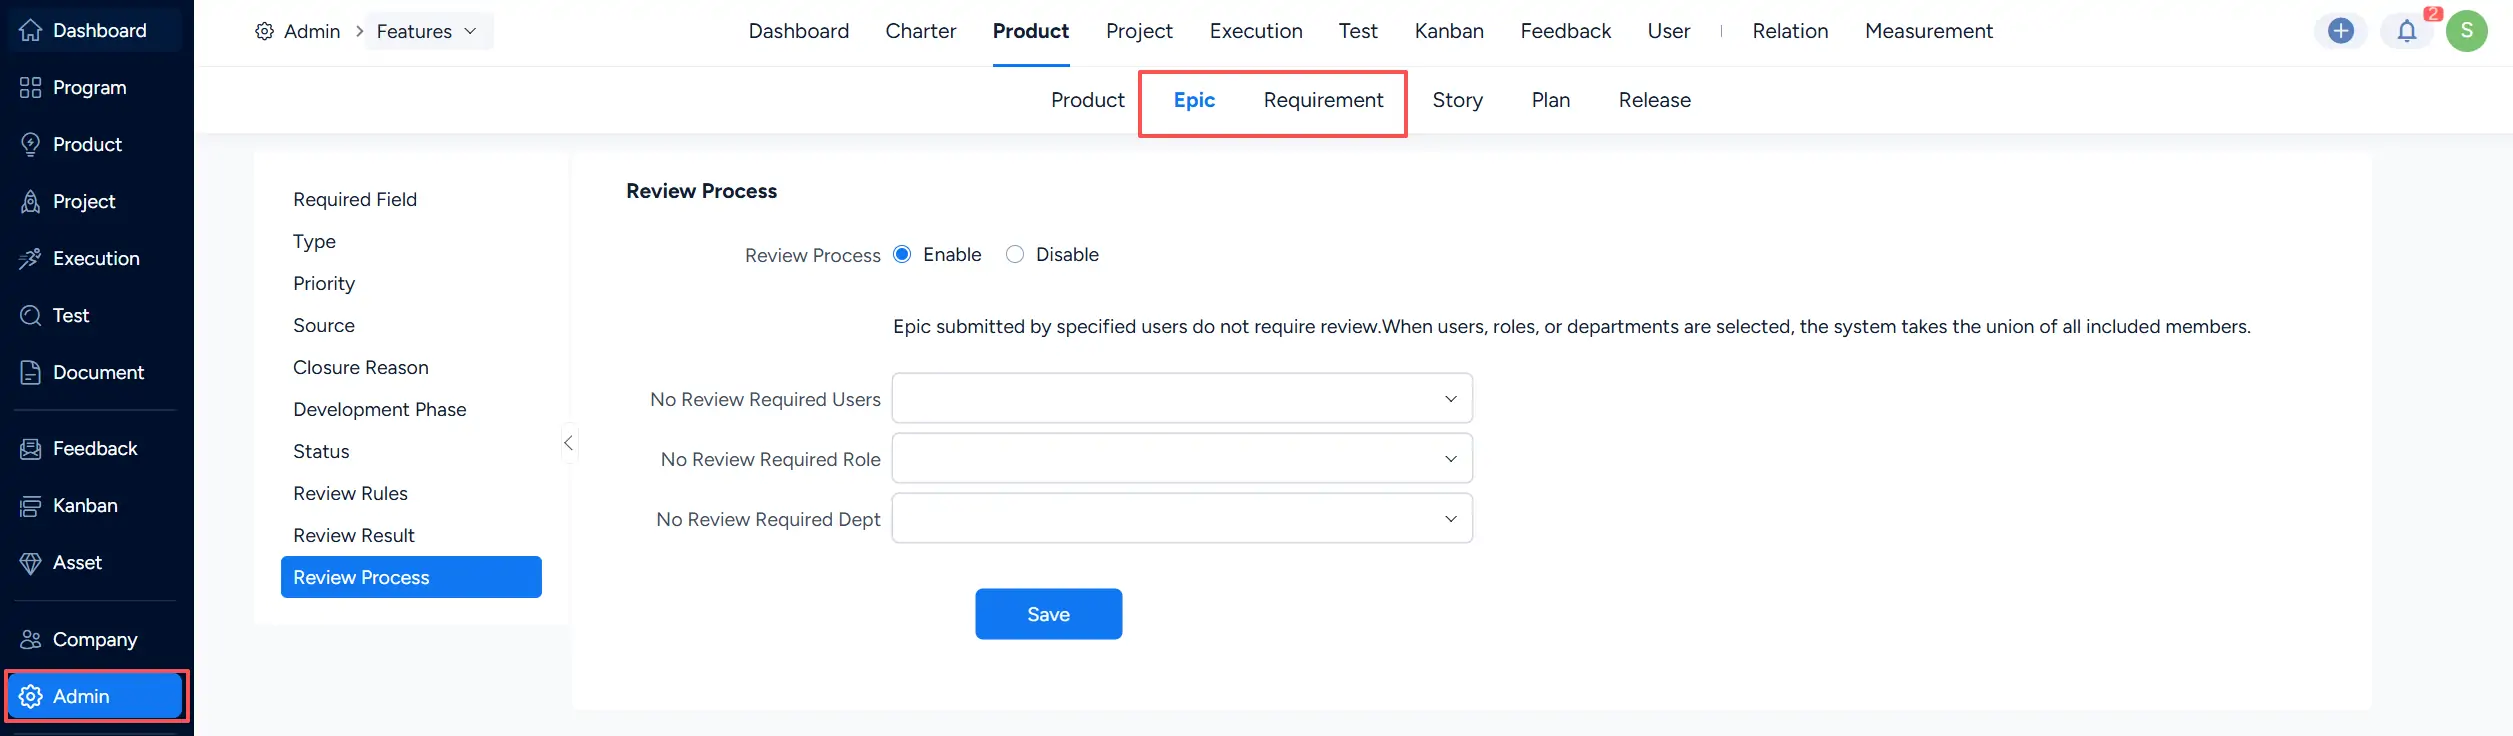
3. Configure Epic, Requirement, and Story Settings
Under Admin > Features > Product, Epic, Requirement, and Story each have their own configuration page.
Depending on the selected requirement concept, administrators can manage settings such as:
- Required Field
- Type
- Priority
- Source
- Closure Reason
- Development Phase
- Status
- Review Rules
- Review Result
- Review Process
This allows each level of the requirement hierarchy to follow configuration rules appropriate to its role in the Product lifecycle.