Catalog
The Execution Kanban provides a visual way to manage Stories, Bugs, and Tasks associated with an execution.
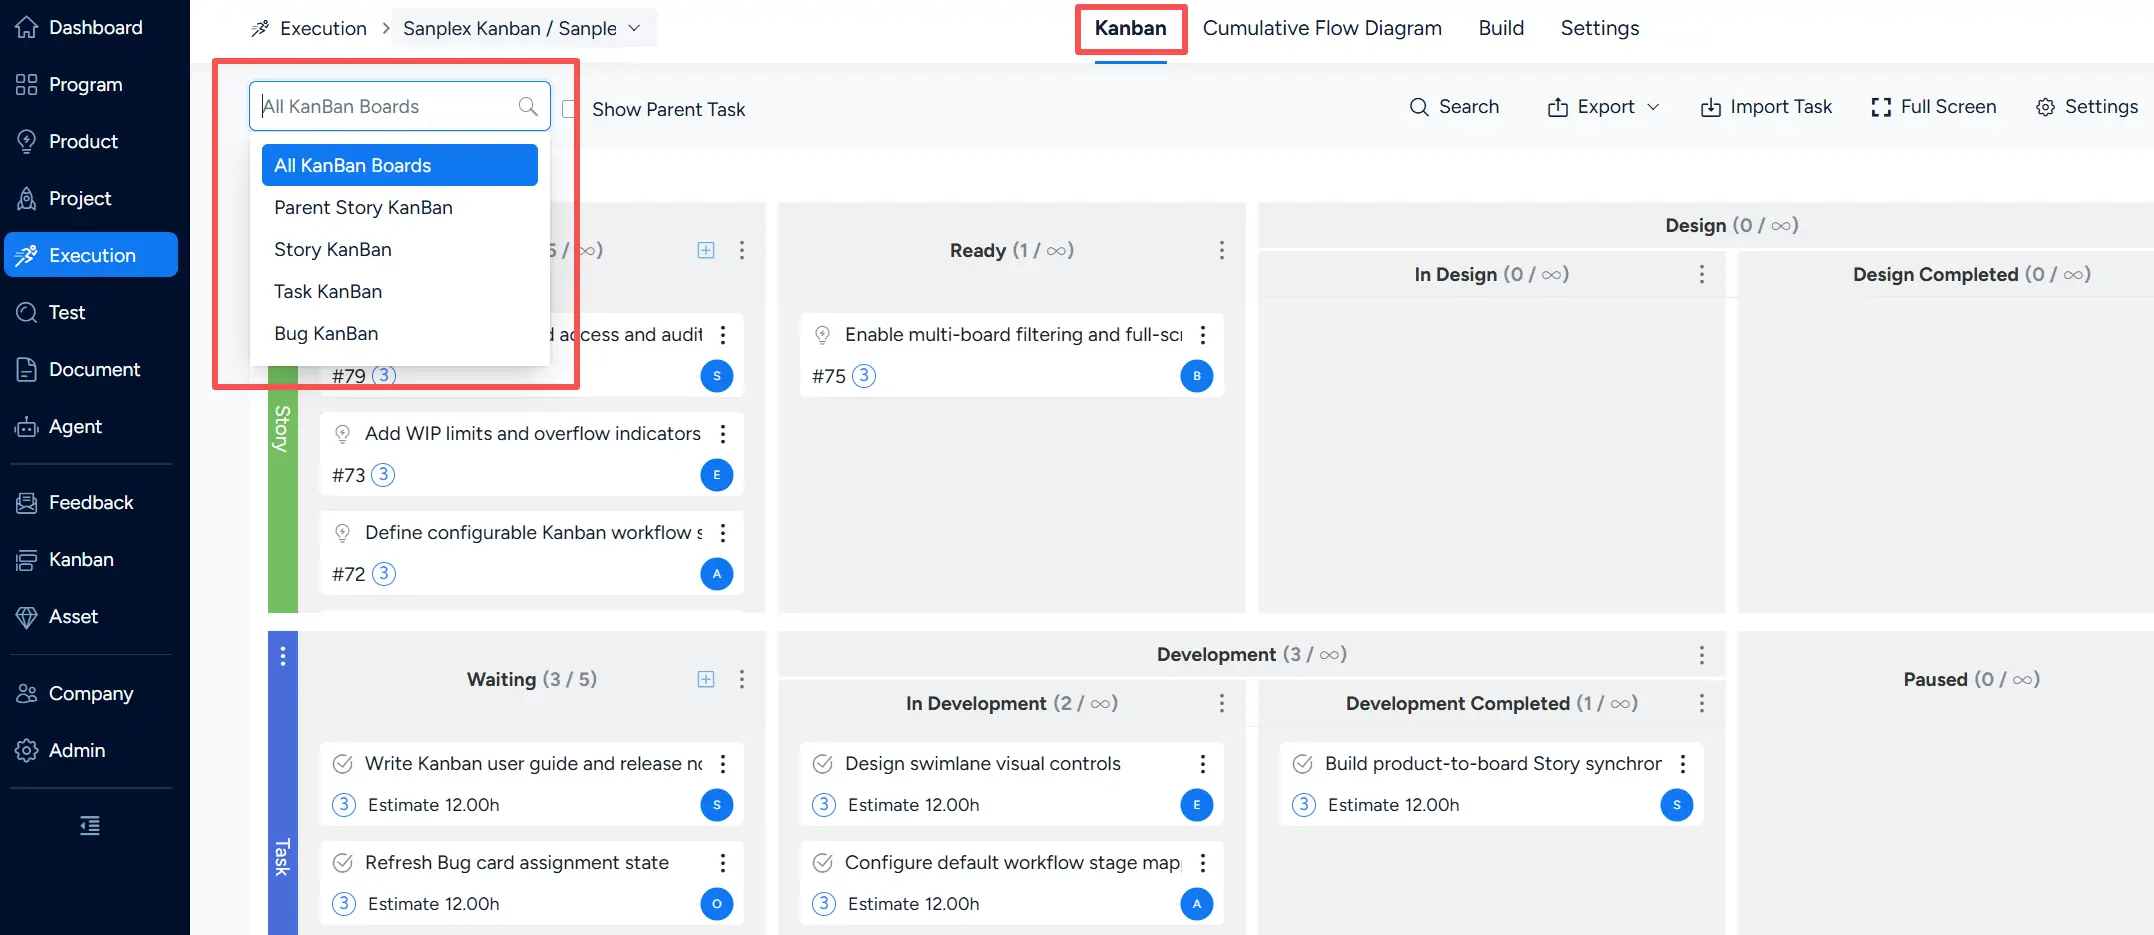
Use the board selector in the upper-left corner to switch among:
- All KanBan Boards
- Parent Story KanBan
- Story KanBan
- Task KanBan
- Bug KanBan
All KanBan Boards displays different work-item types together, while the individual Kanban boards provide focused views for Stories, Tasks, or Bugs.
I. All KanBan Boards
All KanBan Boards provides a combined view of the work items managed within the execution. The following sections use this view to introduce common Kanban operations.
1. Create Stories, Bugs, and Tasks from the Kanban
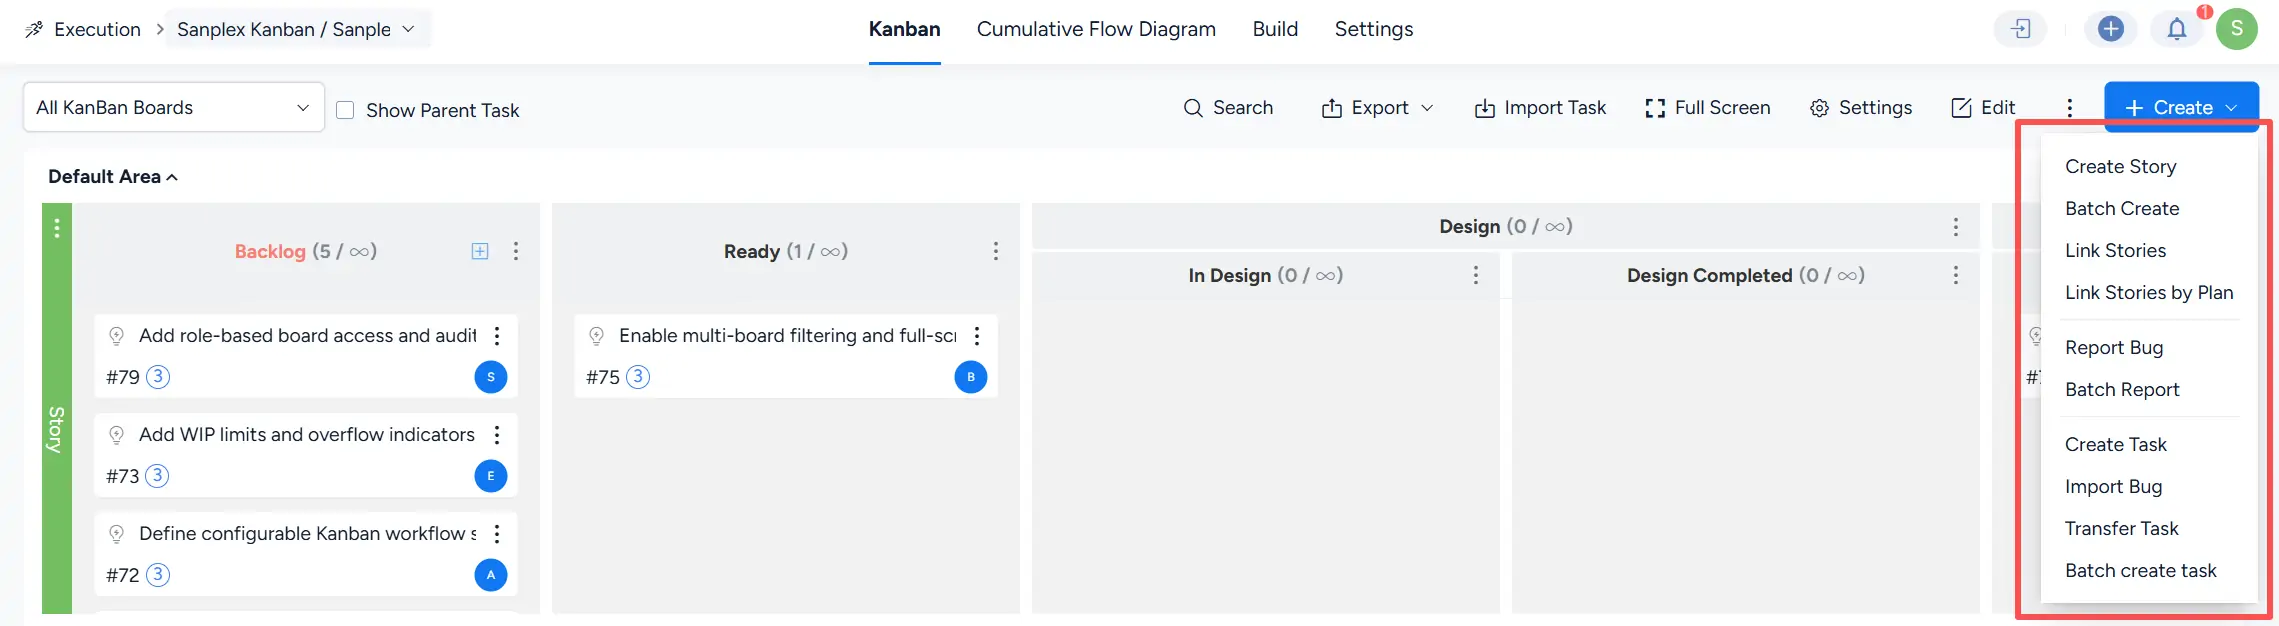
Click Create in the upper-right corner to access creation and linking actions for different work-item types.
The menu includes:
- Stories: Create Story, Batch Create, Link Stories, and Link Stories by Plan
- Bugs: Report Bug and Batch Report
- Tasks: Create Task, Import Bug, Transfer Task, and Batch create task
Items created or linked through these actions are reflected in the corresponding execution views.
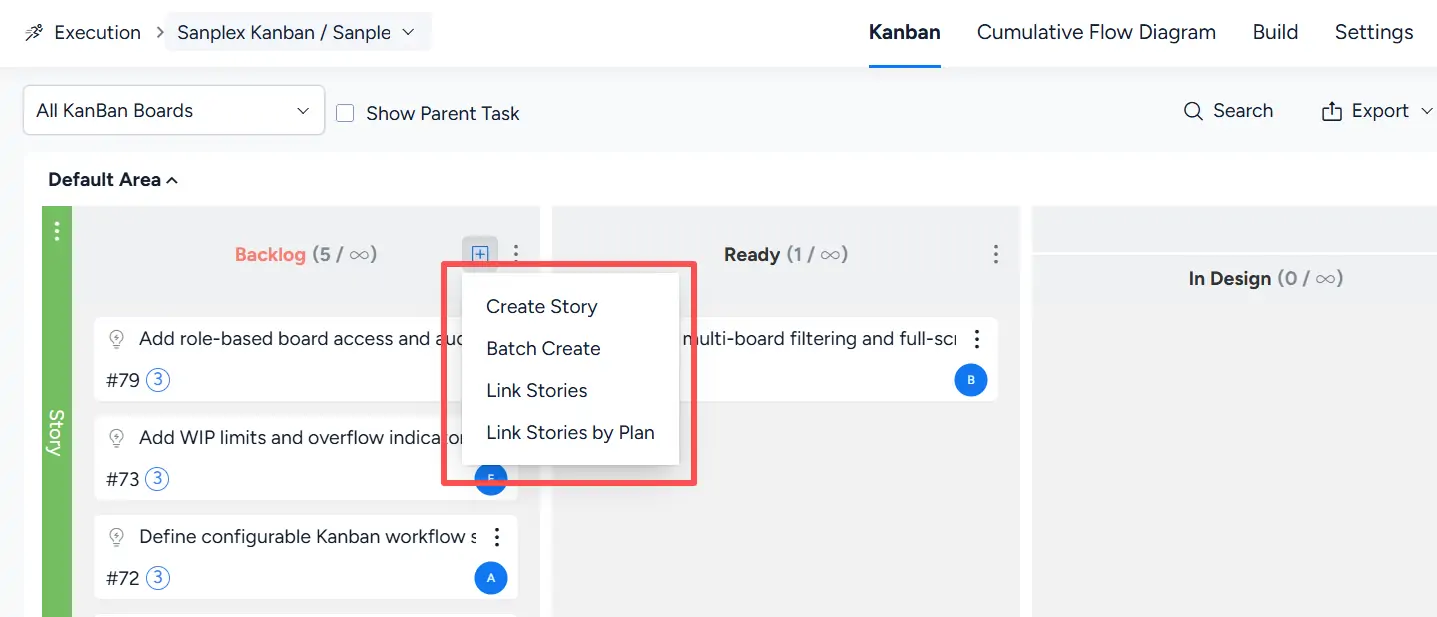
On the Story lane, click the Add (+) button in the Backlog column to access:
- Create Story
- Batch Create
- Link Stories
- Link Stories by Plan
Newly created or linked Stories are added to the Kanban.
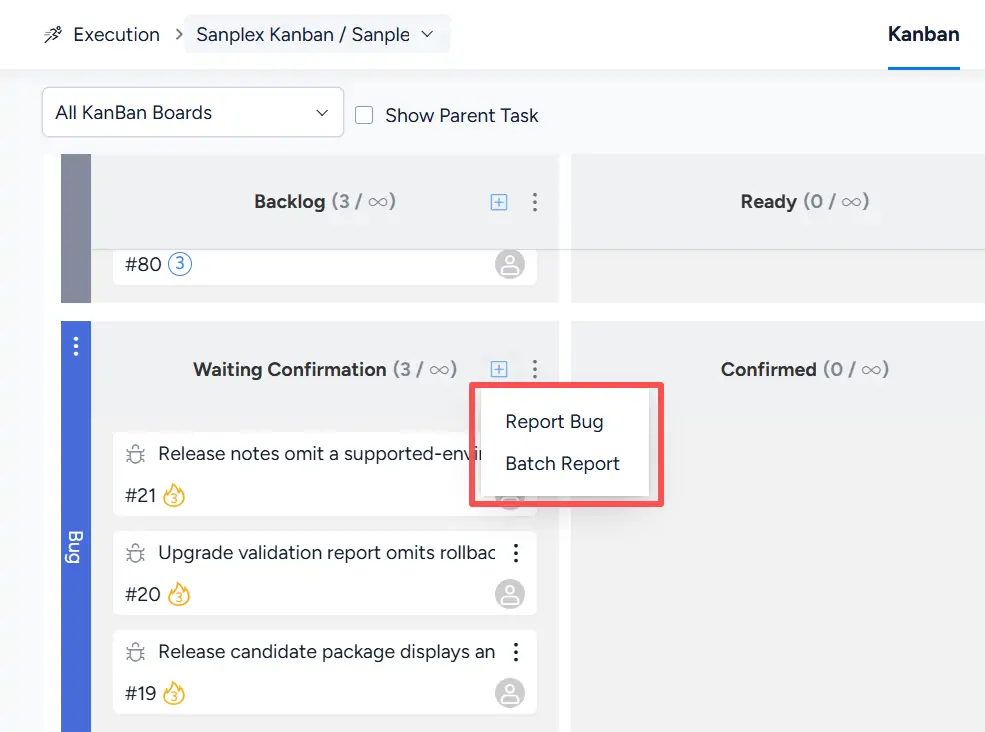
On the Bug lane, click the Add (+) button in Waiting Confirmation to select Report Bug or Batch Report.
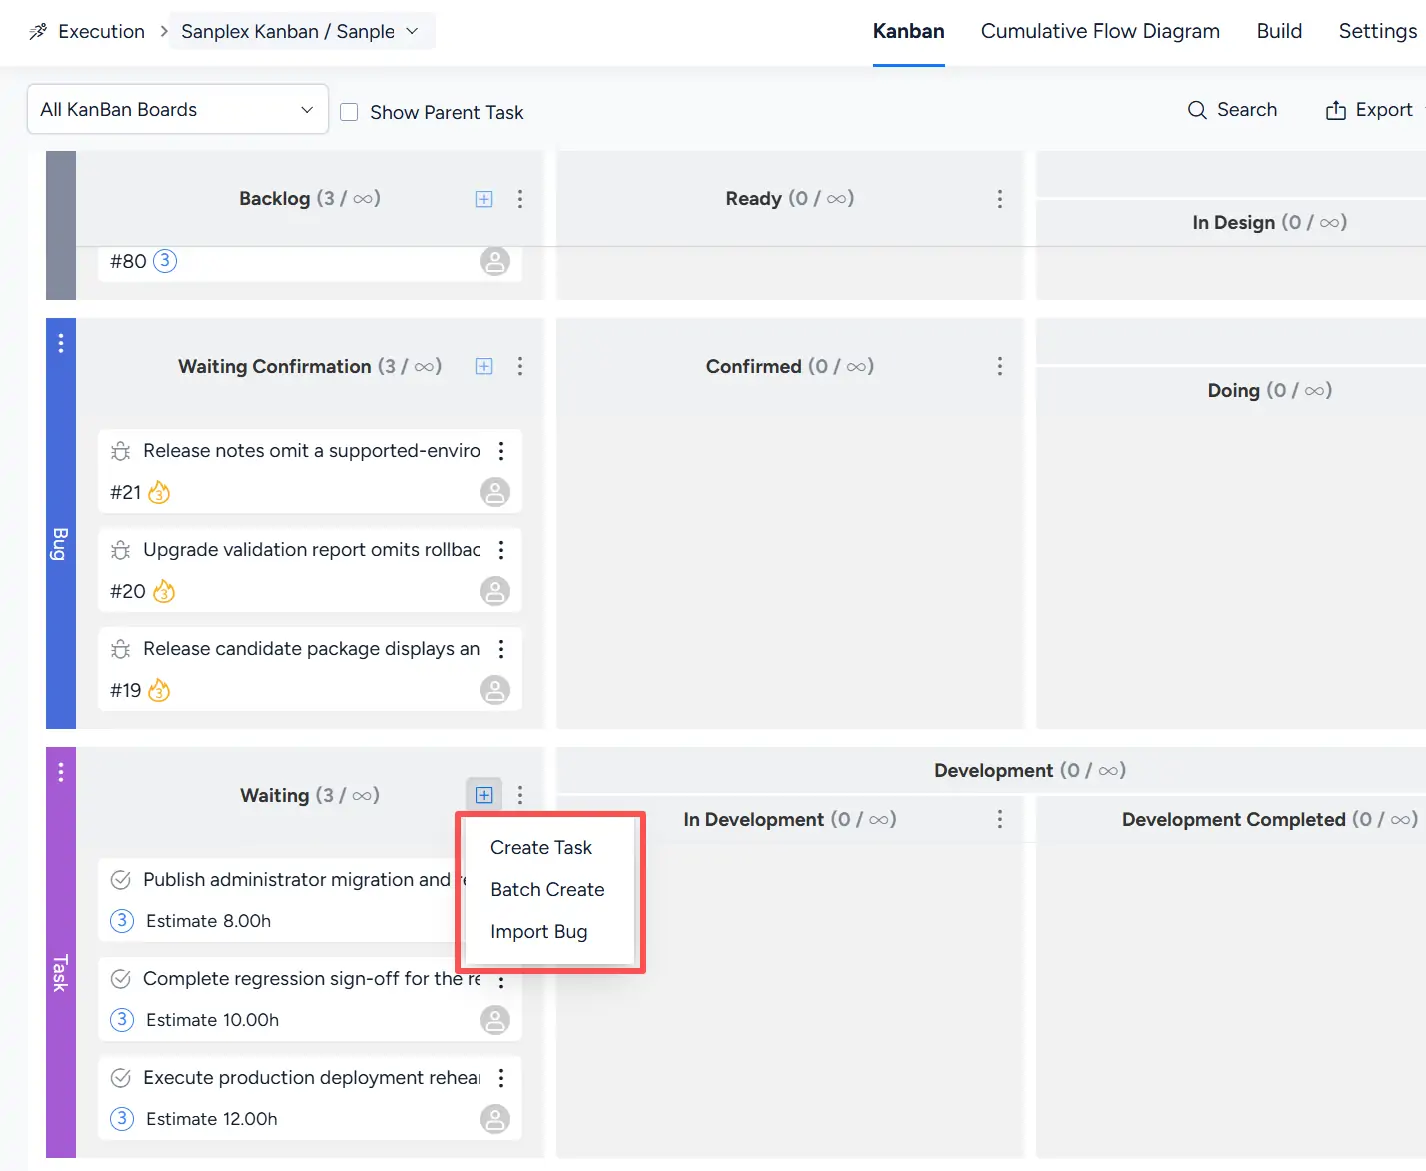
On the Task lane, click the Add (+) button in the Waiting column to select Create Task, Batch Create, or Import Bug.
2. Configure and View the Kanban
The toolbar provides direct access to Full Screen and Settings.
The More (⋯) menu also provides board-level actions including Delay, Suspend, Close, and Delete.

2.1 Kanban Settings
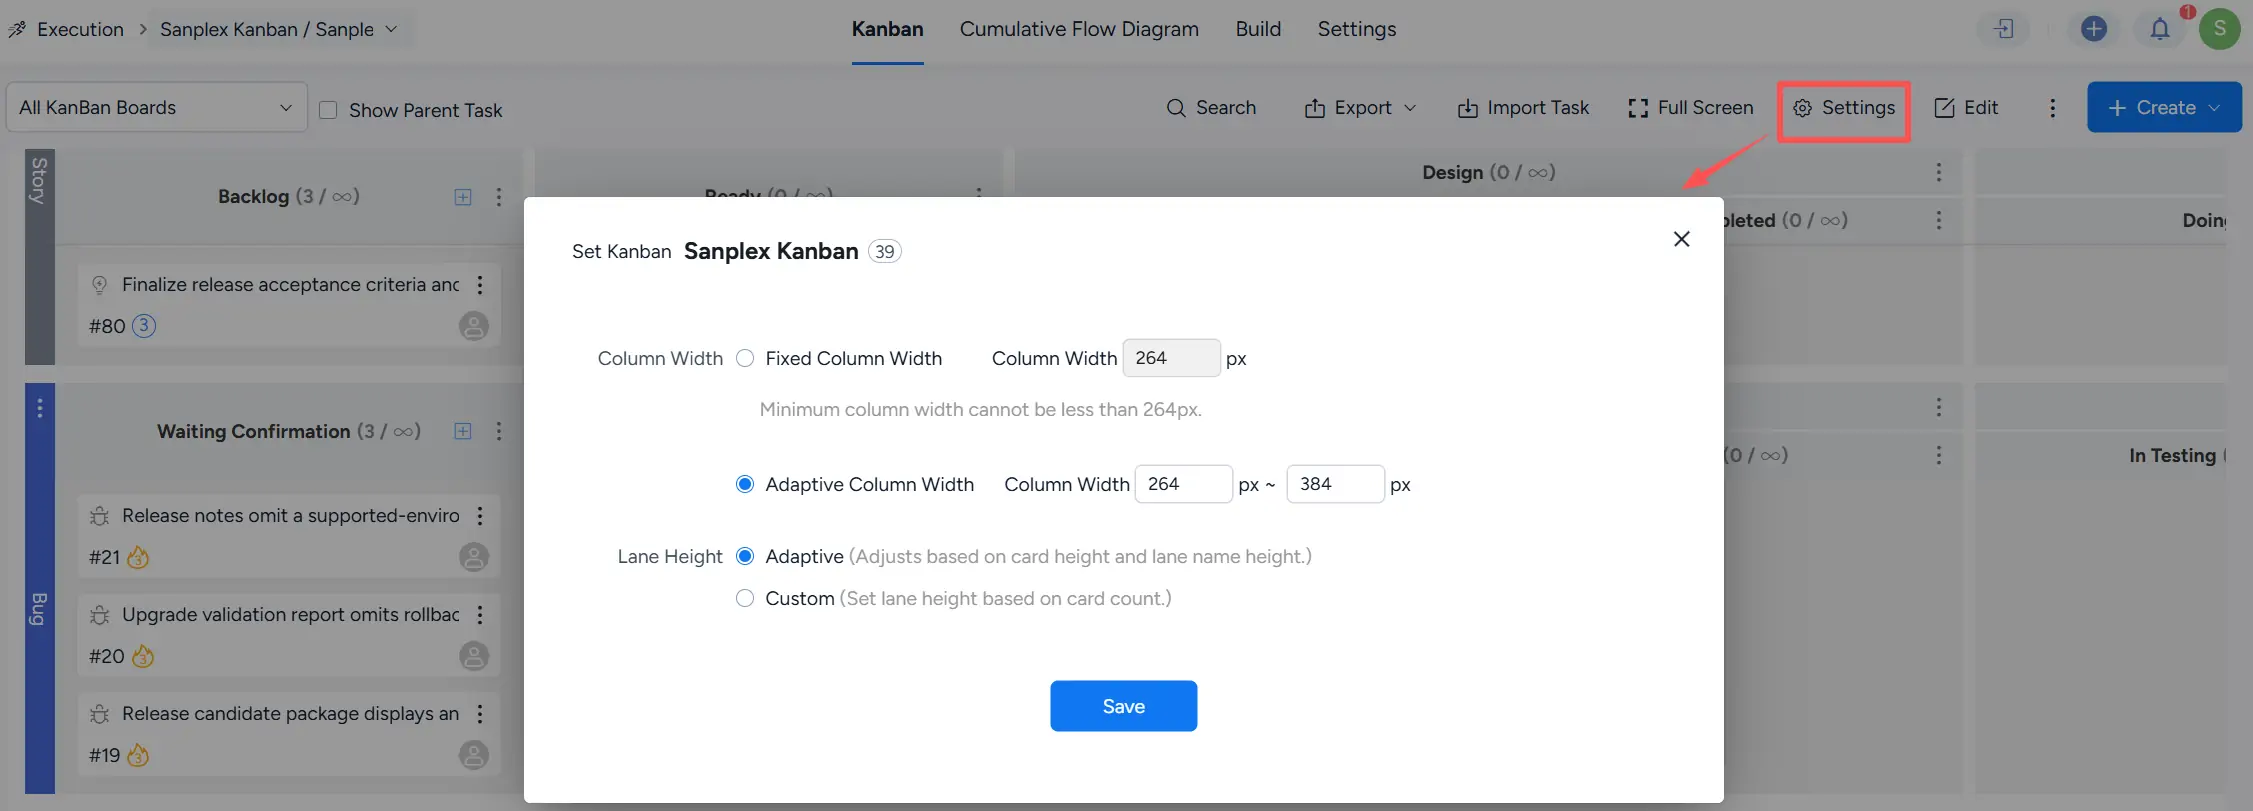
Click Settings to configure the display of the Kanban board.
For Column Width, you can use Fixed Column Width or Adaptive Column Width. For Lane Height, you can select Adaptive or Custom.
2.2 Full-Screen Mode
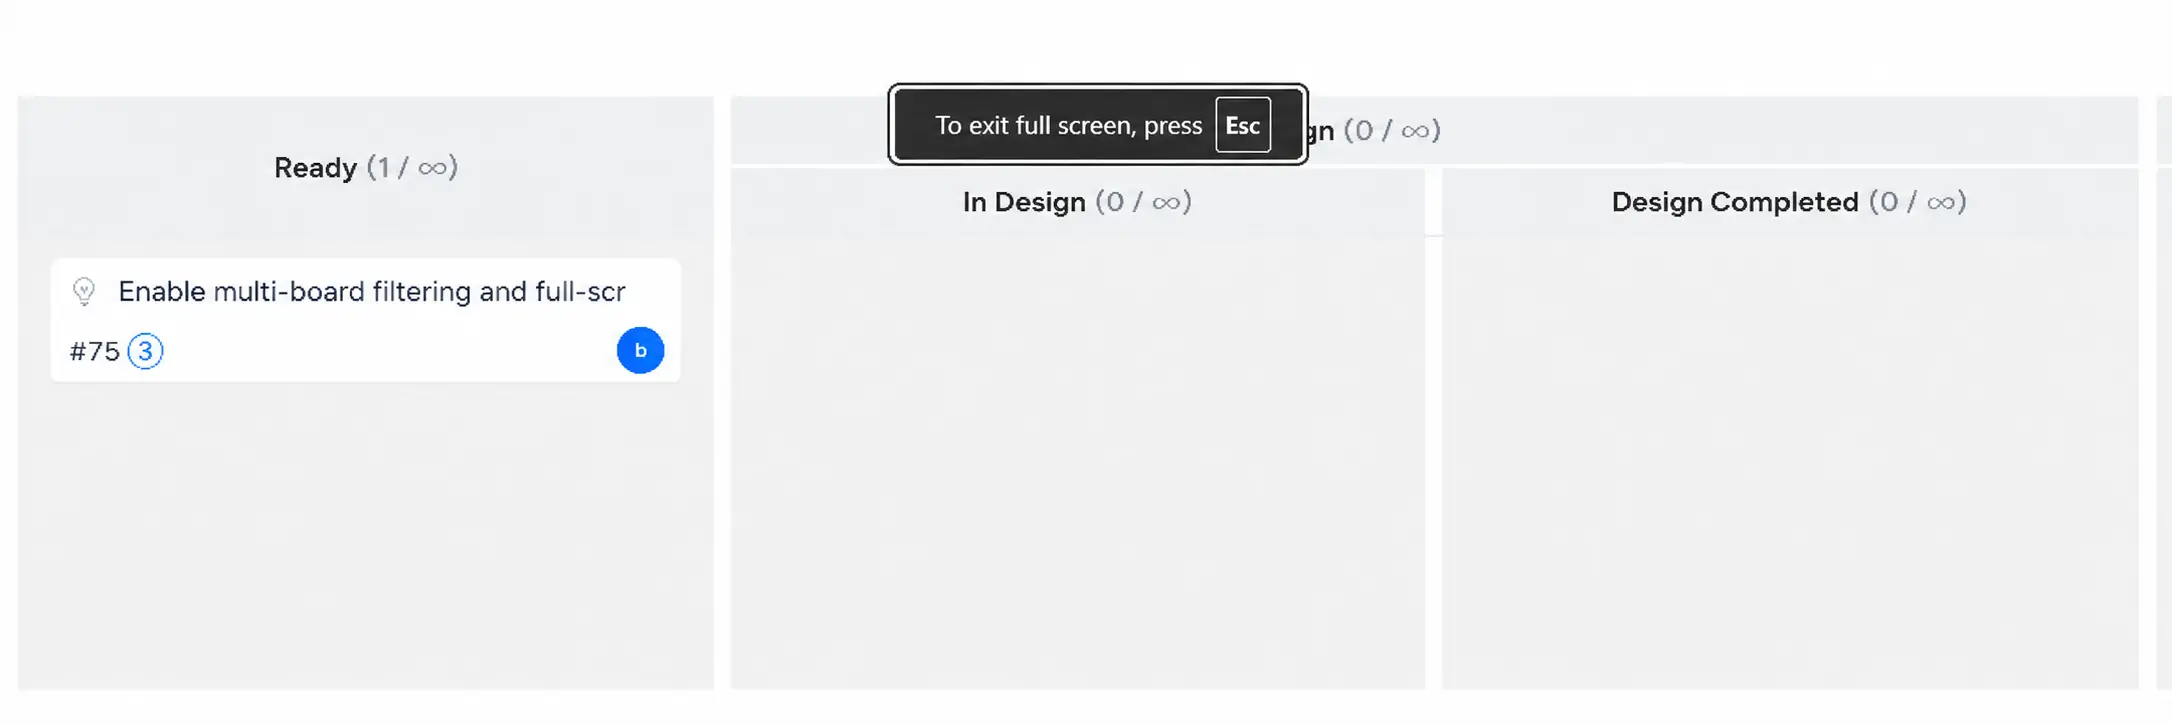
Click Full Screen in the toolbar to display the Kanban board in full-screen mode.
Full-screen mode provides a larger view of the board for reviewing work items and execution progress. Press Esc to exit full-screen mode.
3. Configure Columns and WIP Limits
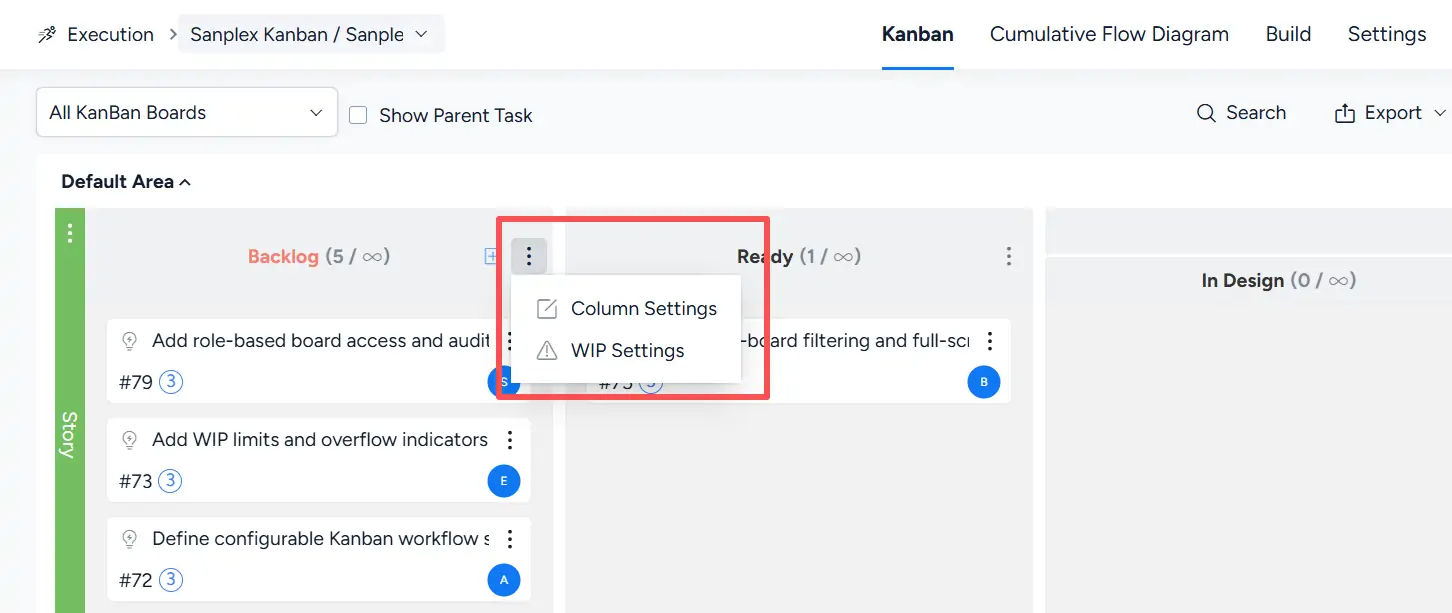
Open the More (⋯) menu for a column to access Column Settings and WIP Settings.
Use WIP Settings to configure a WIP (Work In Progress) limit for a column or sub-column. Select No Limit when no WIP limit is required.
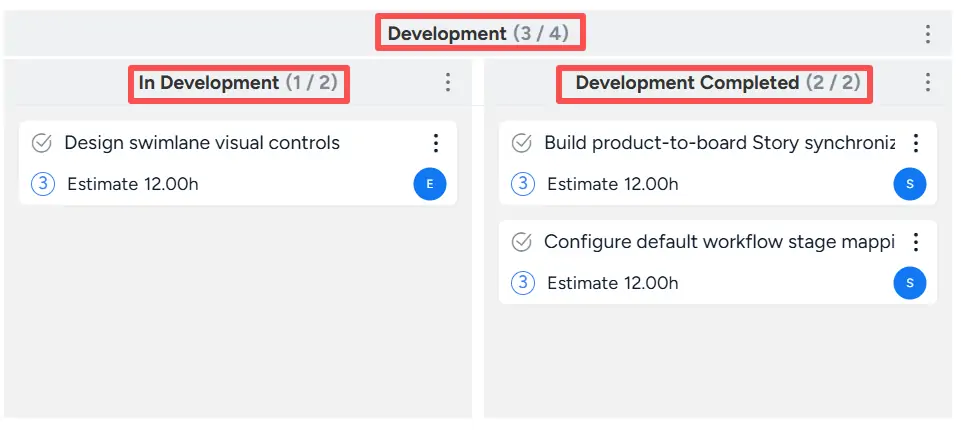
For a parent column with sub-columns, the combined WIP limits of its sub-columns must not exceed the parent column WIP limit.
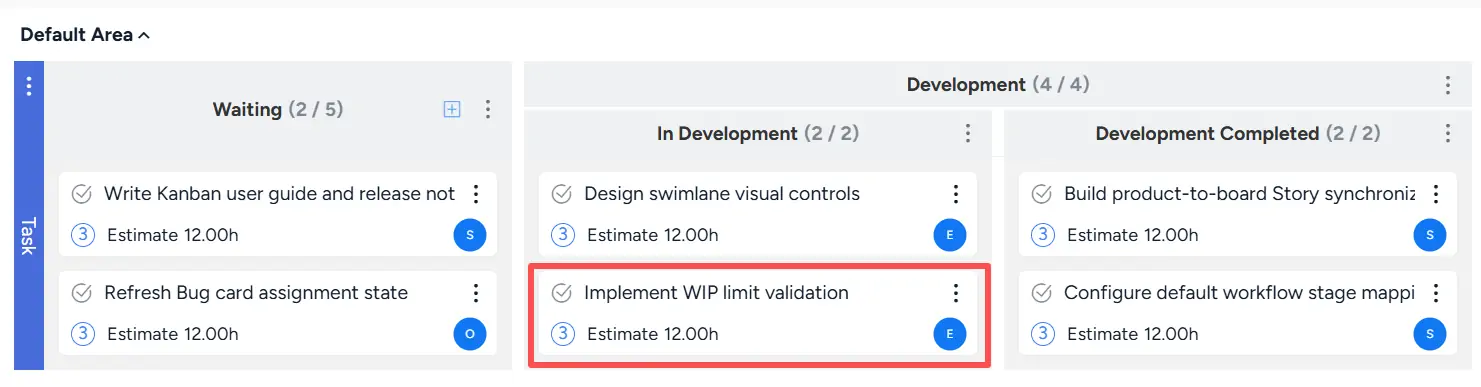
For example, the Development column has a WIP limit of 4, while In Development and Development Completed each have a WIP limit of 2. The combined sub-column limit is therefore 4.
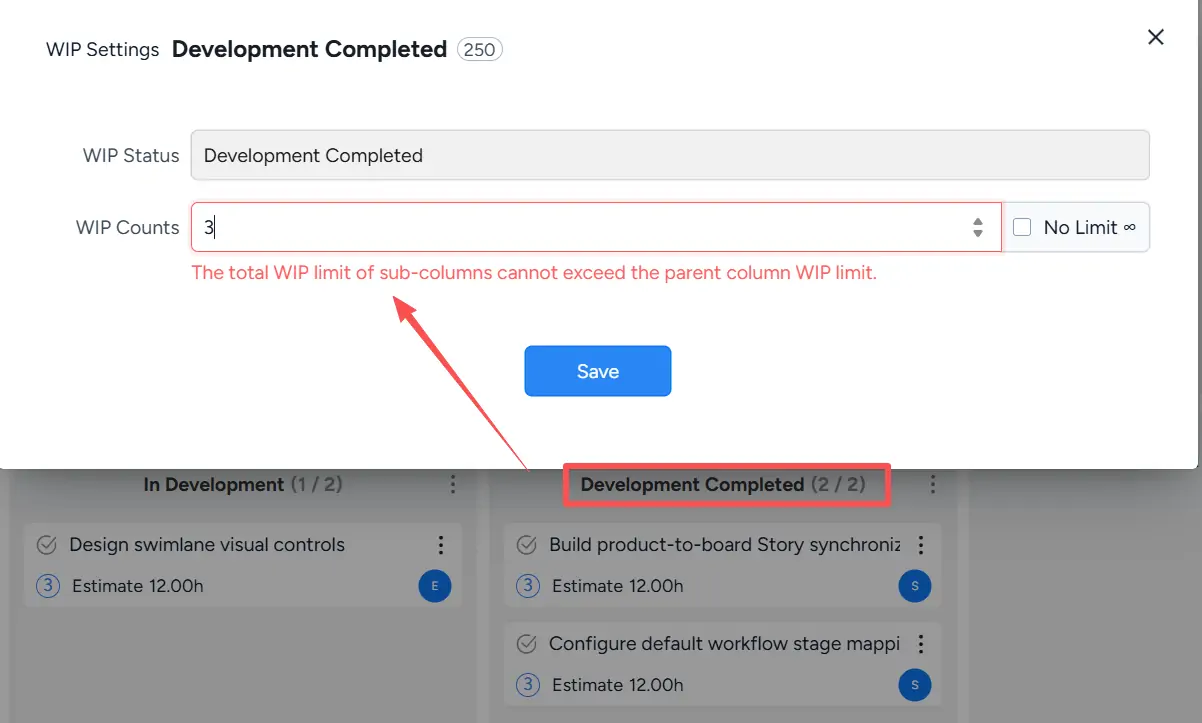
If a change would cause the combined sub-column WIP limits to exceed the parent column limit, Sanplex displays a validation message and prompts you to adjust the limits.
3.1 Edit Lane Name and Color
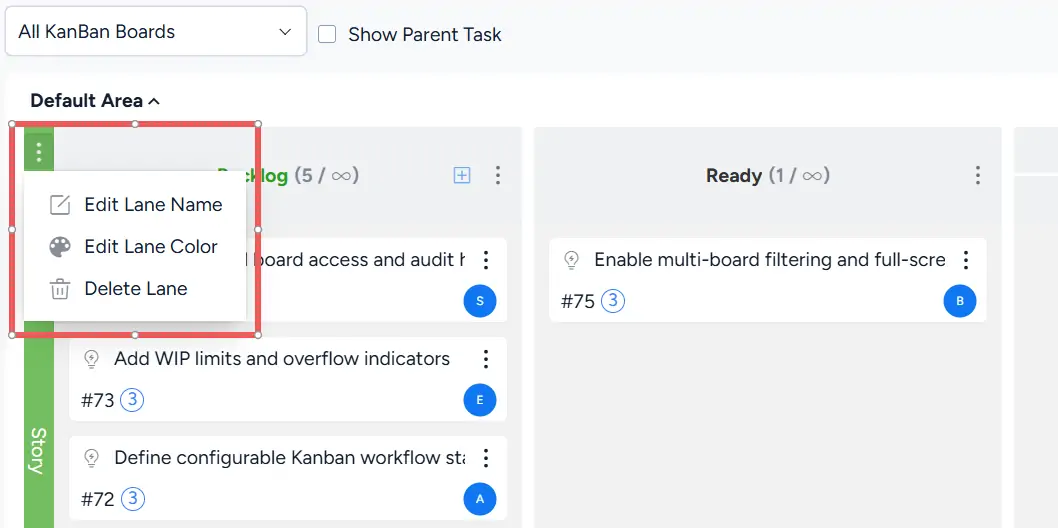
Click the More (⋯) menu for a lane. Select Edit Lane Name to rename the lane or Edit Lane Color to change its color.
The same menu also provides Delete Lane.
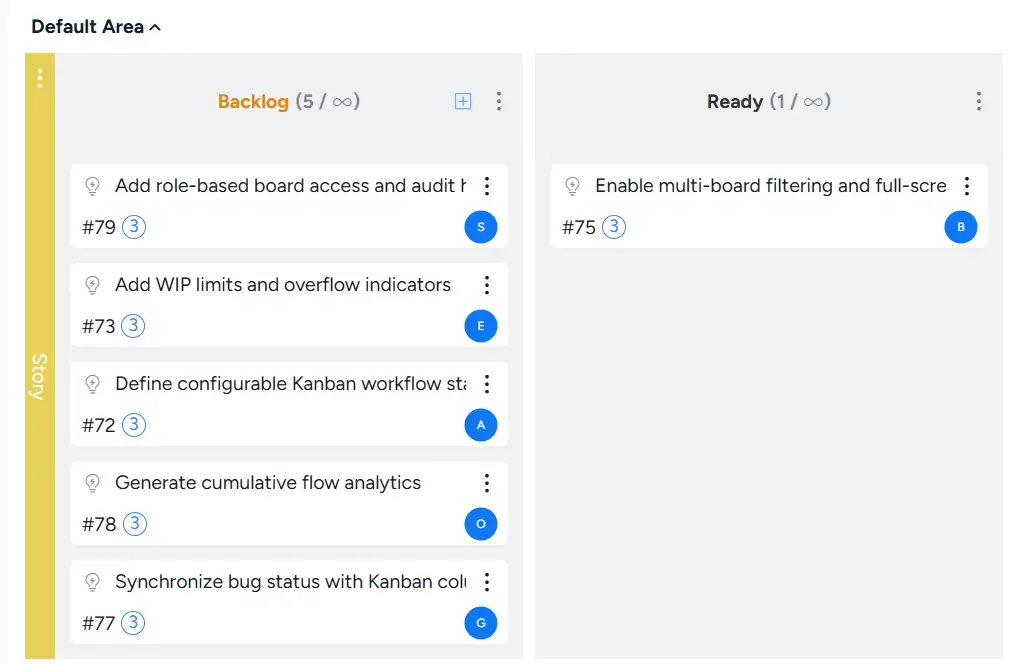
When editing the lane color, select the required color and click Save.
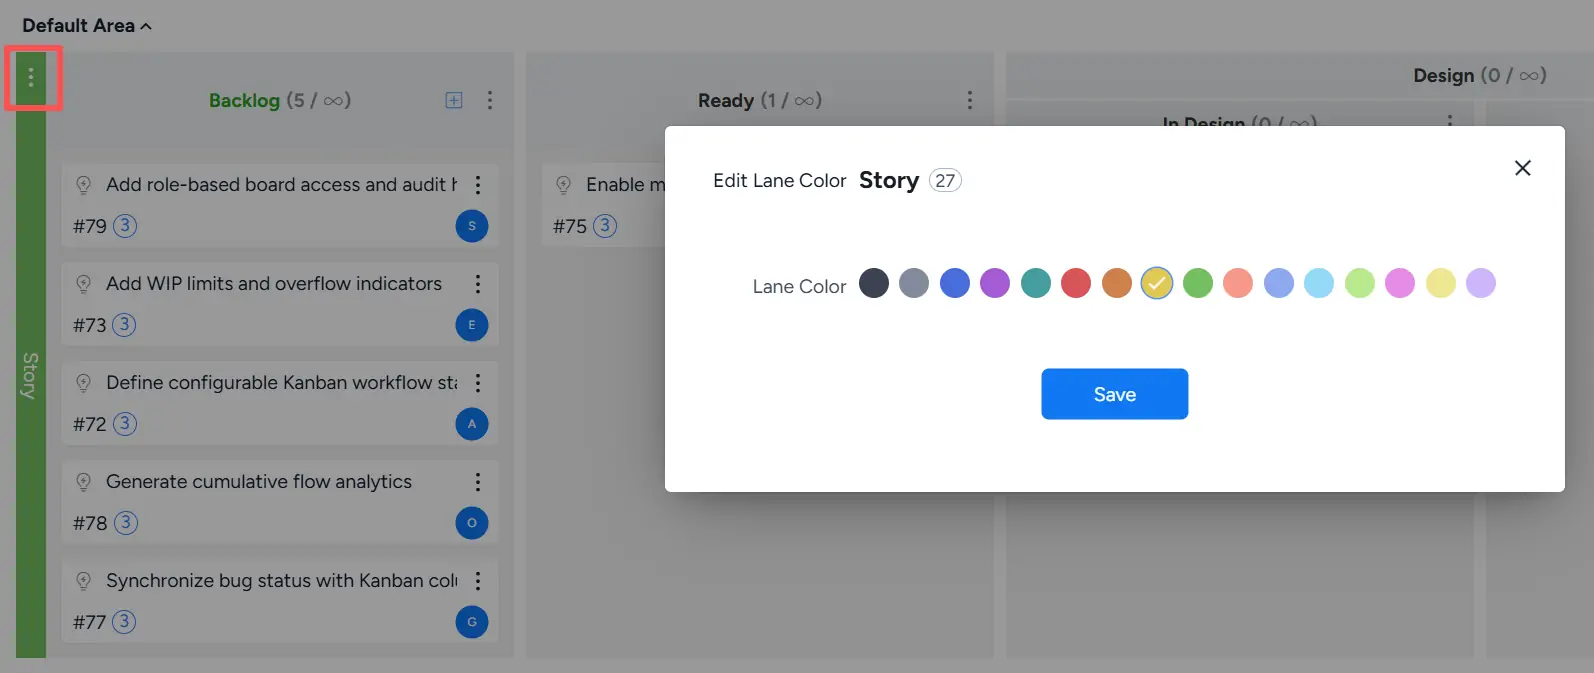
After saving, the selected color is applied to the lane on the Kanban board.
3.2 Set Column WIP Limit
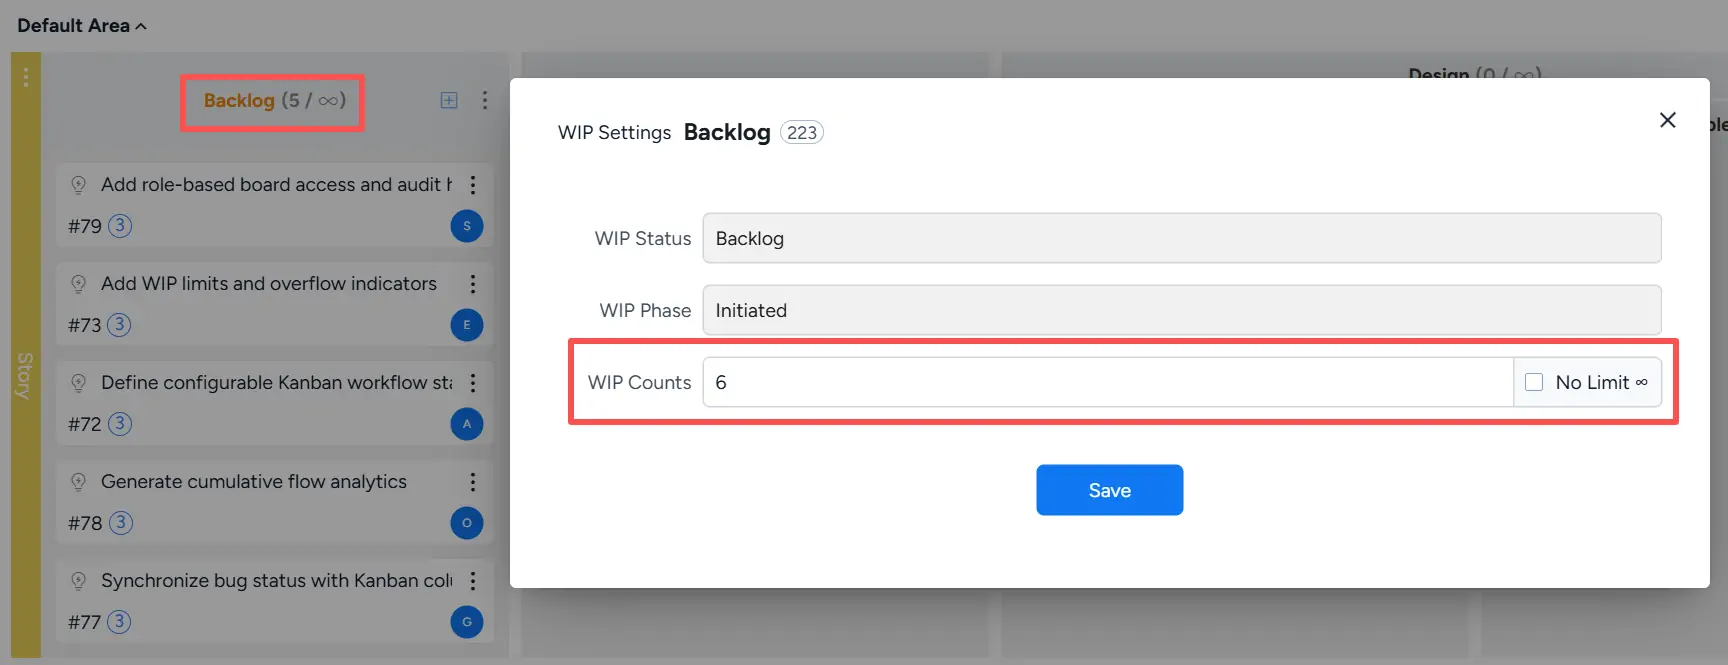
Open WIP Settings for a column and enter the limit in WIP Counts. You can also select No Limit to leave the column unlimited.
For example, the Backlog column can be configured with a WIP limit of 6.
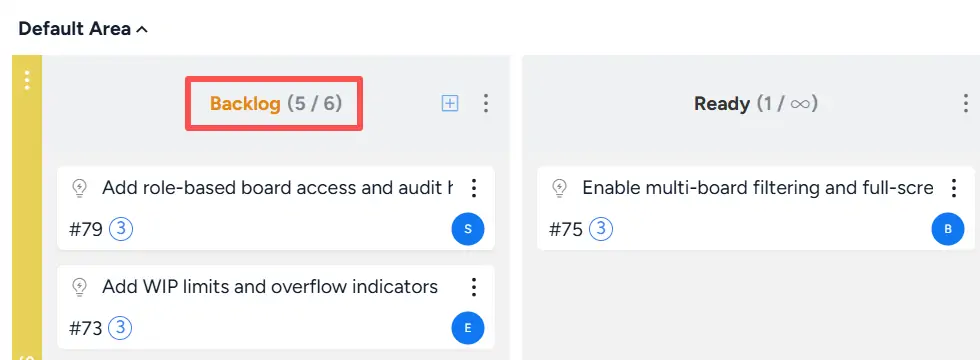
After saving, the column header displays the current item count / WIP limit.
For example, Backlog (5 / 6) indicates that the column currently contains five items and has a WIP limit of six.
4. Import and Export Tasks
Sanplex provides task import and export functions directly from the Kanban toolbar.
Click Export to select:
- Export Task Data to export task data.
- Export Task Template to obtain the template used for preparing task data for import.
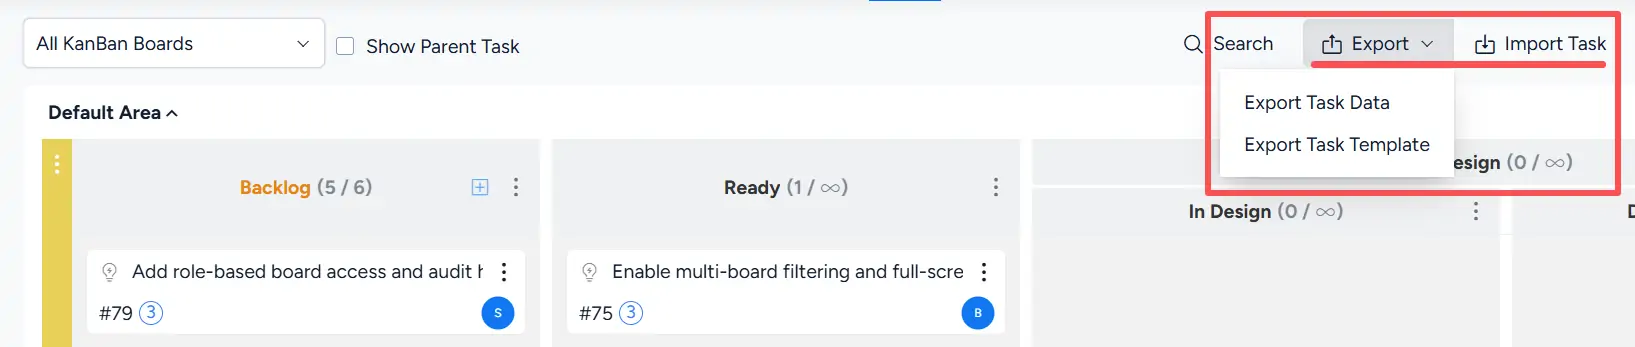
To import tasks, click Import Task. In the Import Excel dialog, select the completed import file and click Import.
For bulk task imports, export the task template first, enter the task data according to the template format, and then import the completed file.
The Create menu also provides Import Bug and Transfer Task as additional ways to bring work into the Task Kanban.
5. Assign Stories, Bugs, and Tasks on the Kanban
Work items can be assigned directly from the Kanban.
Cards without an assignee display a gray assignee avatar. Hovering over the avatar displays the No Assigned label.
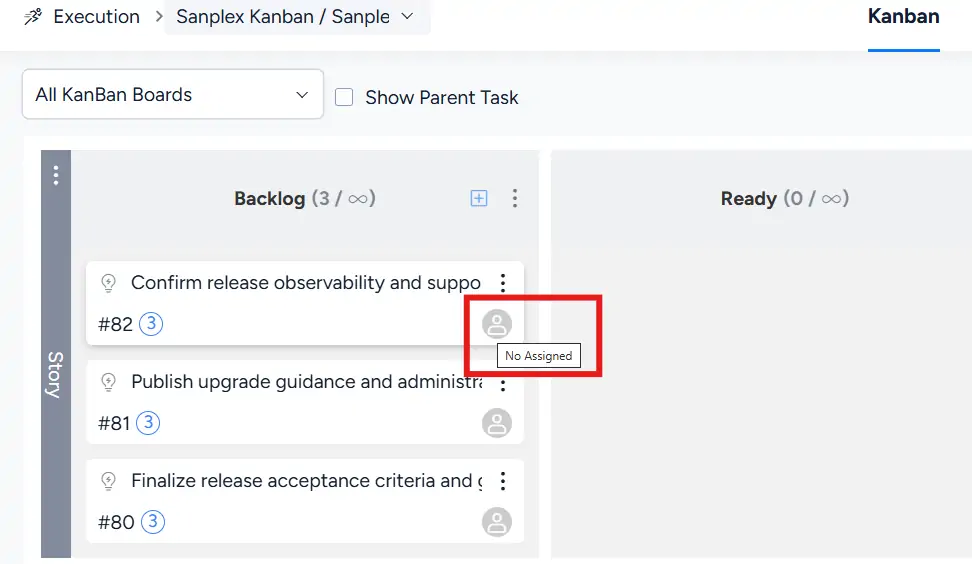
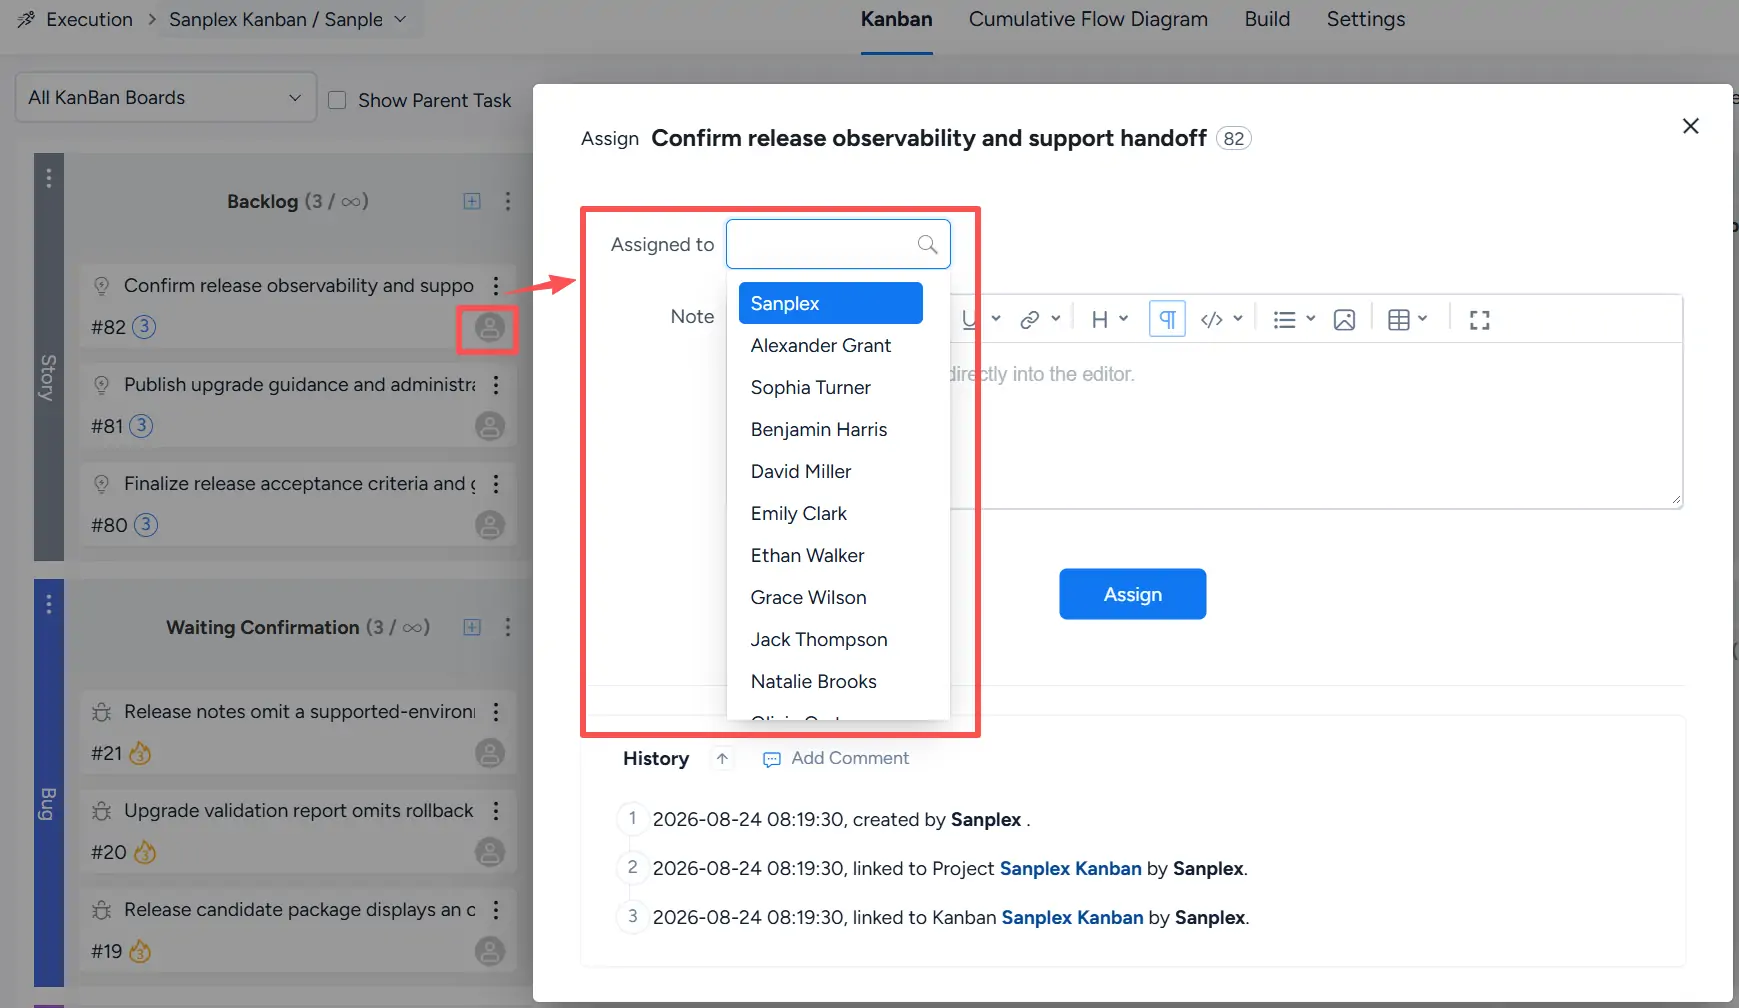
Click the assignee avatar to open the Assign dialog. Select a user in Assigned to, optionally add a note, and click Assign.
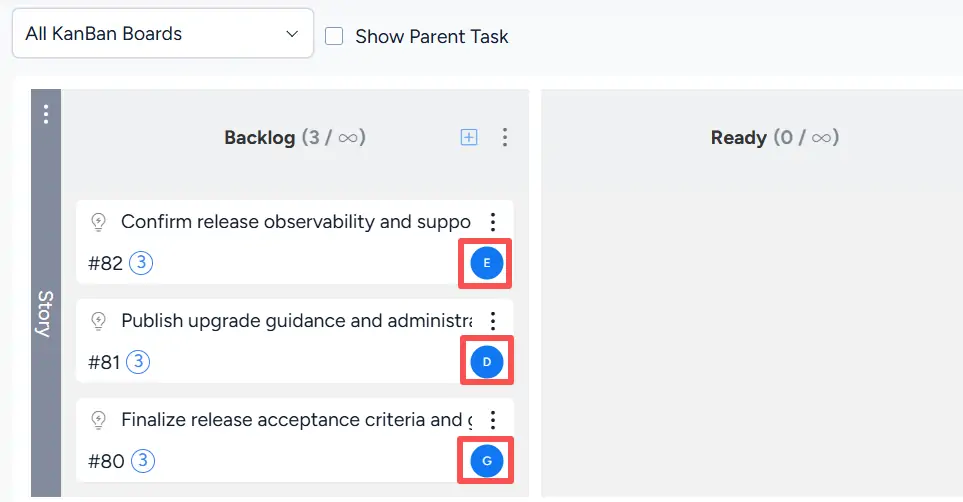
After assignment, the card displays an avatar representing the current assignee.
II. Story KanBan
Select Story KanBan from the board selector to focus on Stories in the current execution.
The grouping selector provides the following options:
- Default Group
- Story Priority
- Story Category
- Story Module
- Story Source
- Assignee
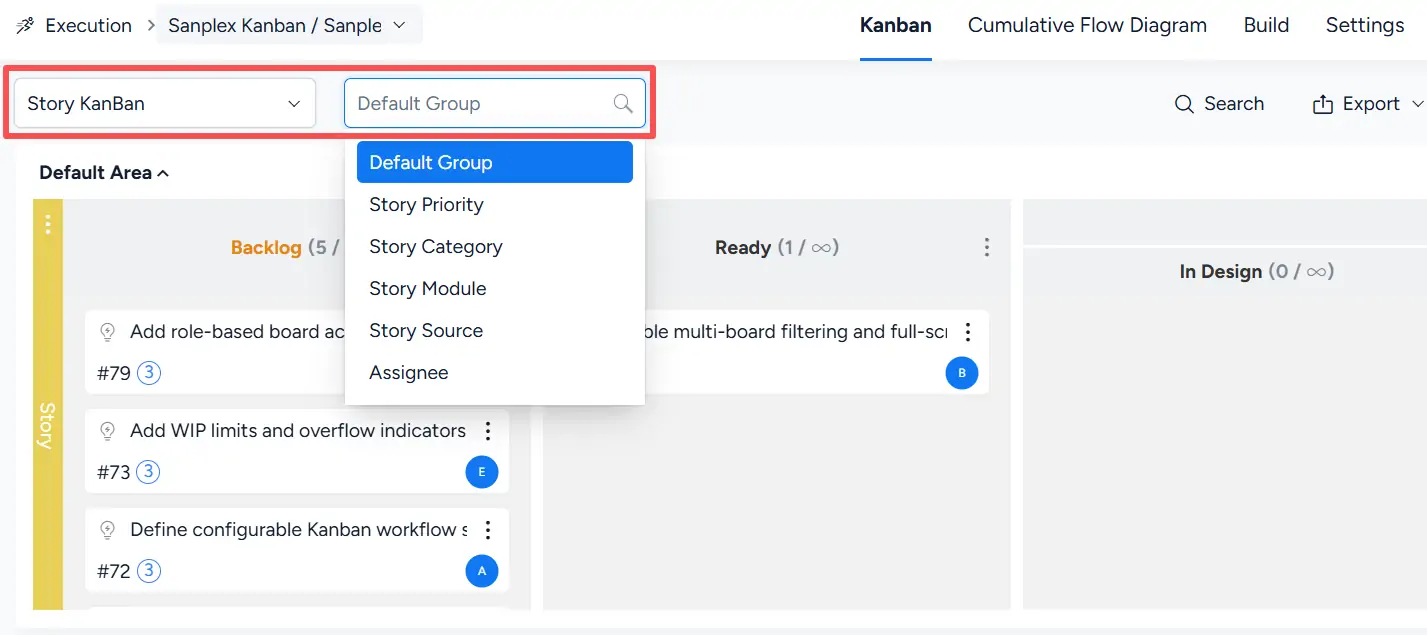
Use these grouping options to organize Story cards according to the information most relevant to the current review or planning activity.
III. Bug KanBan
Select Bug KanBan from the board selector to focus on Bugs associated with the execution.
Available grouping options include:
- Default Group
- Bug Priority
- Bug Severity
- Bug Module
- Bug Type
- Assignee
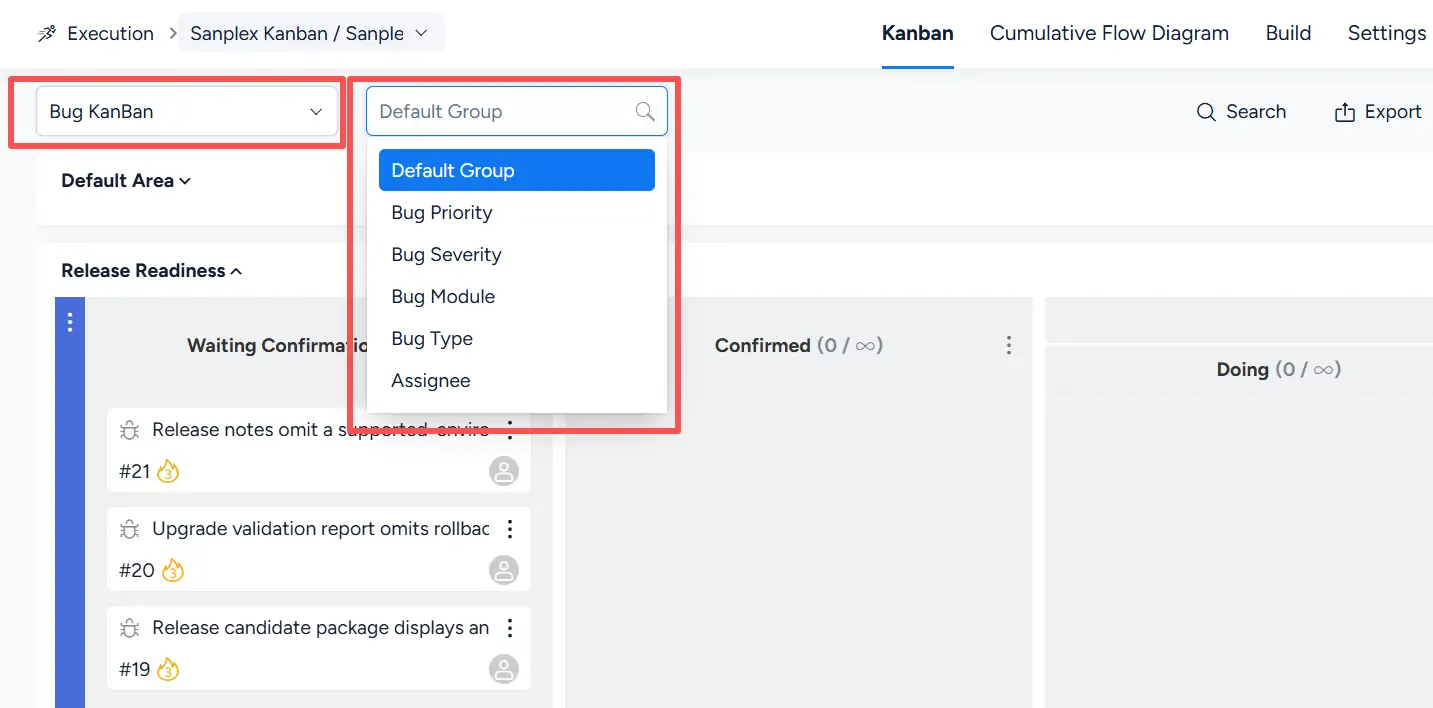
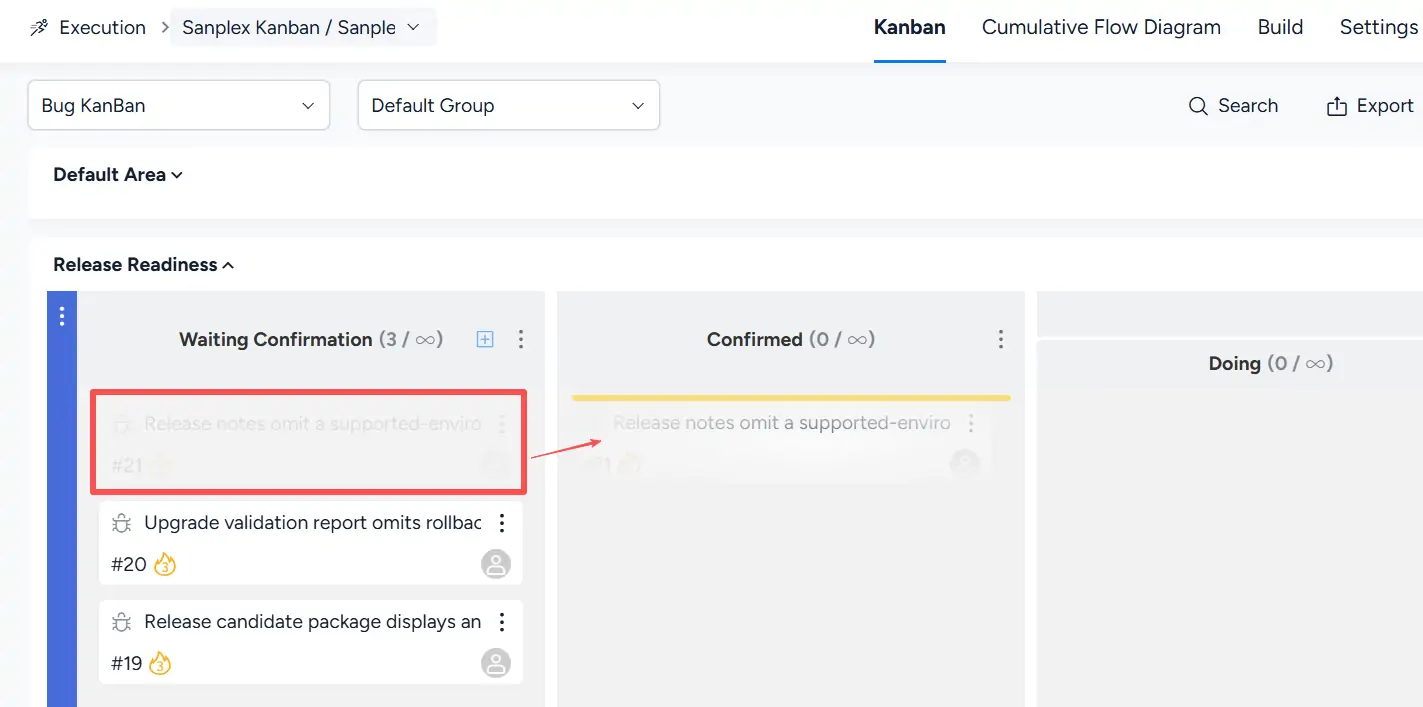
Bug cards can be moved between available workflow columns by drag-and-drop.
For example, a Bug in Waiting Confirmation can be dragged to Confirmed. During the drag operation, the target position is indicated on the board.
IV. Task KanBan
Select Task KanBan from the board selector to focus on Tasks associated with the execution.
The grouping selector provides:
- Default Group
- Task Priority
- Task Type
- Task Module
- Assignee
- Story
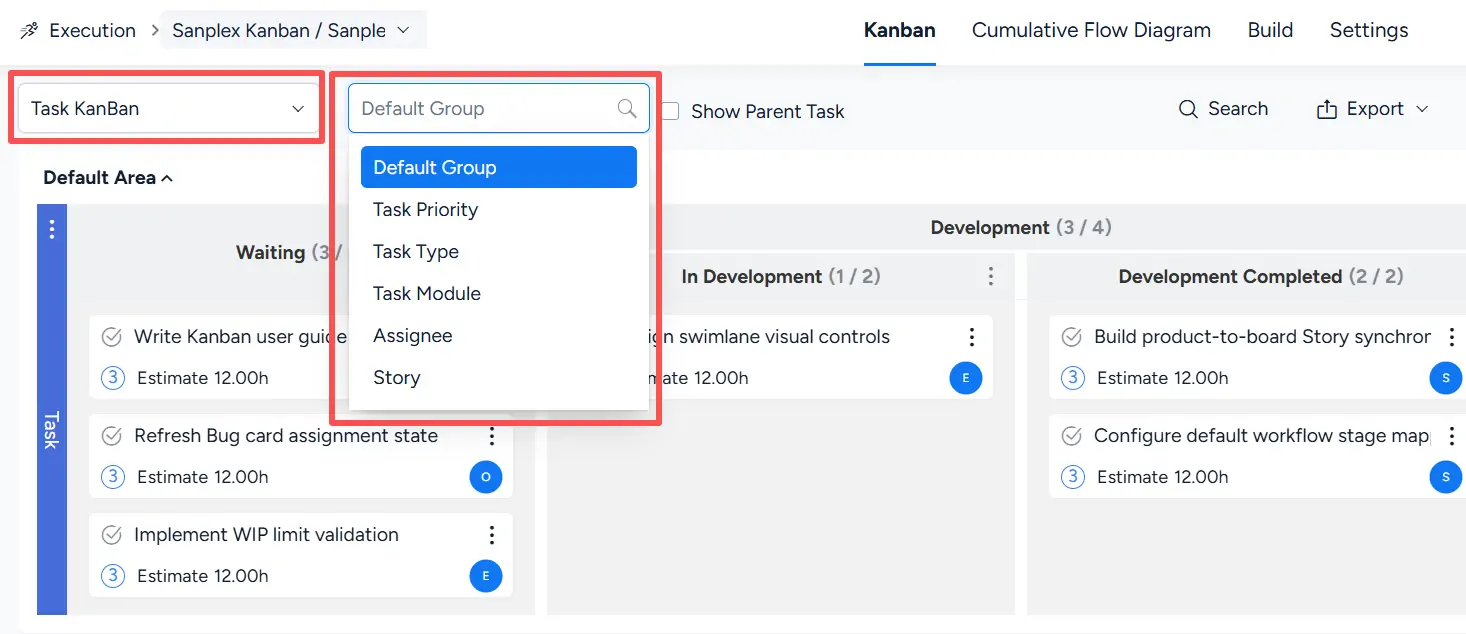
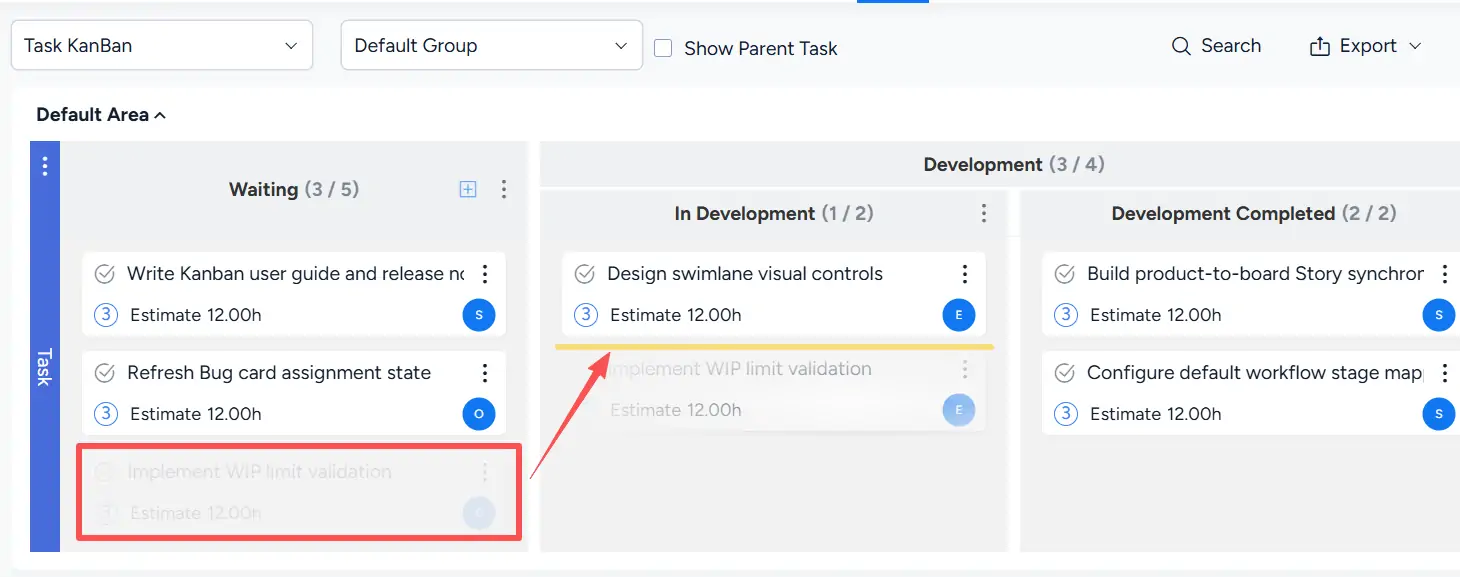
Task cards can be moved between workflow columns by drag-and-drop.
When a task is dragged from Waiting to the In Development sub-column, Sanplex displays a placement indicator at the target location.
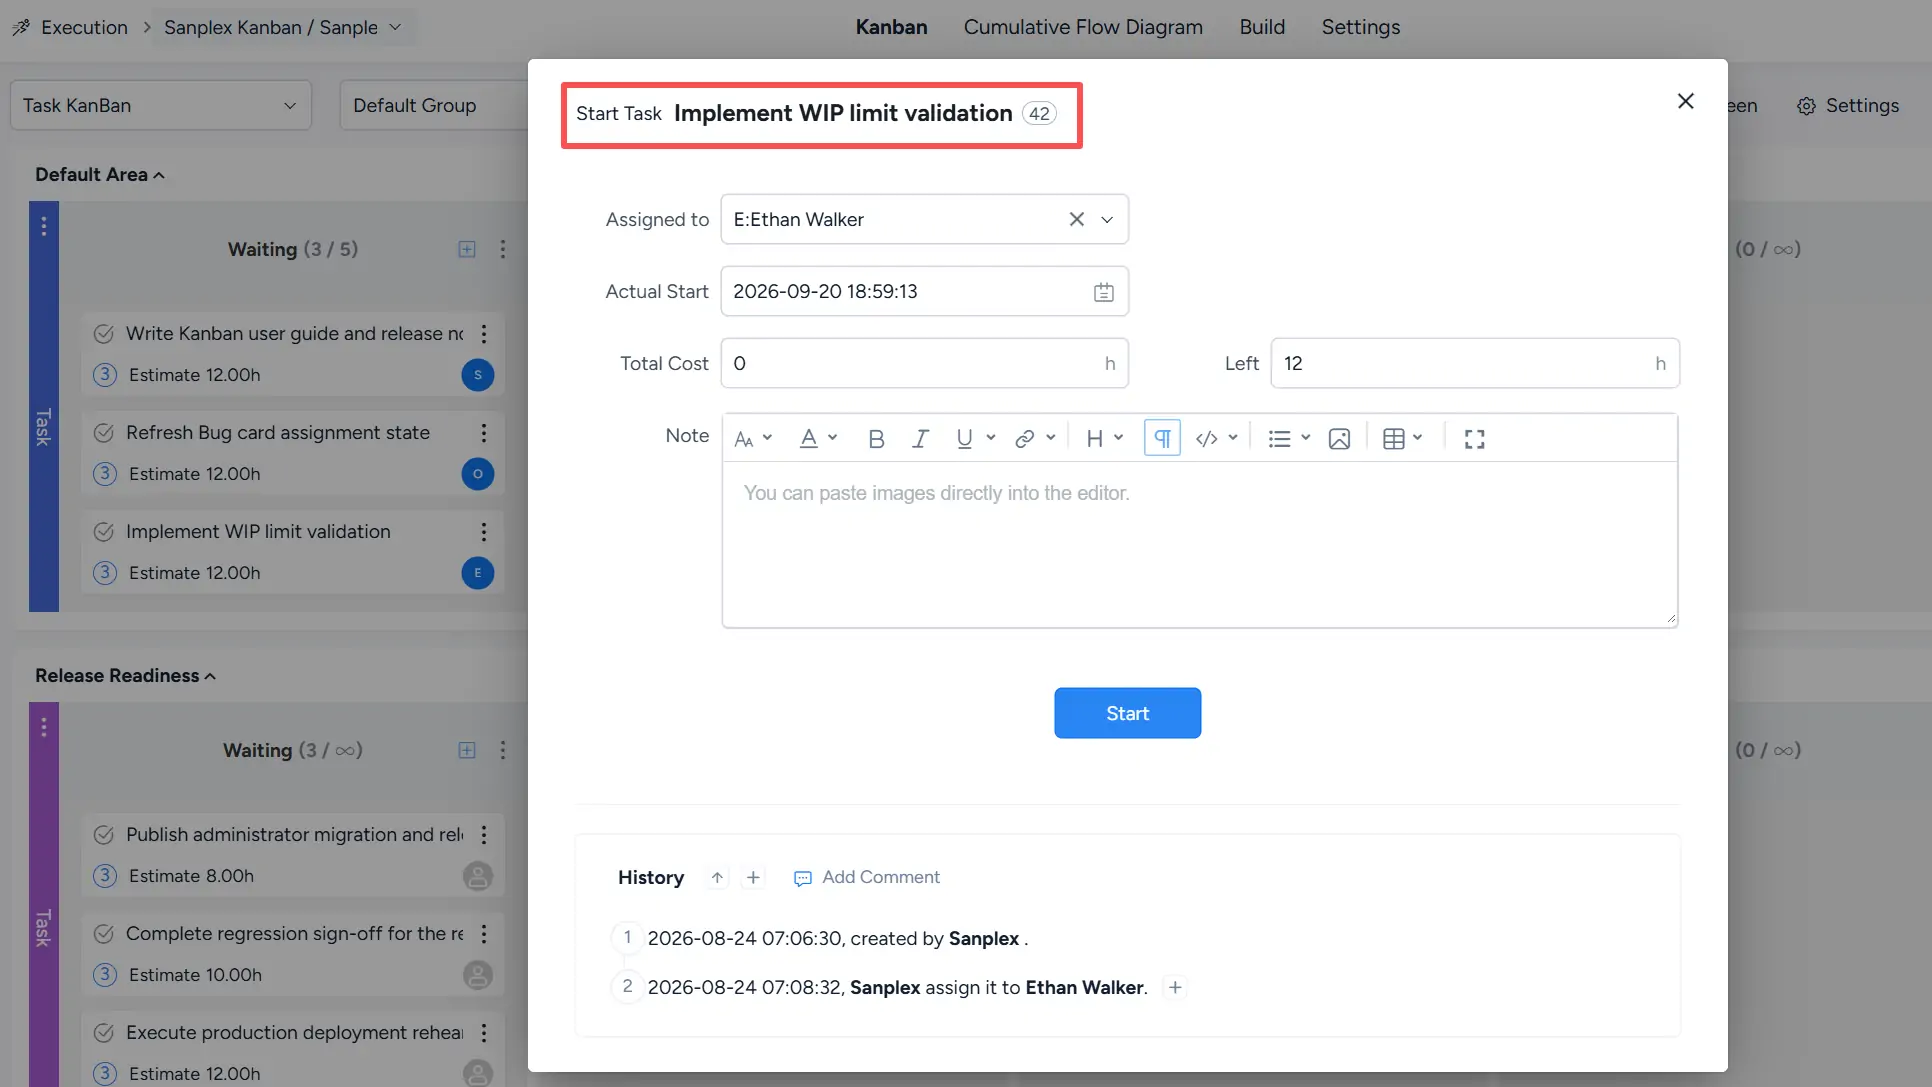
After the task is dropped into In Development, the Start Task dialog opens.
Review or update Assigned to, Actual Start, Total Cost, Left, and Note, then click Start.
After the task is started, it appears in In Development, and the WIP counts displayed in the relevant columns are updated accordingly.