

Catalog
Sanplex supports multi-branch and multi-platform management for Products, with the following key capabilities:
- Multi-branch and multi-platform management supports Products with different delivery structures. A Project or Execution can be linked to a specific branch or platform of a Product.
- Branches and platforms can be managed independently and created as needed at different stages of the Product lifecycle.
- Branches and platforms support merge operations, allowing completed branches or platforms to be merged into the mainline or another branch/platform.
- Except for the mainline, branches and platforms are managed independently to keep their related data separate.
The following examples use a multi-branch Product to explain these capabilities in detail.
I. Maintain Branches for a Multi-Branch Product
1. Set the Product as a multi-branch or multi-platform Product
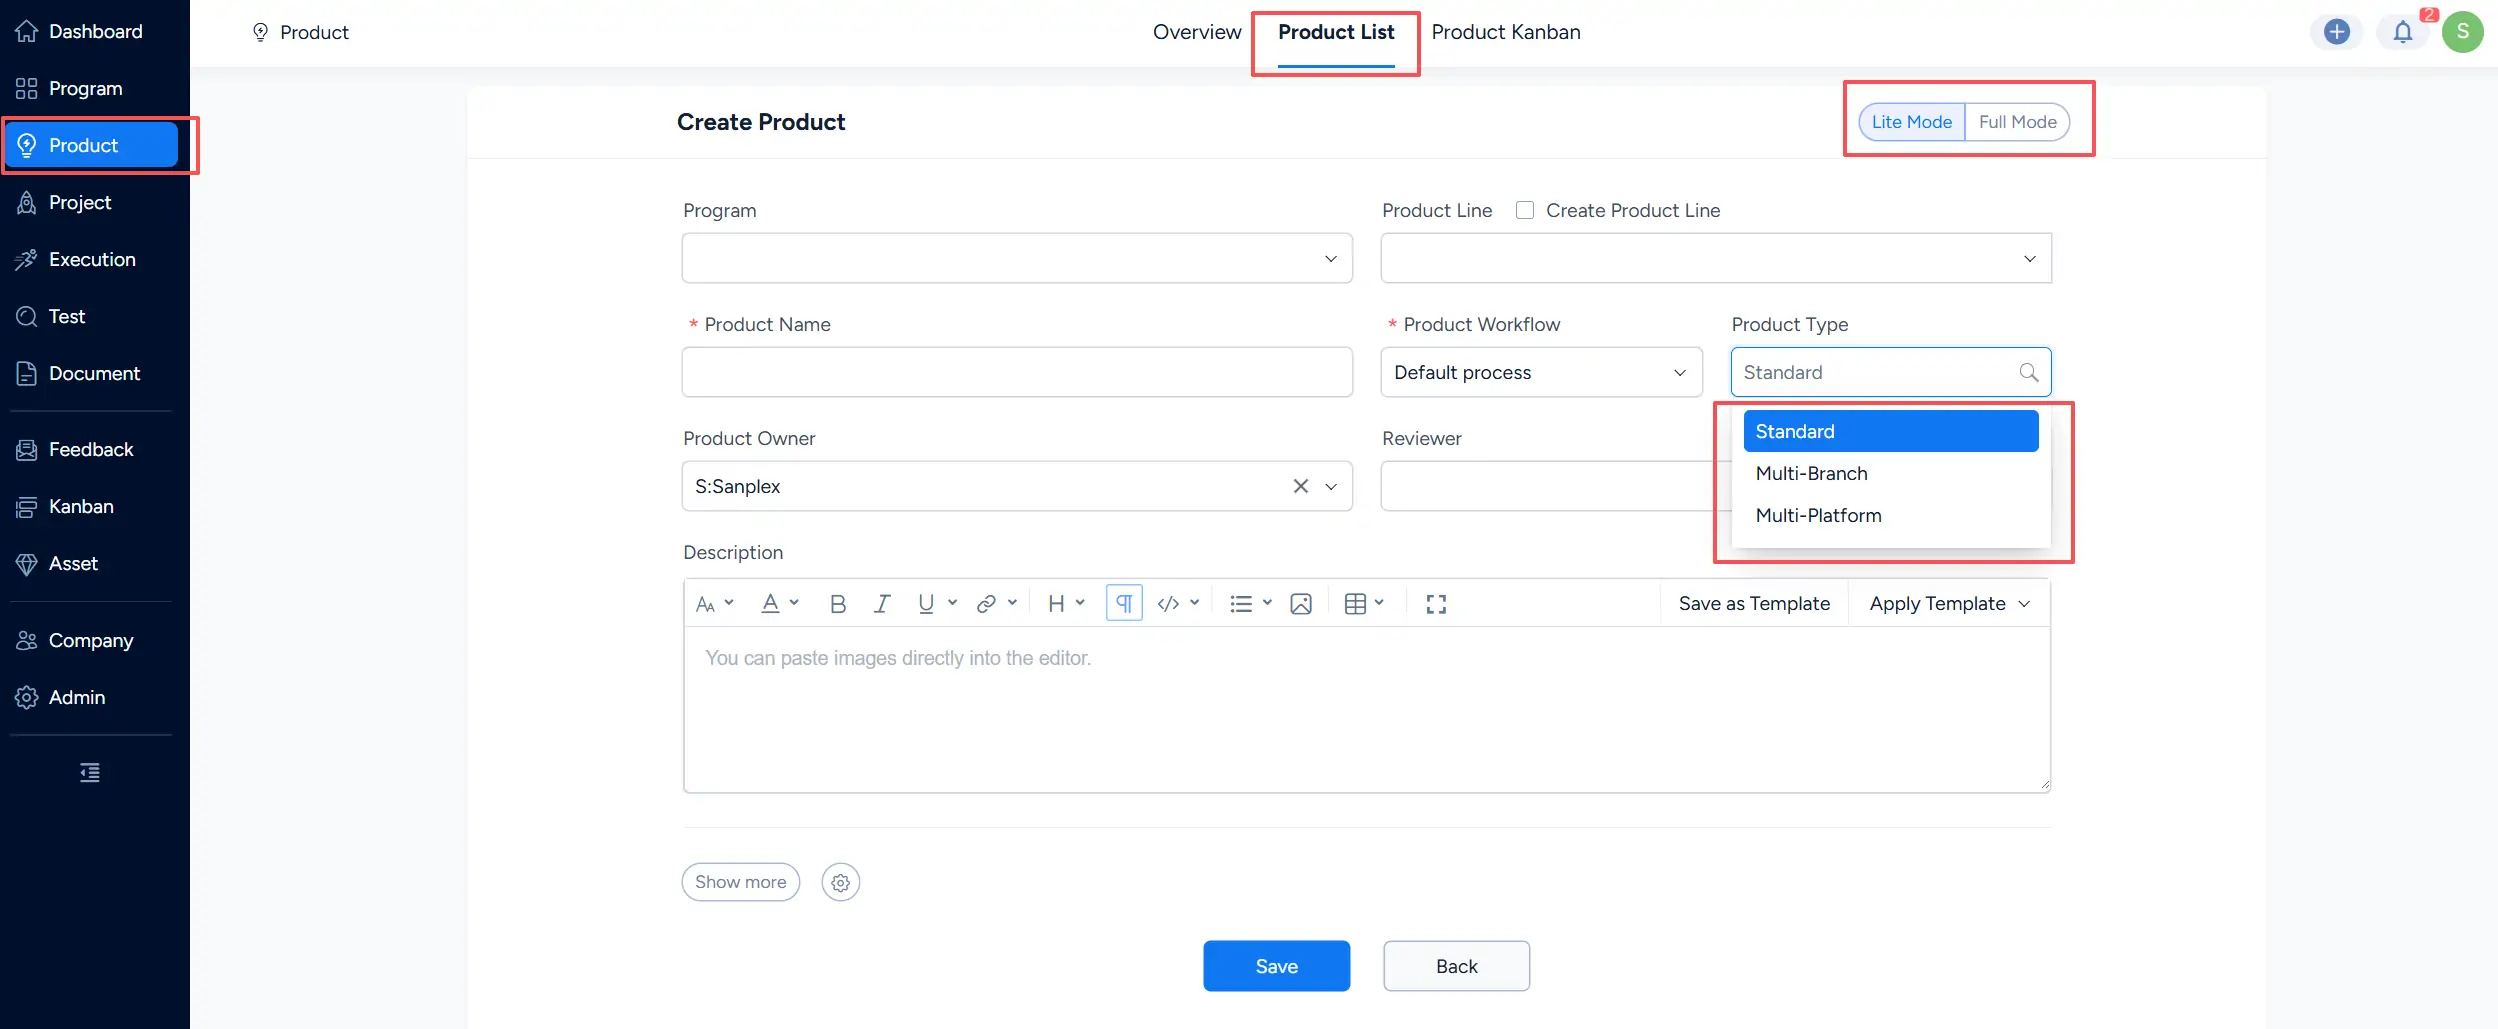
When creating a Product, select Multi-Branch or Multi-Platform as the Product Type.
2. Manage Product branches
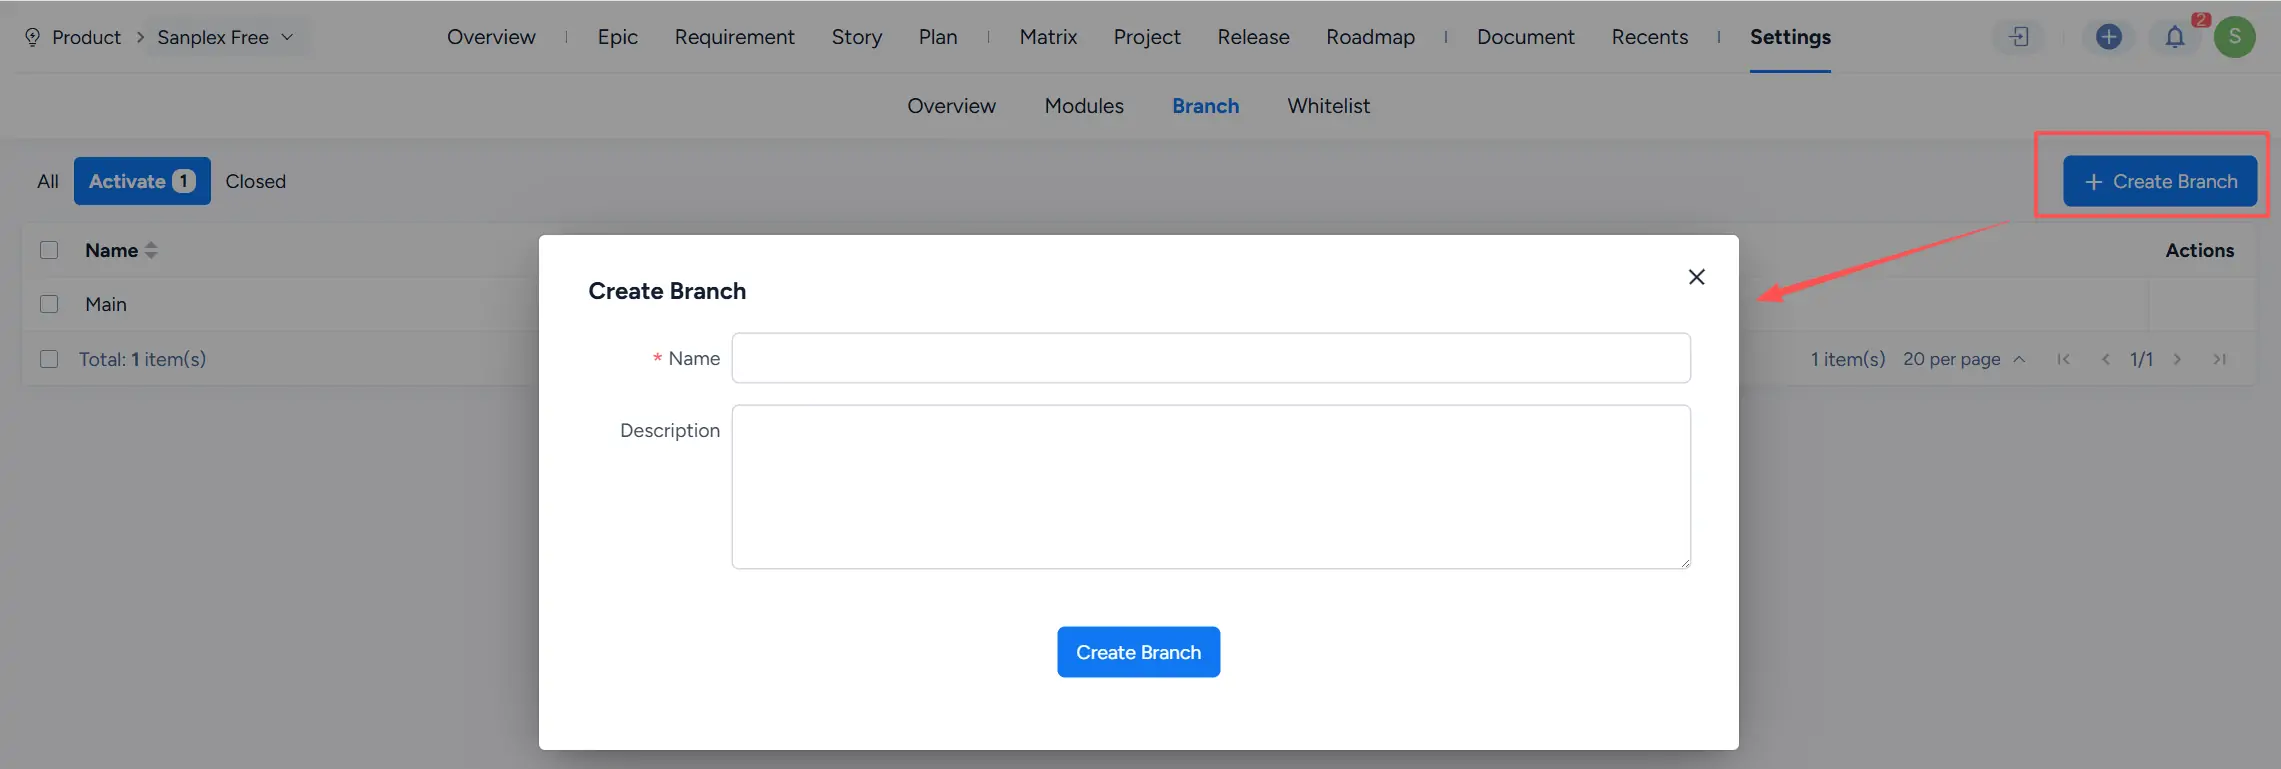
Go to Product > Settings > Branch to view and manage branches.
The system automatically creates a default mainline branch. The mainline cannot be edited or deleted.
3. Create a branch
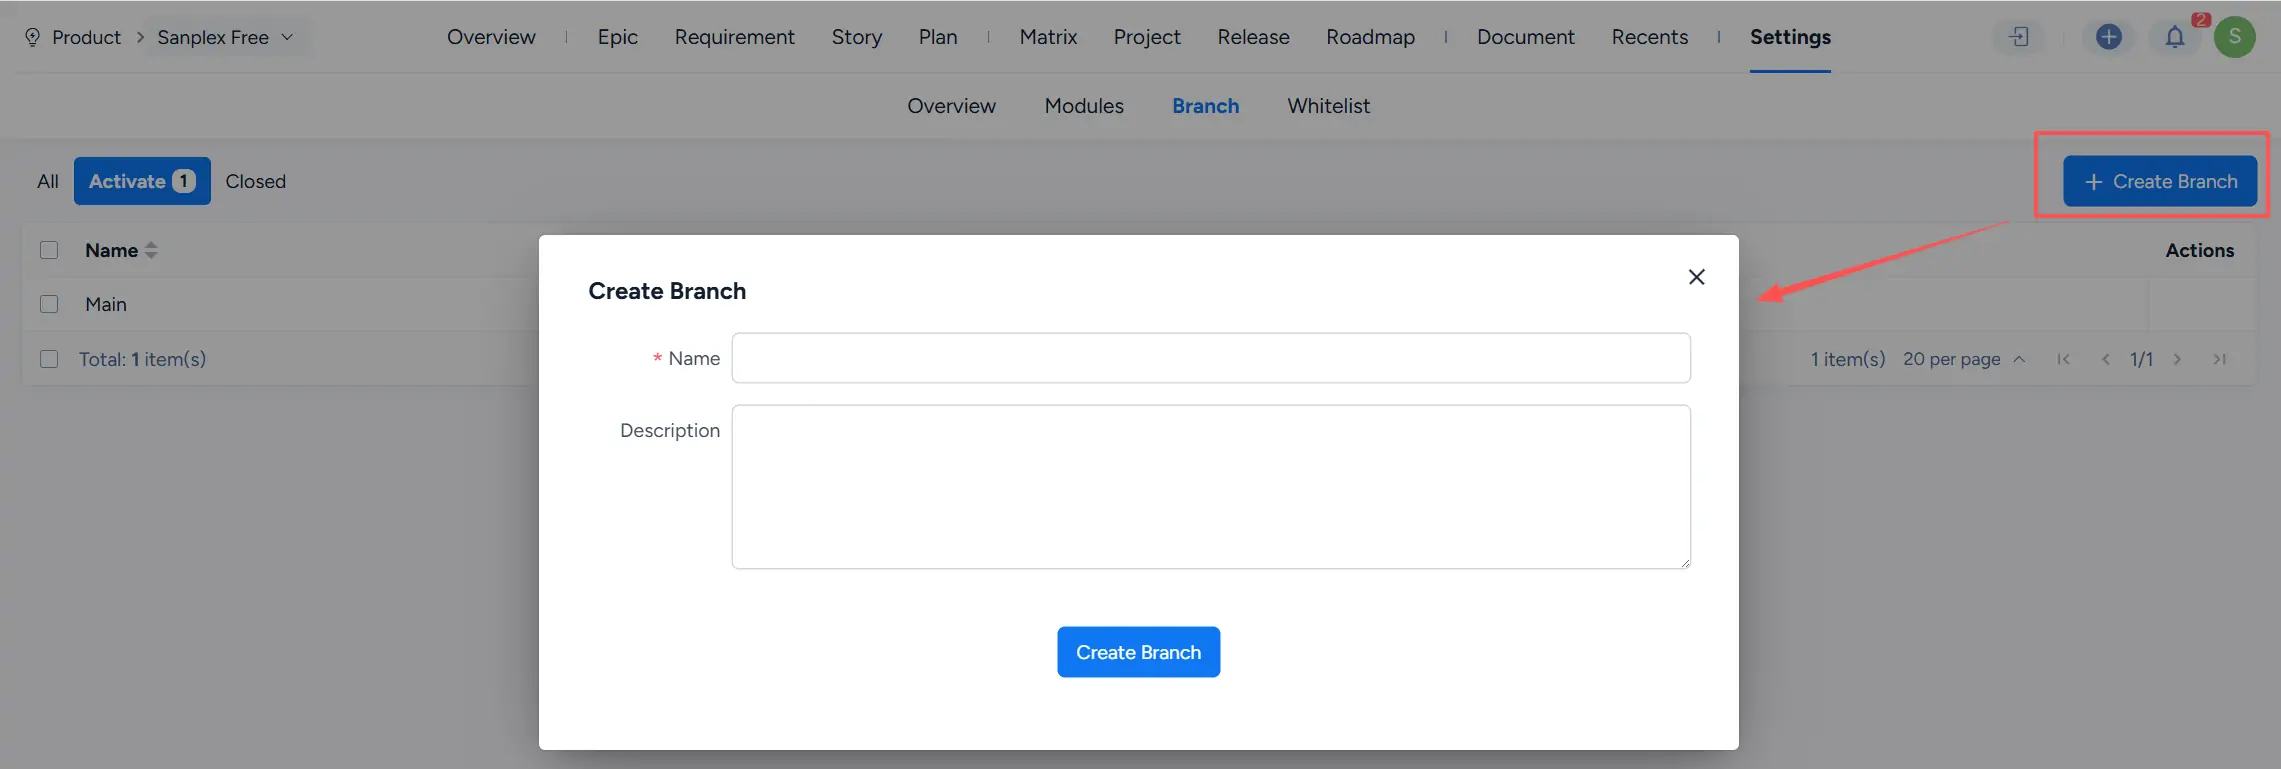
Click Create Branch in the upper-right corner of the branch list to open the branch creation dialog.
Enter the branch name and description, then click Create Branch.
4. Edit a branch
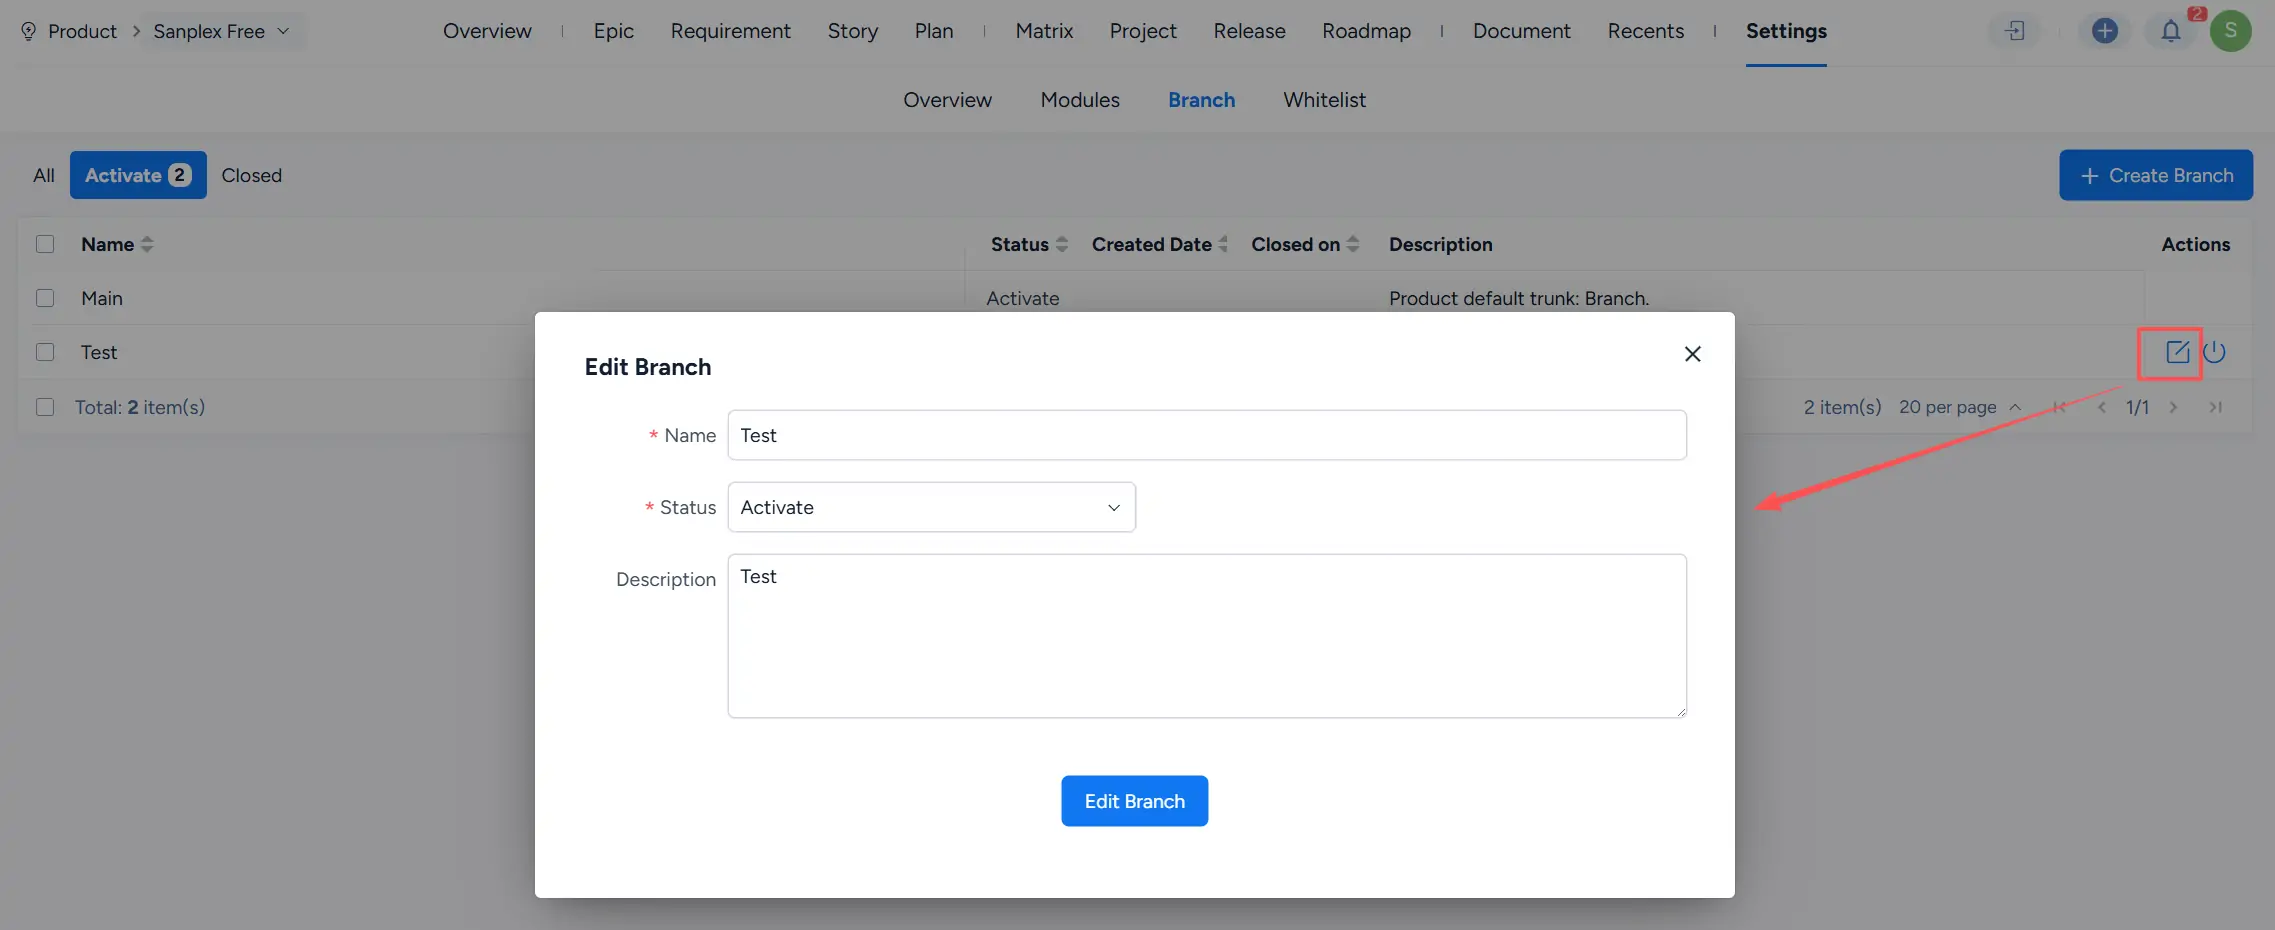
Click Edit in the branch list to modify a branch.
You can update the branch name, status, and description.
After a branch is created, its default status is Active. You can change the status to Closed when the branch is no longer in use.
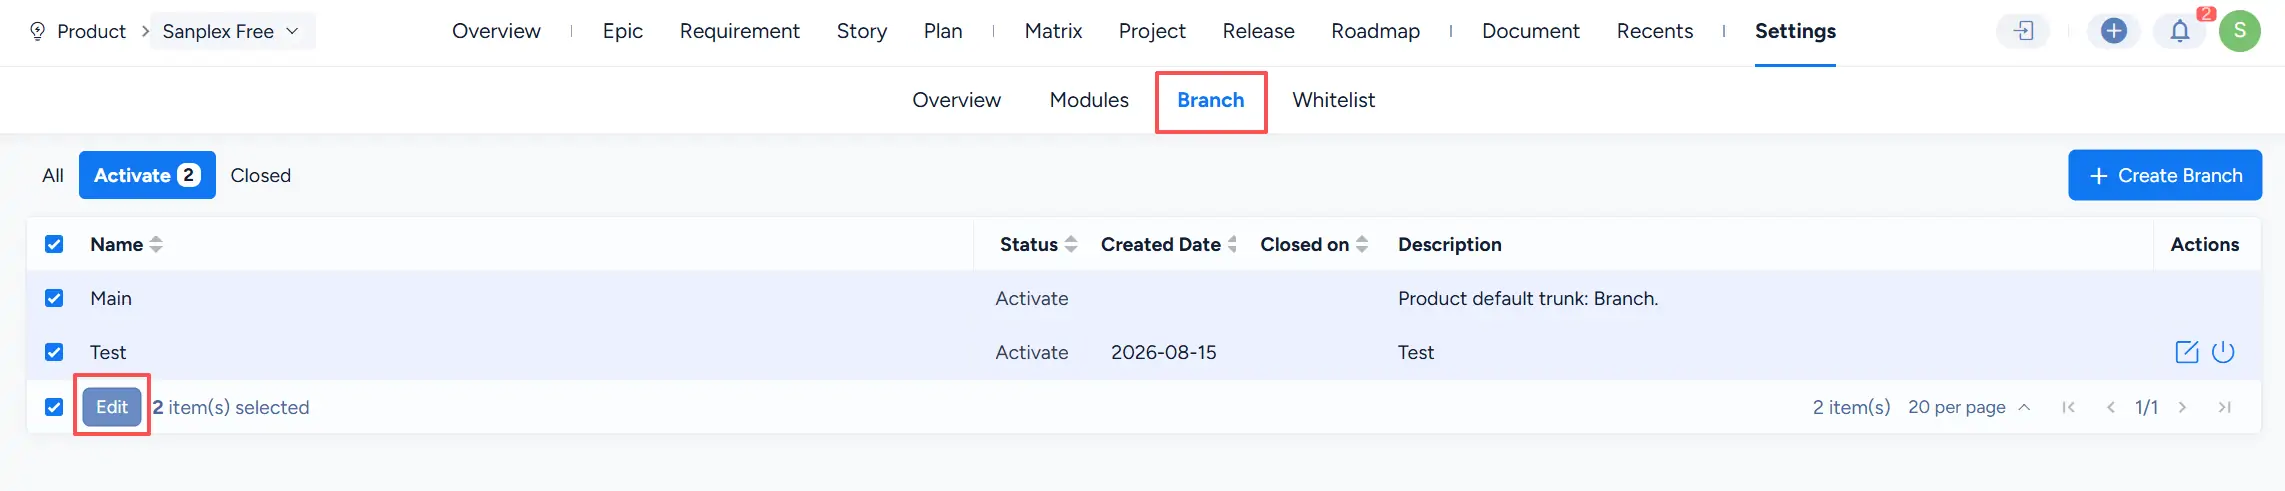
To edit multiple branches at once, select the branches and click Edit at the bottom of the page.
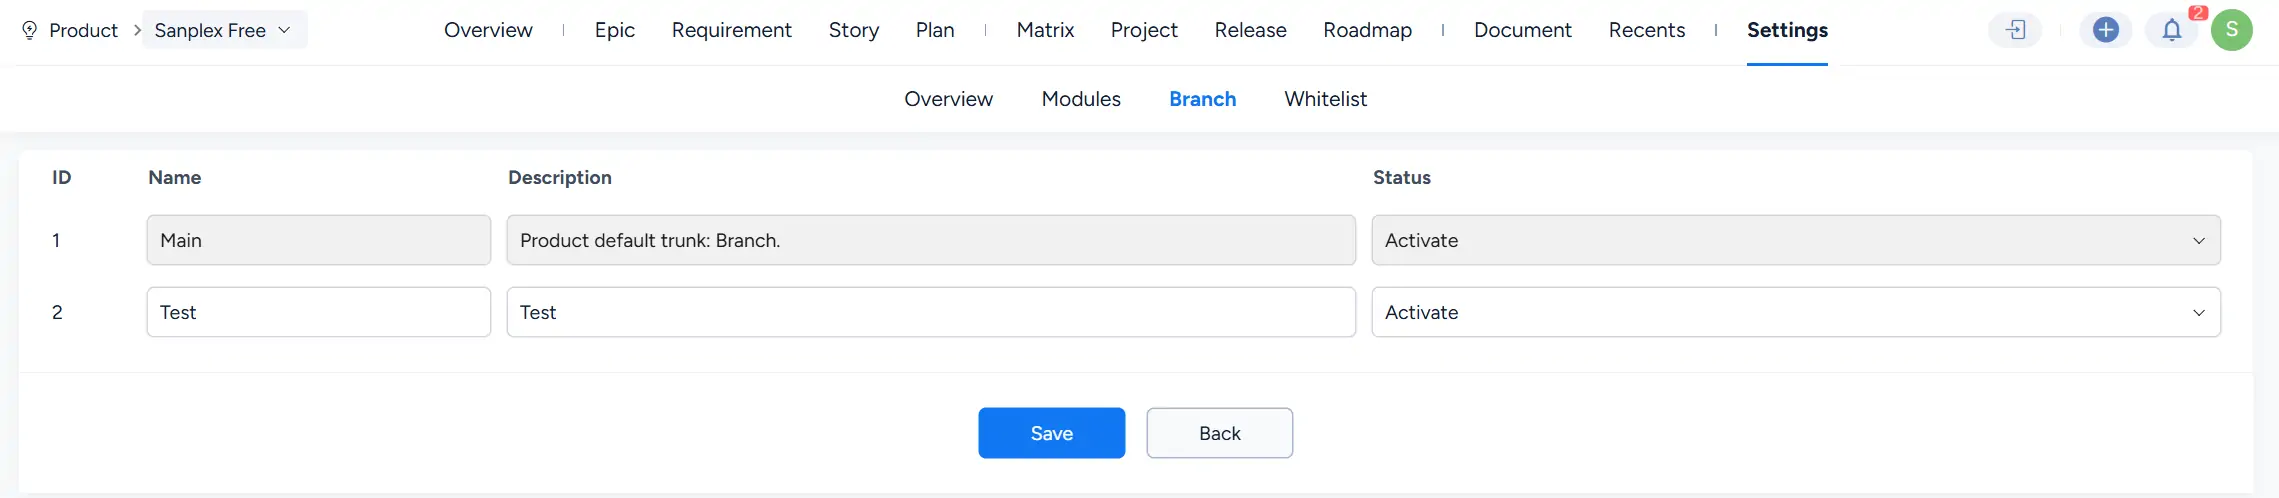
On the batch edit page, update the branch information as needed, then click Save.
5. Close a branch
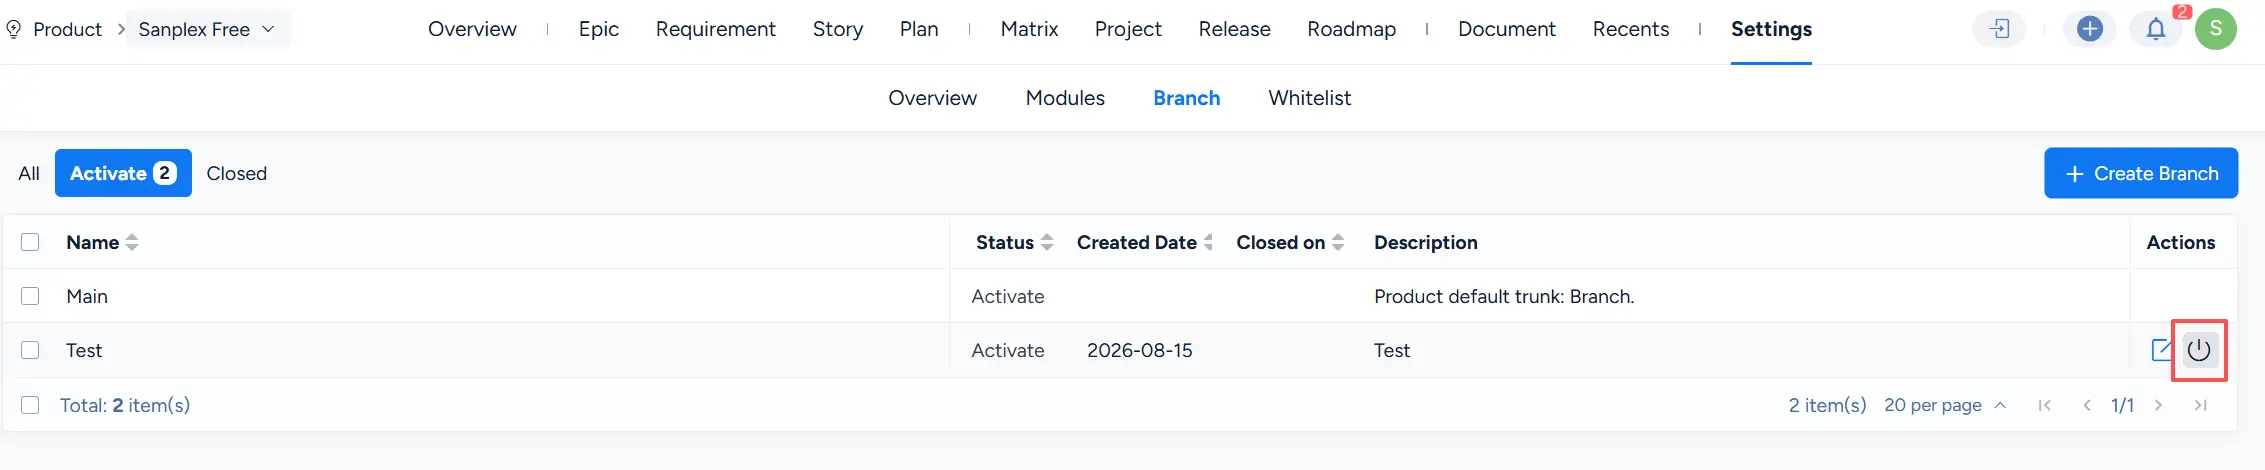
To close a branch, click the Close action in the Actions column of the branch list.
6. Merge branches
The mainline cannot be merged. If the mainline is selected together with other branches, the Merge button is not available.

When only non-mainline branches are selected, the Merge button becomes available.
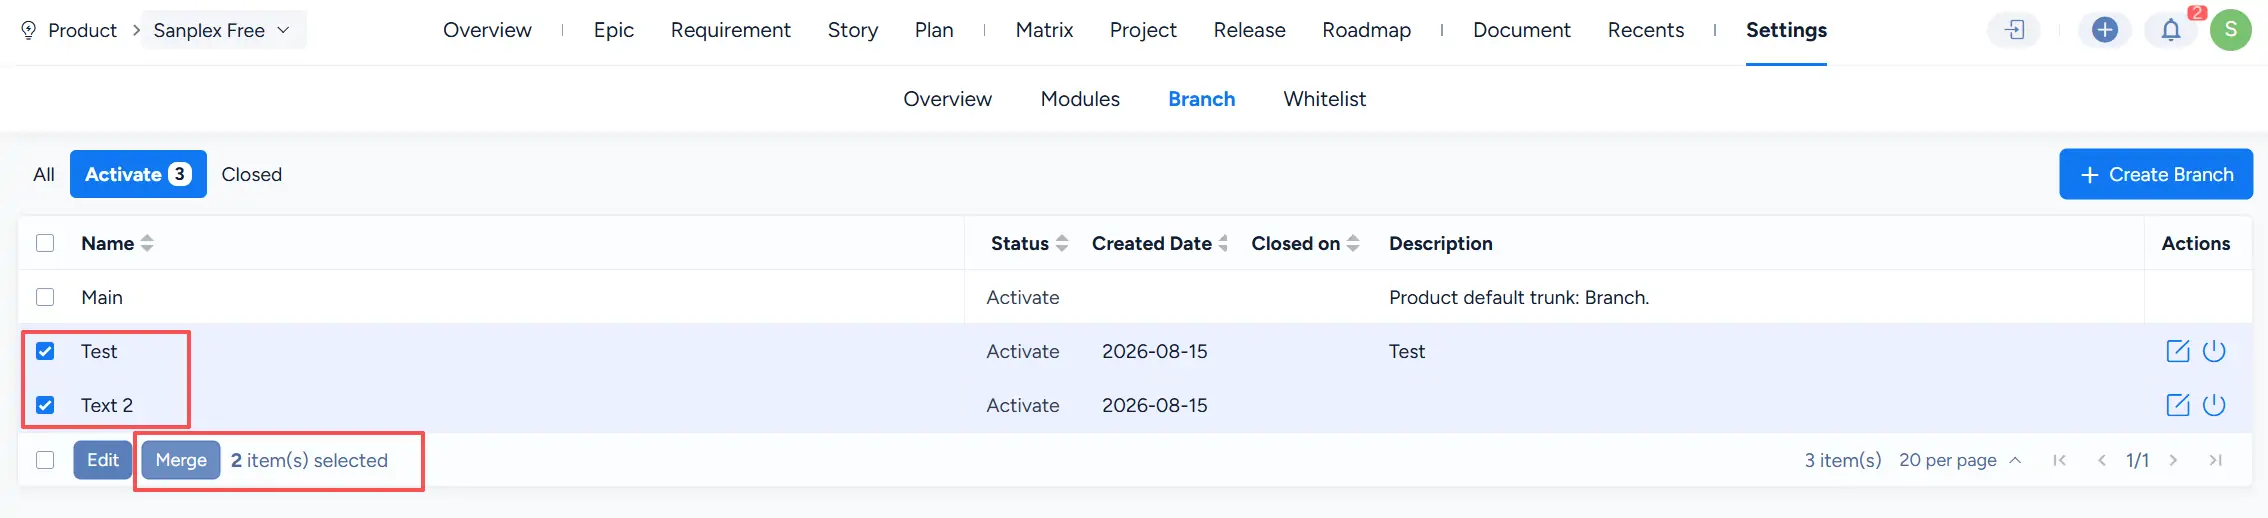
Click Merge to merge the selected branches into another existing branch that is not currently selected.
When branches are merged, their related Releases, Plans, Versions, Modules, Requirements, Bugs, and Test Cases are also moved to the target branch.
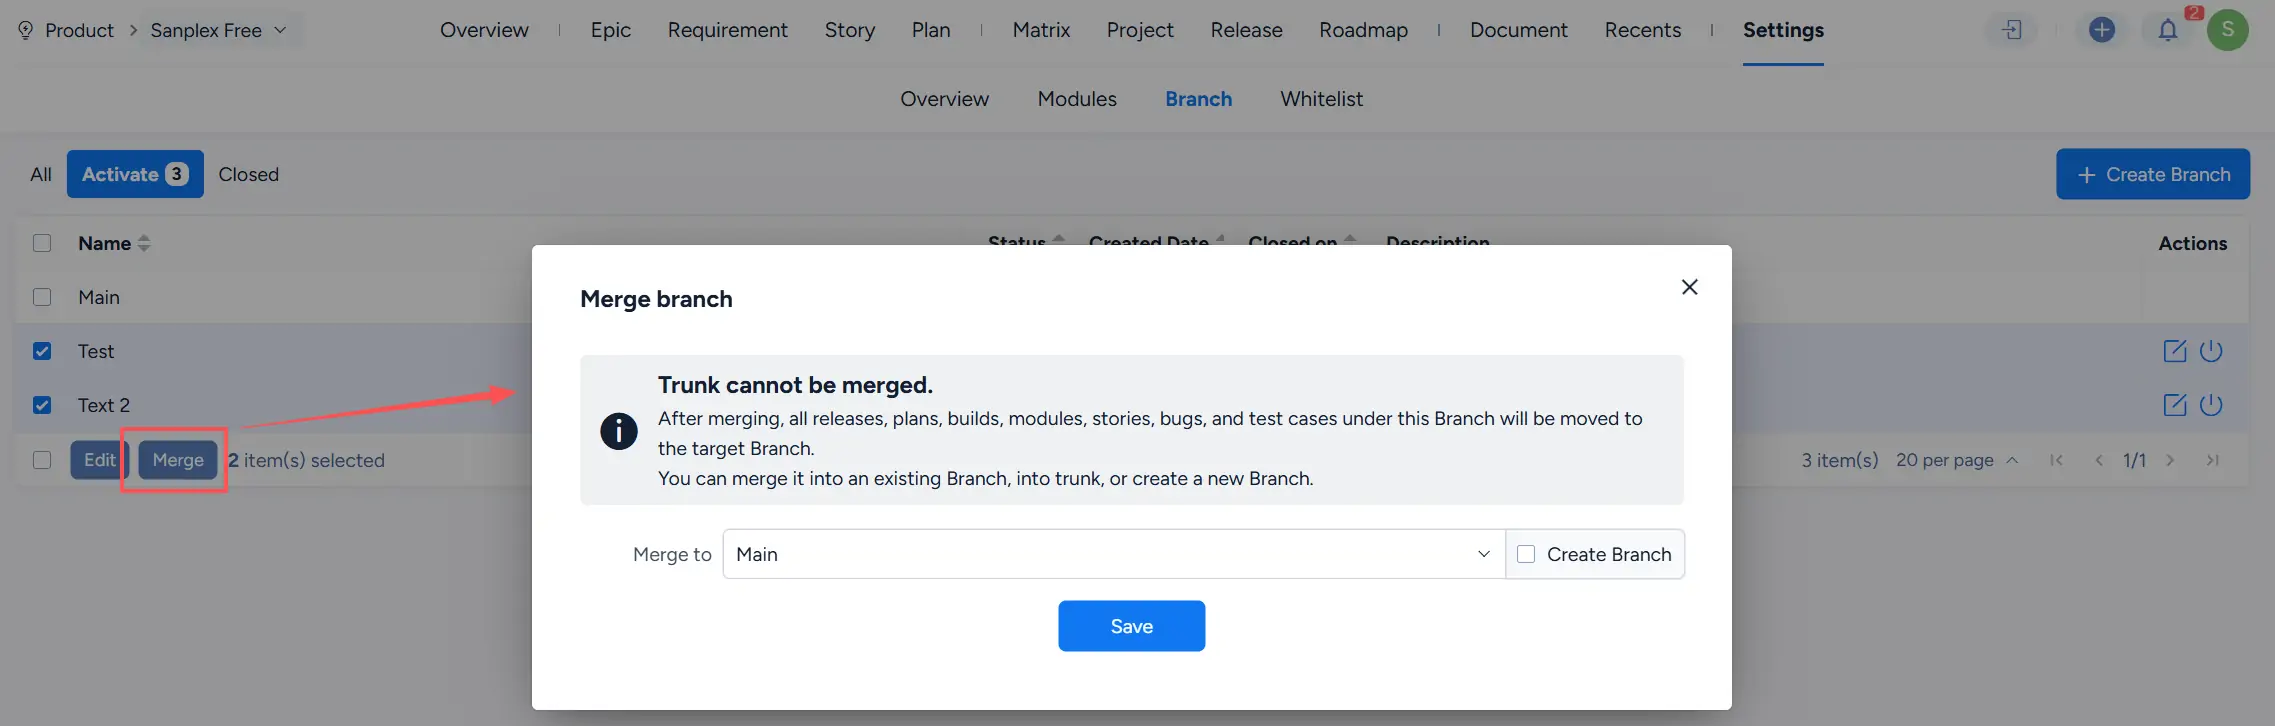
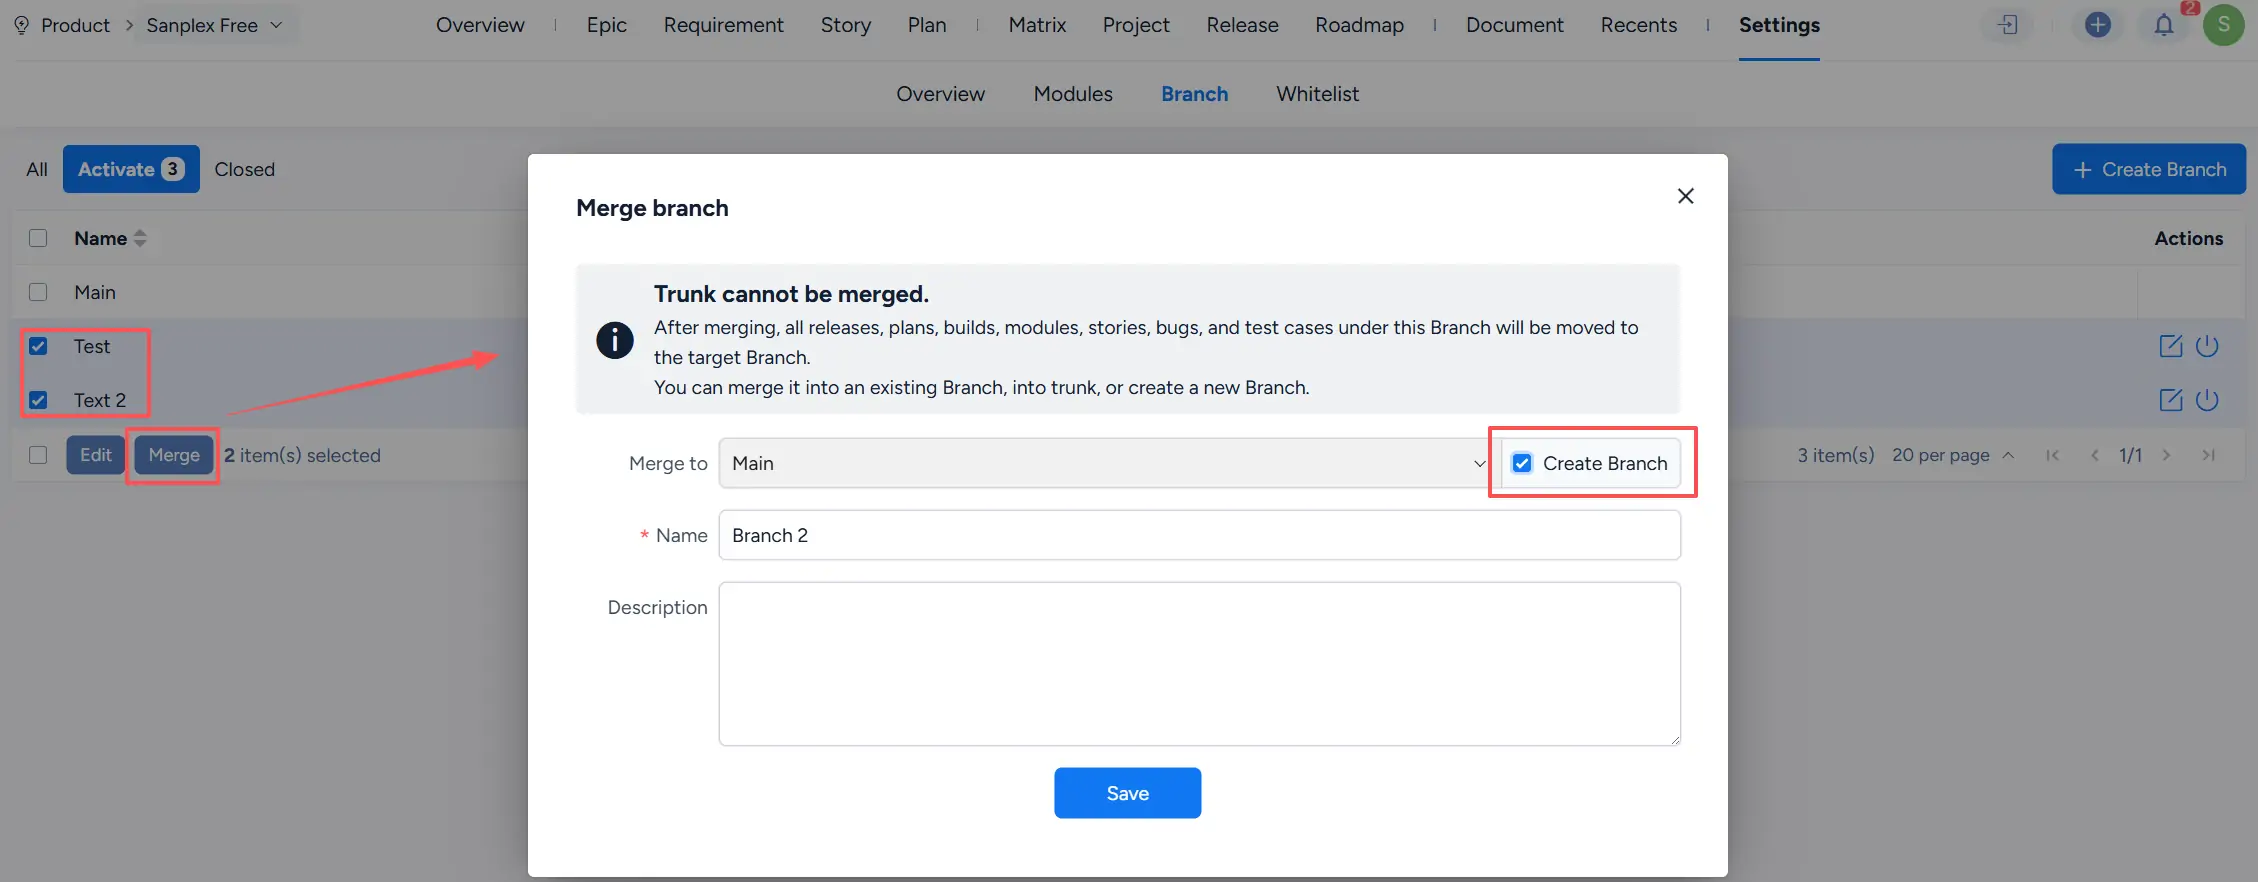
You can also merge selected branches into a newly created branch.
Select Create Branch, enter the new branch name and description, and then click Save.
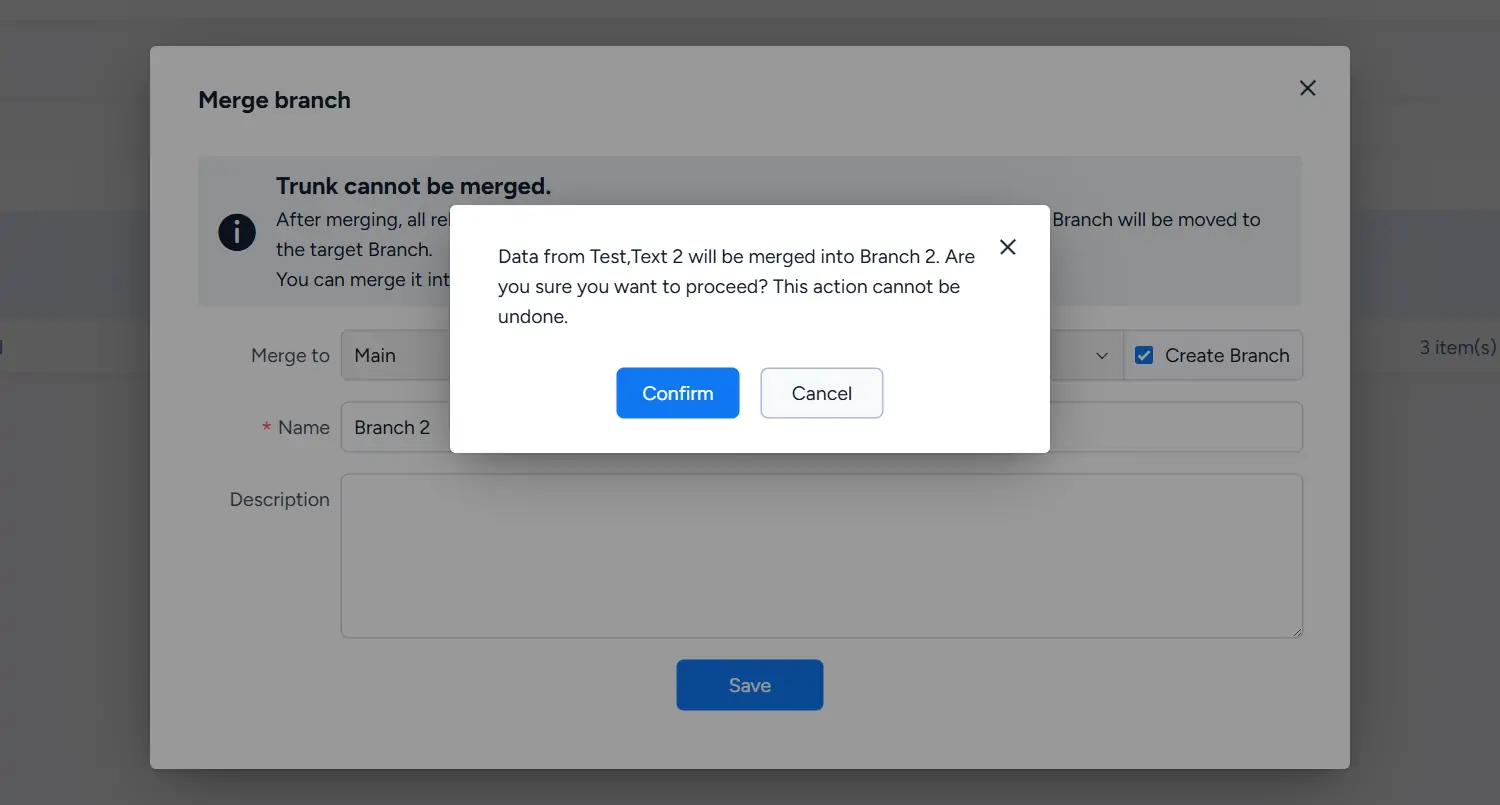
After you click Save, the system displays a confirmation message. Because a branch merge cannot be undone, confirm the operation carefully before proceeding.
II. Maintain Modules for Each Branch
After branches are created, you can maintain modules separately for each branch. Module management within a branch works in the same way as module management for a standard Product.
1. Add modules for a branch
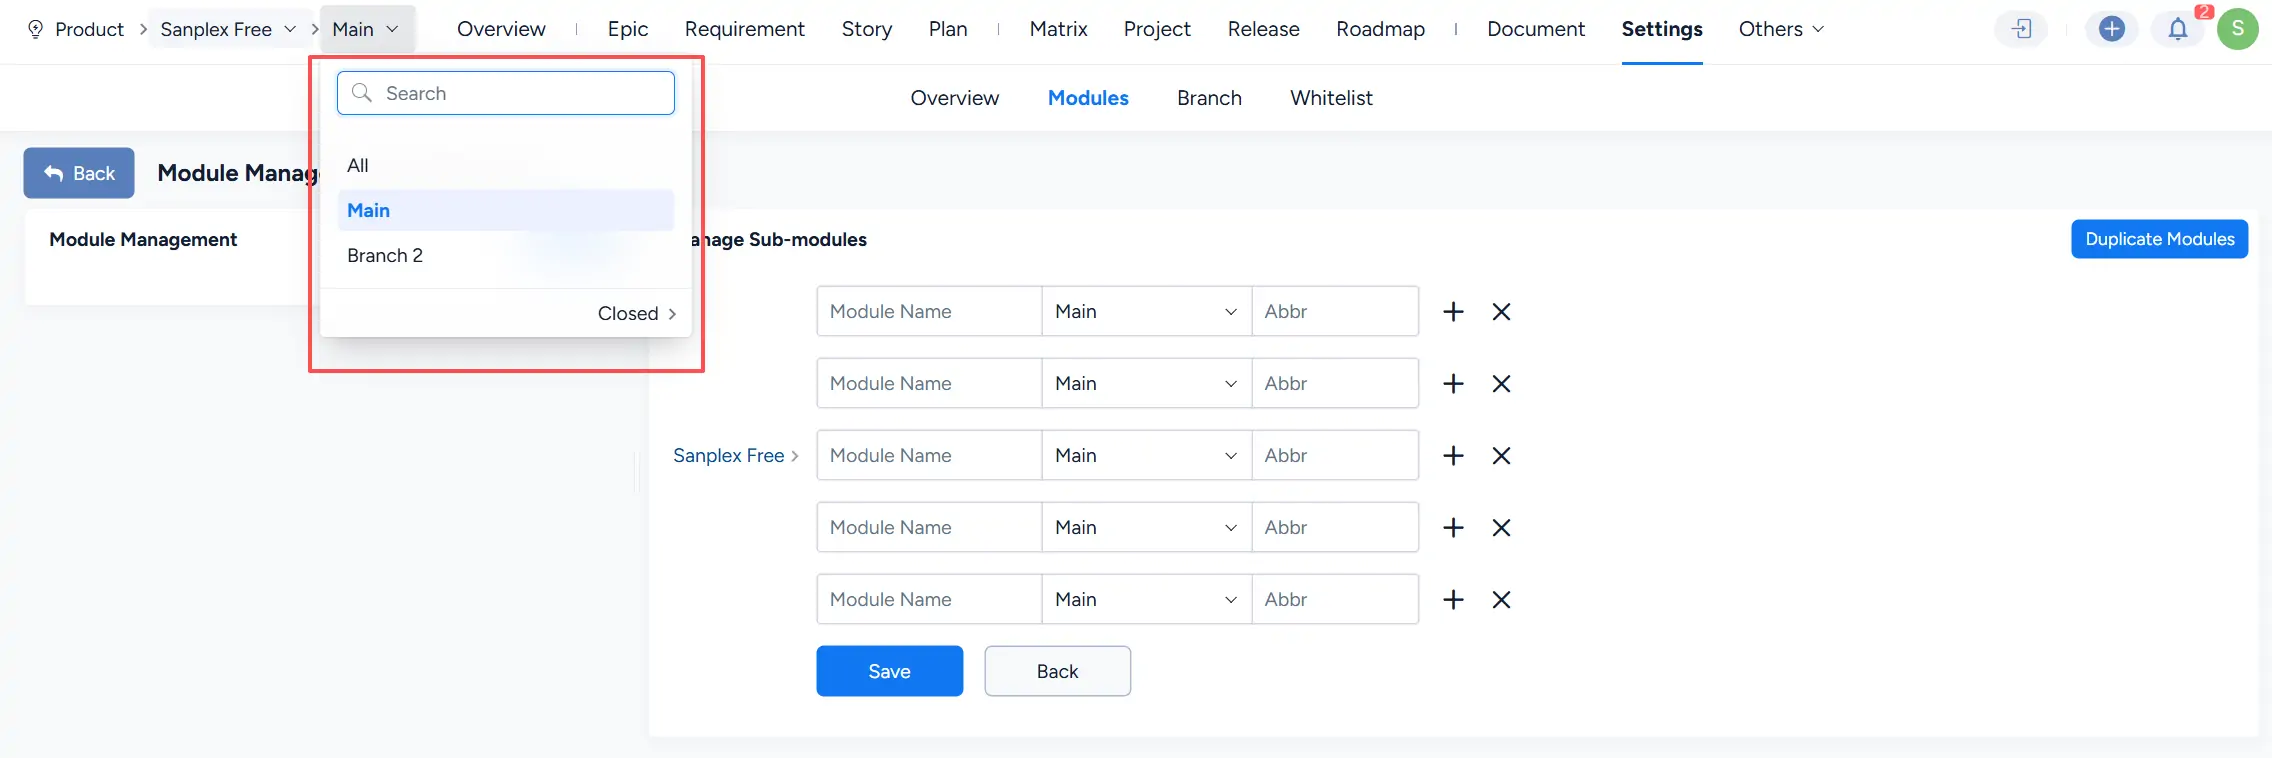
Go to Product > Settings > Modules to create and manage modules for the current branch.
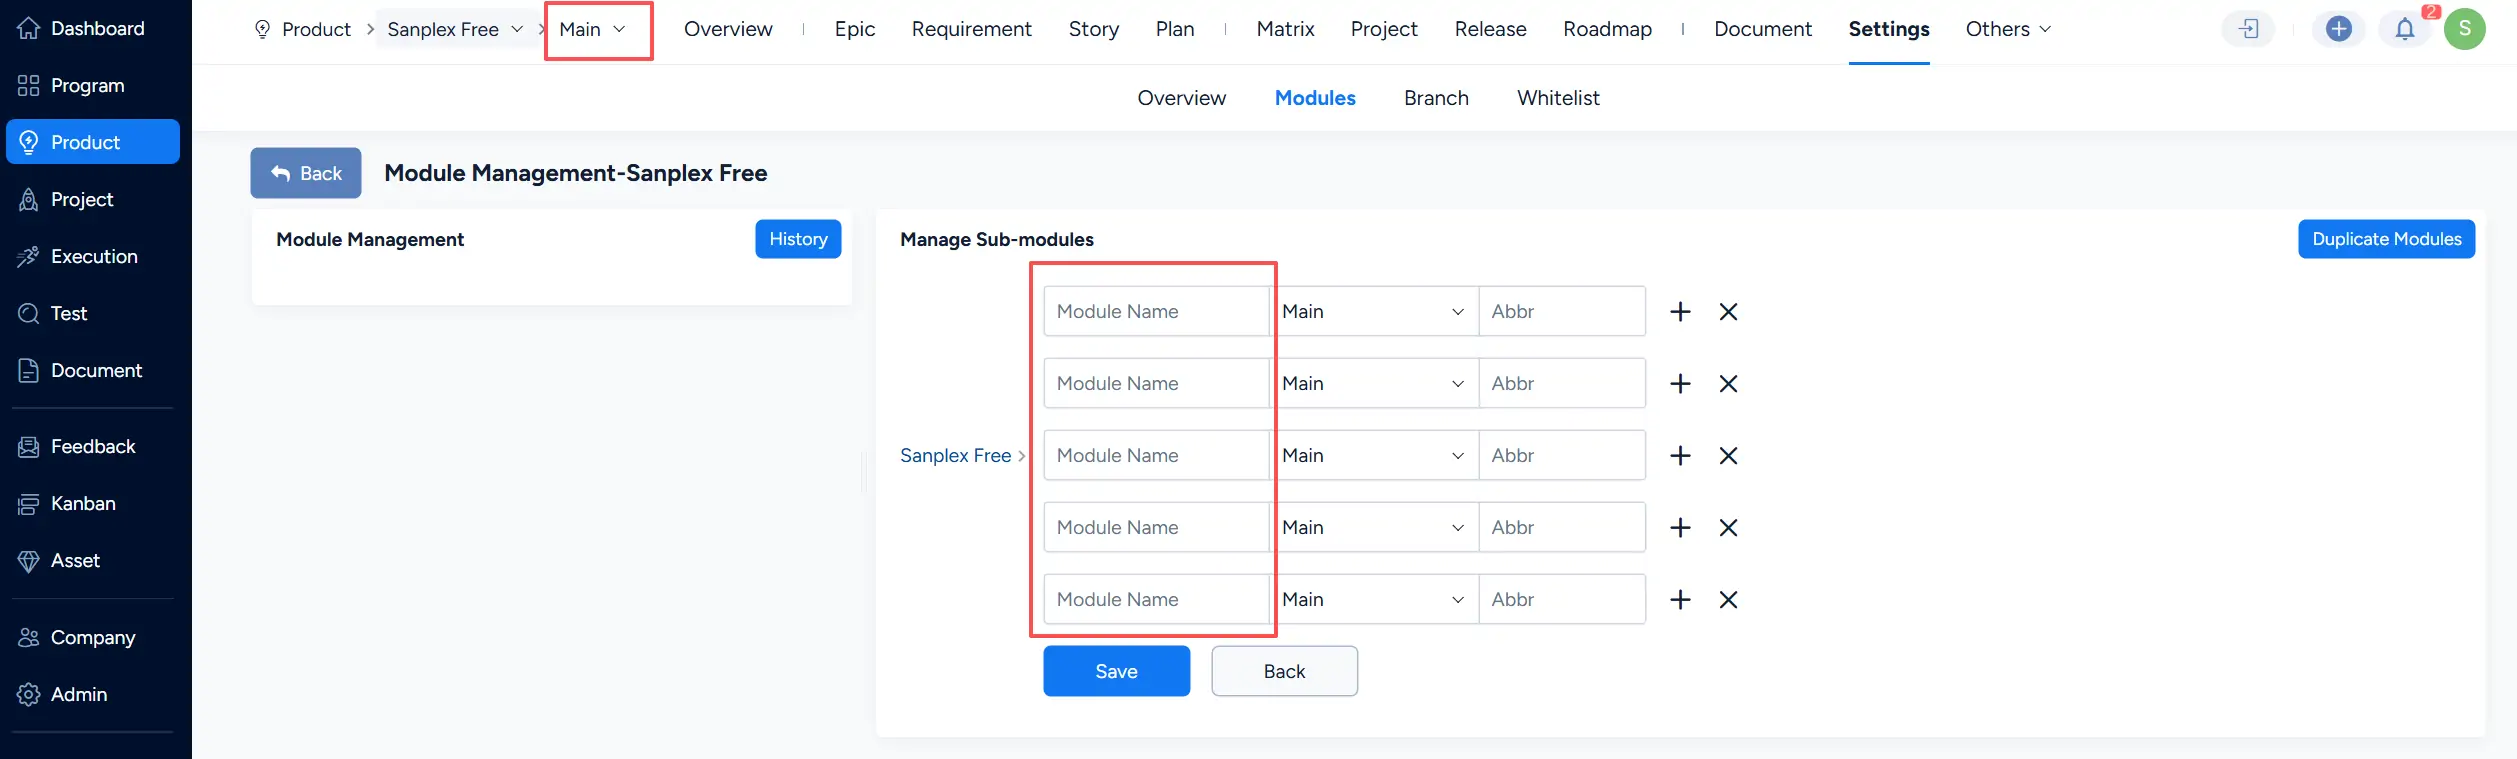
To maintain modules for another branch, switch to that branch from the Product selector and then manage its modules.
2. Configure the display of module and branch names
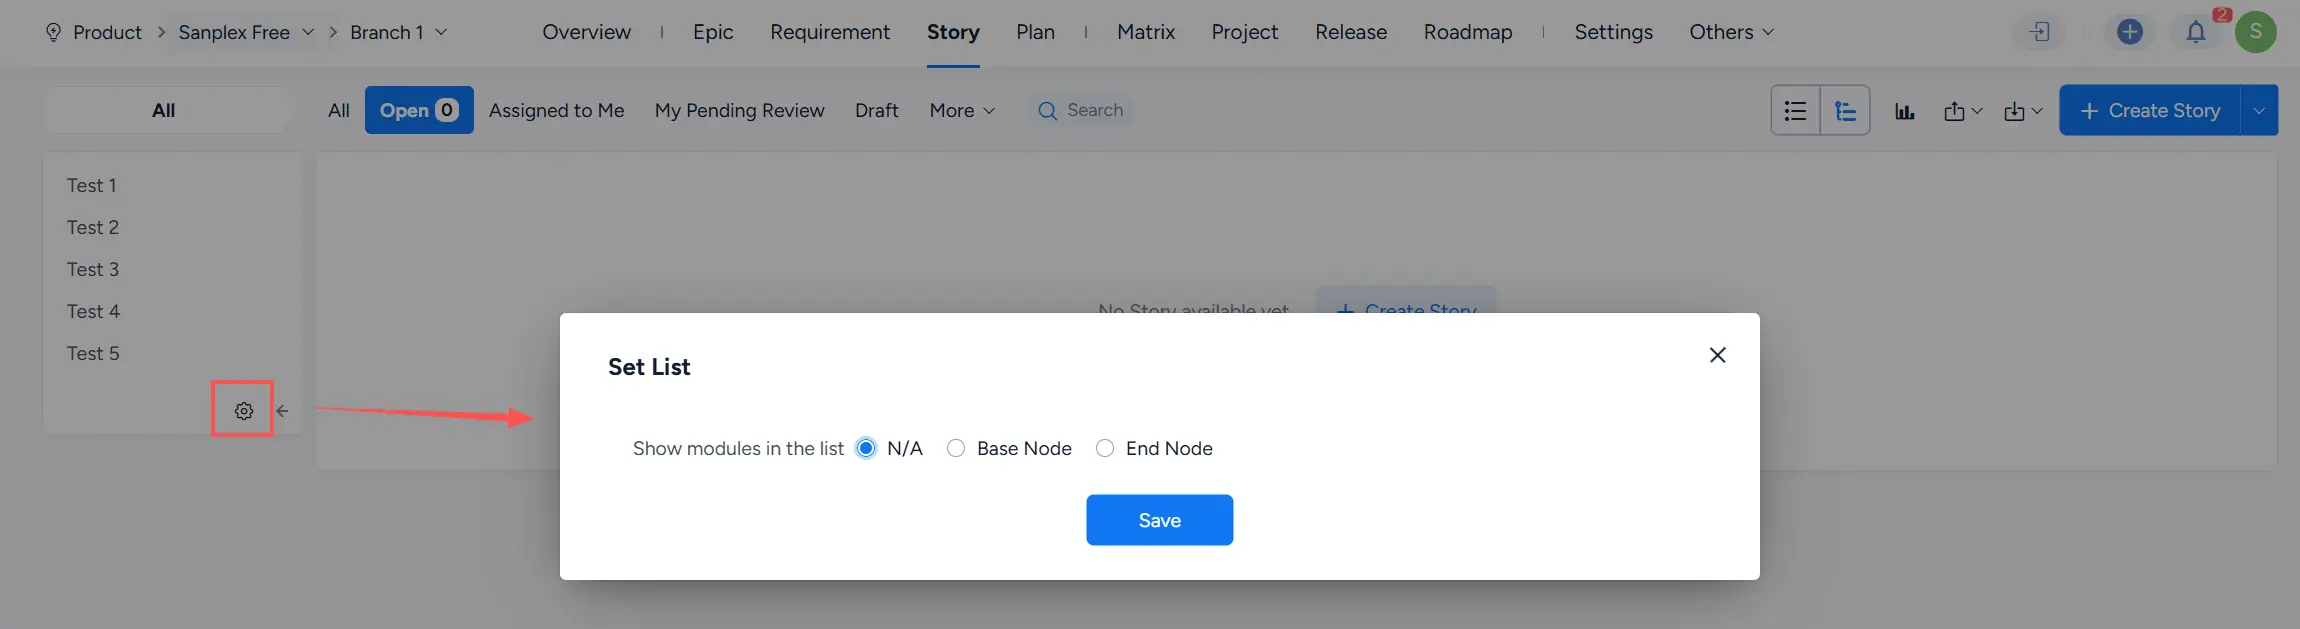
For a multi-branch Product, Display Settings includes an additional option for displaying branch names.
Open Display Settings to configure whether module names and branch names are shown in the list.
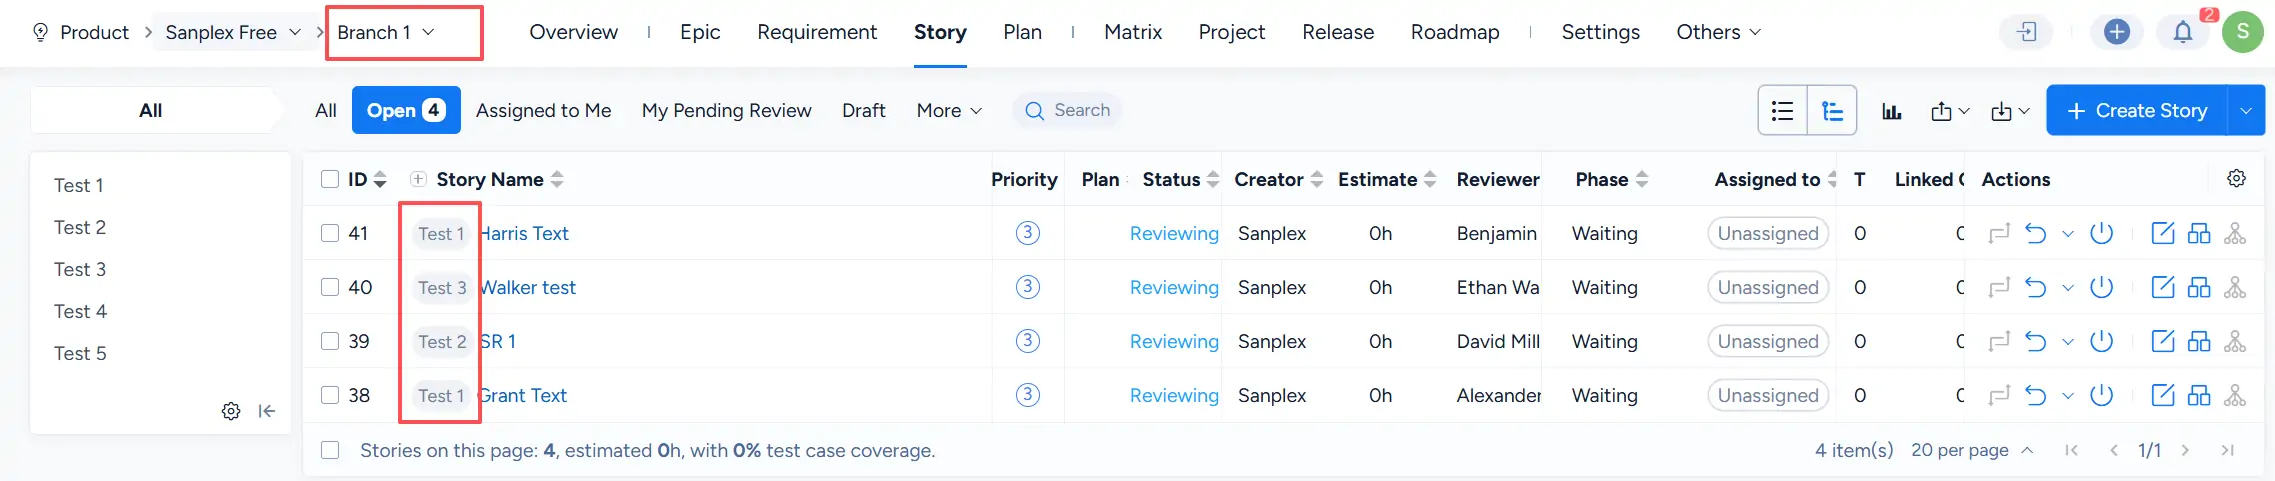
When the corresponding display options are enabled, the branch and module information is shown with the work items in the list.
III. Other Branch-Related Functions and Logic
Branches can be associated with Requirements, Modules, Plans, Releases, Versions, Bugs, and Test Cases.
Projects and Executions can also be linked to Product branches to support requirement delivery and development within a specific branch.
1. Module display and selection logic
- When creating or editing a Requirement, Bug, or Test Case under the mainline, only modules from the mainline can be selected.
- When creating or editing a Requirement, Bug, or Test Case under a non-mainline branch, modules from both the current branch and the mainline can be selected.
- For upgraded data, if a Requirement, Bug, or Test Case belongs to a module under a specific branch, it is assigned to the branch that owns that module after the upgrade.
Using Requirements as an example:
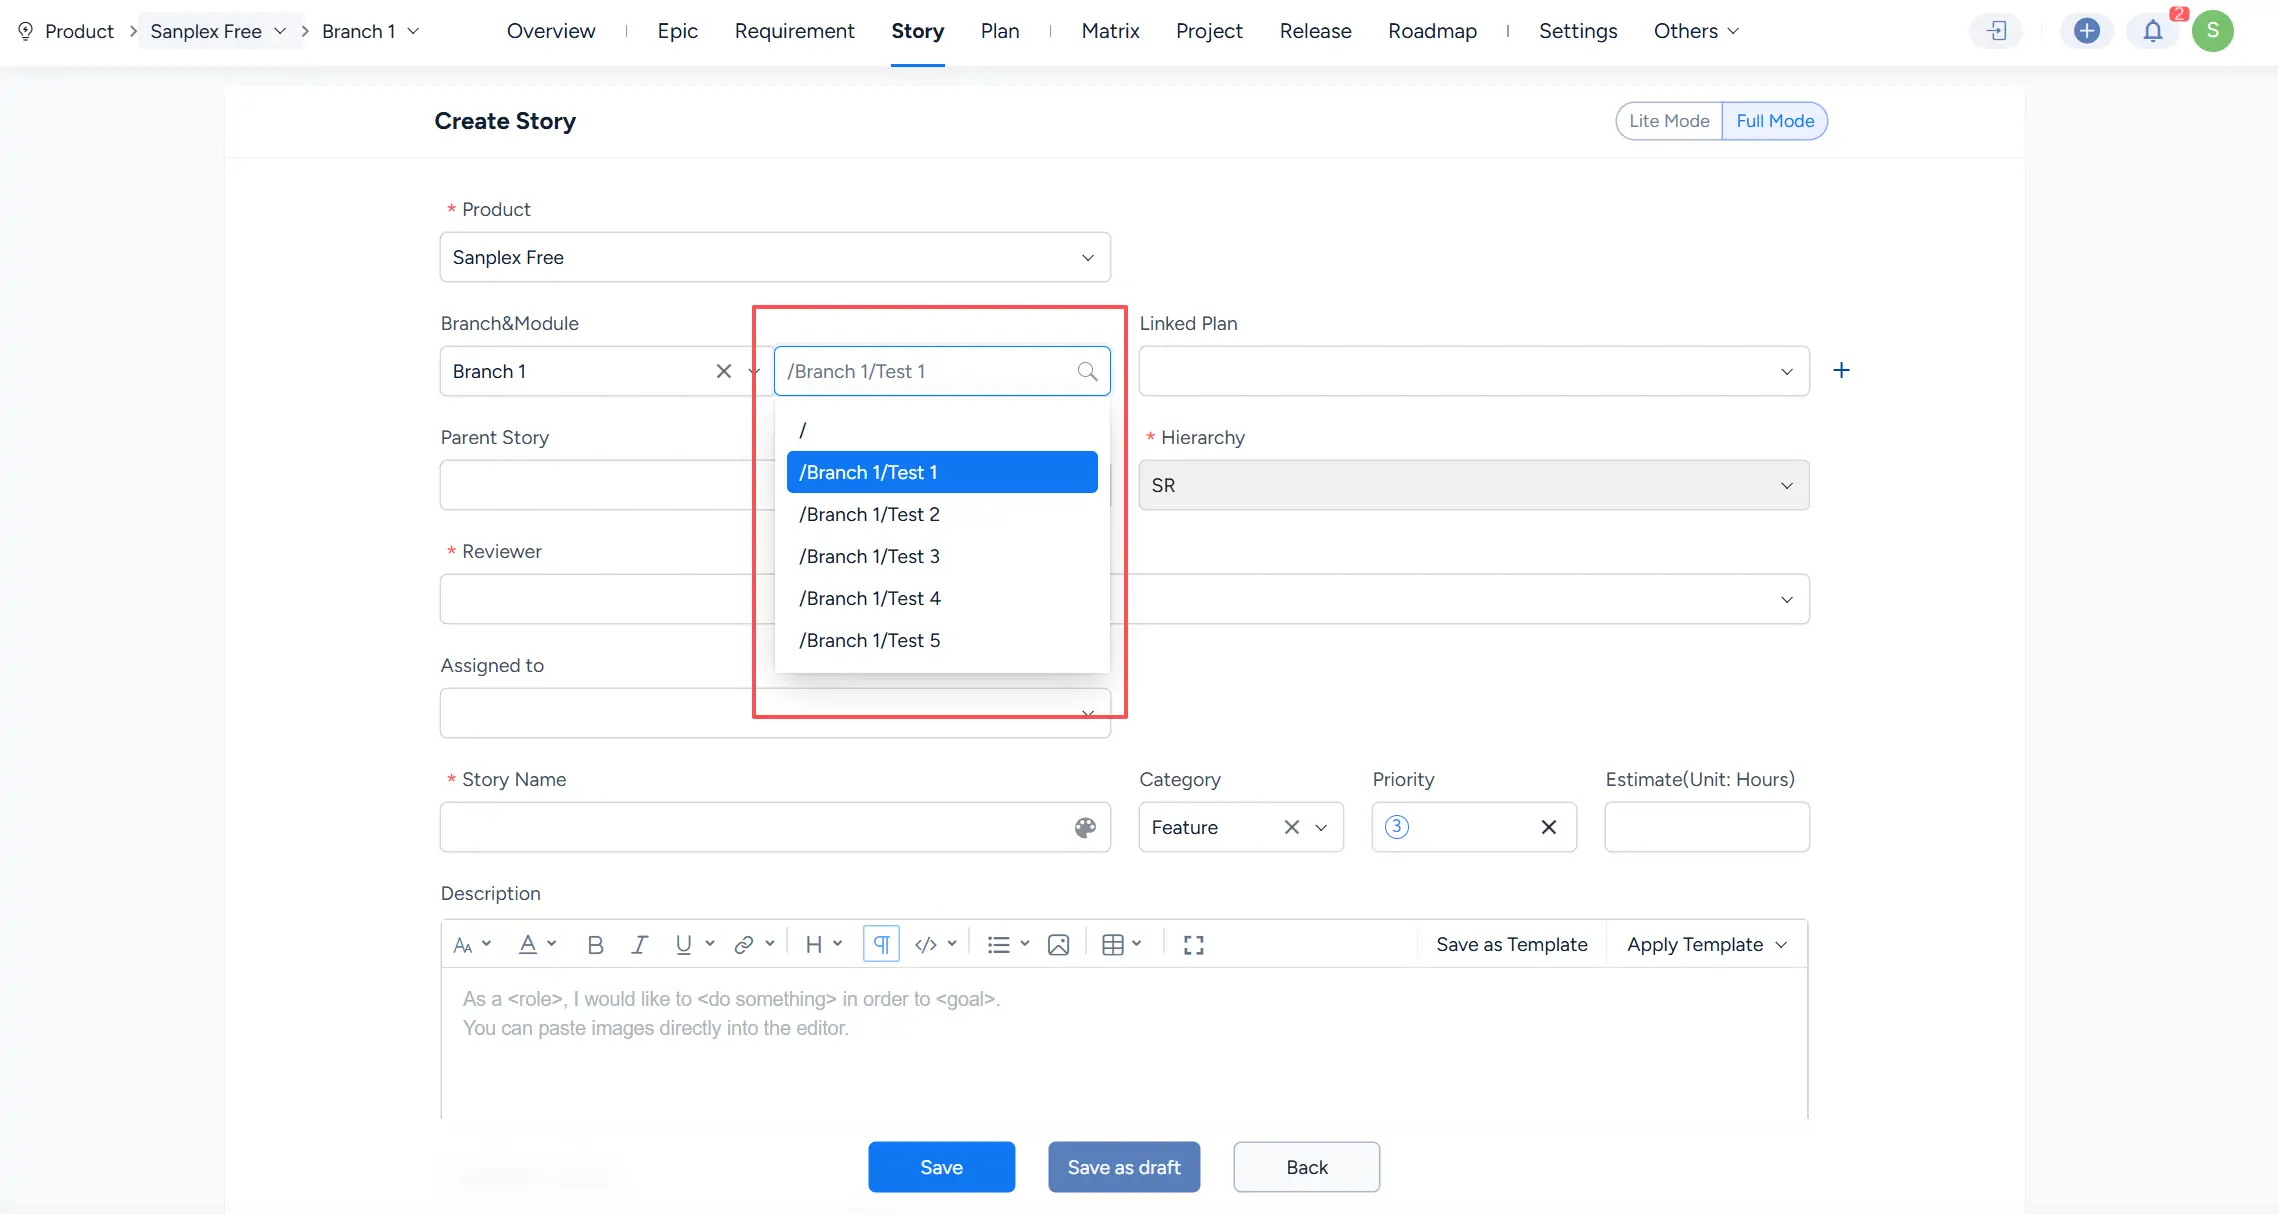
- When creating a Requirement under the mainline, only mainline modules can be selected.
- After switching to a non-mainline branch, the Module field allows you to select modules from both the current branch and the mainline.
2. Plan display and selection logic
- When creating a Requirement and linking it to a Plan, only non-parent Plans in the current branch that have not expired can be selected.
- A mainline Plan can be linked only to mainline Requirements.
- A Plan under Branch 1 can be linked to both mainline Requirements and Requirements under Branch 1.
- When creating a Project or Execution, only non-parent Plans in the current branch that have not expired can be linked.
- When editing a Project or Execution, any non-parent Plan in the current branch can be linked.
3. Logic for linking Requirements and Bugs to Versions
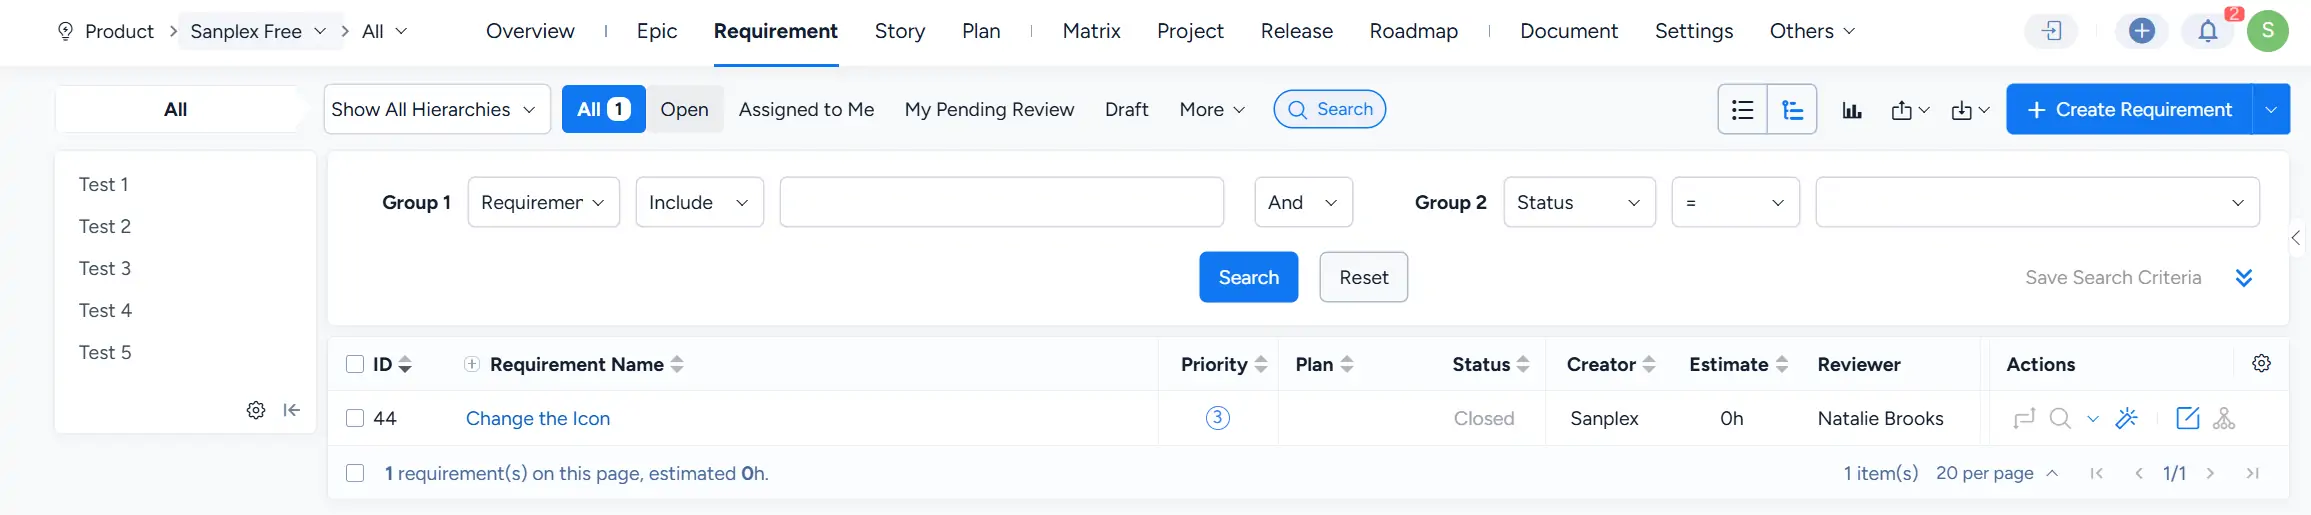
- When linking Requirements to a mainline Version, the list initially shows mainline Requirements that are already linked to the Execution but have not yet been linked to the Version. After you click Search, all mainline Requirements are displayed.
- When linking Bugs to a mainline Version, the list initially shows mainline Bugs under the Execution that have not yet been linked to the Version. After you click Search, all mainline Bugs are displayed. The Execution linked when the Bug was submitted is no longer treated as a separate filter condition.
- When linking Requirements to a Version under Branch 1, the list initially shows Requirements from both the mainline and Branch 1 that are already linked to the Execution but have not yet been linked to the Version. After you click Search, all Requirements from the mainline and Branch 1 are displayed.
- When linking Bugs to a Version under Branch 1, the list initially shows Bugs under Branch 1 in the Execution that have not yet been linked to the Version. After you click Search, all Bugs from the mainline and Branch 1 are displayed.
Using Version > Link Requirements as an example:
- Before clicking Search, the list for a mainline Version shows mainline Requirements that are already linked to the Execution but have not yet been linked to the Version.
- After clicking Search, all Requirements under the mainline are displayed.
4. Logic for linking Requirements and Bugs to Releases
4.1 Link Requirements and Bugs to a Product Release (mainline)
- Link Requirements: By default, only mainline Requirements of the current Product are displayed. Search results also include only mainline Requirements.
- Link Bugs: By default, only mainline Bugs of the current Product are displayed. Search results also include only mainline Bugs.
4.2 Link Requirements and Bugs to a Product Release (Branch 1)
- Link Requirements: By default, Requirements from both Branch 1 and the mainline of the current Product are displayed. Search results also include Requirements from both scopes.
- Link Bugs: By default, Bugs from both Branch 1 and the mainline of the current Product are displayed. Search results also include Bugs from both scopes.
4.3 Link Requirements and Bugs to a Project Release (mainline)
- Link Requirements: By default, the list shows mainline Requirements linked to the Product associated with the Version. Search results show all mainline Requirements under the current Product.
- Link Bugs: By default, the list shows mainline Bugs linked to the Product associated with the Version. Search results show all mainline Bugs under the current Product.
4.4 Link Requirements and Bugs to a Project Release (Branch 1)
- Link Requirements: By default, the list shows mainline and Branch 1 Requirements linked to the Product associated with the Version. Search results show all mainline and Branch 1 Requirements under the current Product.
- Link Bugs: By default, the list shows mainline and Branch 1 Bugs linked to the Product associated with the Version. Search results show all mainline and Branch 1 Bugs under the current Product.
4.5 Default scope when linking legacy Bugs
By default, the list includes unlinked Bugs that belong to the current Product's branch or mainline for the current Release when the Bug creation date falls within the start and end dates of the iteration linked to the Version, inclusive.
The Bug must also either be in Active status or have a resolution date later than the end date of the Execution linked to the Version.
4.6 Default scope when linking resolved Bugs
By default, the list includes unlinked Bugs that belong to the current Product's branch or mainline for the current Release when the Bug resolution date is later than the start date of the iteration linked to the Version.
The Bug must either belong to the Execution linked to the current Version or, if it does not belong to that Execution, have a creation date earlier than the start date of the Execution linked to the Version.


