
Administrator
1. Using Sanplex by Role
1.1. Administrator
1.1.1 Manage Departments
1.1.2 Manage Users
1.1.3 Manage Permissions
1.1.4 Configure Notifications
2. Introduction of Sanplex features
2.1. Core Management Framework
2.1.1 Program
2.1.2 Project
2.1.3 Product
2.1.4 Execution
2.1.5 Management Models
2.2. Dashboard
2.2.1 Getting Started with Tutorials
2.2.2 Quick Add
2.2.3 Notification Center
2.2.4 Effort Tracking
2.2.5 Dashboard - Project and Execution
2.2.6 Dashboard - My Work, Contribution, and Recents
2.2.7 Dashboard - Approval
2.2.8 Contacts
2.3. Program
2.3.1 Program List
2.3.2 Program Kanban
2.3.3 Create Program
2.3.4 Create Sub-Programs
2.3.5 Project Charter Management
2.4. Product
2.4.1 Create Product
2.4.2 Manage Modules
2.4.3 Multi-Branch and Multi-Platform Management
2.4.4 Manage Plans
2.4.5 Manage Stories
2.4.6 Story Reviews
2.4.7 Story Status and Phase
2.4.8 Create Releases
2.4.9 Track Progress
2.4.10 Epics and Multi-Level Stories
2.5. Project
2.5.1 Scrum Project
2.5.2. Waterfall Project
2.5.2.1 Manage Project Phases
2.5.2.2 Project Design
2.5.2.3 Project Matrix
2.5.2.4 Project Reports and Earned Value Management
2.5.2.5 Project Baselines
2.5.2.6 Project Change
2.5.3. Kanban Project
2.5.3.1 Set Up Kanban Projects
2.5.3.2 Configure Kanban Boards
2.5.3.3 Use Kanban Boards
2.5.4 Hybrid Agile Project
2.5.5 Hybrid Waterfall Project
2.5.6. Project Settings
2.5.6.1 Project Setup
2.5.6.2 Project Executions
2.5.6.3 Project Requirements
2.5.6.4 Project Builds
2.5.6.5 Project Tests
2.5.6.6 Project Docs
2.5.6.7 Project Releases
2.5.6.8 Project Reports
2.5.6.9 Project Risks
2.5.6.10 Project Issues
2.5.6.11 Project Opportunities
2.5.6.12 Project Deliverables
2.5.6.13 Project Reviews
2.5.6.14 Project Process
2.5.6.15 Deliverables
2.5.6.16 Quality Assurance
2.5.6.17 Project-specific Workflow Management
2.5.7 Project Templates
2.6. Execution
2.6.1 Product Planning and Task Breakdown
2.6.2 Task Assignment and Daily Tracking
2.6.3 Build Creation and Test Requests
2.6.4 Bug Confirmation and Resolution
2.6.5 Execution Kanban Boards
2.7. Testing
2.7.1 Write Test Cases
2.7.2 Execute Test Cases
2.7.3 Bug Submission and Reports
2.7.4 Verify and Close Bugs
2.7.5 Test Case Scenes
2.7.6 Submit a Test Request
2.7.7 Test Report
2.8. Agent
2.8.1 Conversation
2.8.2 Sanplex Agents
2.8.3 General Agents
2.8.4 Skill Management
2.8.5 AI Knowledge Library
2.8.6 Models
2.8.7 ZAI Service Installation
2.8.8 ZAI Service Control Panel
2.8.9 ZAI Configuration
2.9. Kanban
2.9.1 Kanban Spaces
2.9.2 Kanban Regions
2.9.3 Kanban Cards
2.10. Company
2.10.1 View Team Members and Work Information
2.10.2 View Recent Company Activity
2.10.3 View and Edit Company Information
2.11. Feedback
2.11.1 Configure, Create, and Review Feedback
2.11.2 Process Feedback and Send Notifications
2.11.3 Tickets
2.12. Admin Settings
2.12.1. System Settings
2.12.1.1 Mode
2.12.1.2 Backup
2.12.1.3 Trash
2.12.1.4 License
2.12.1.5 Security
2.12.1.6 Cron Job
2.12.1.7 Time Zone
2.12.1.8 Rebuild Index
2.12.1.9 LDAP
2.12.1.10 Table Engine
2.12.2 Feature Options
2.12.3. Users Management
2.12.3.1 Set Departments and Edit Company Profile
2.12.3.2 Manage Users
2.12.3.3 Set Permisions
2.12.4. Feature Configuration
2.12.4.1 Dashboard
2.12.4.2 Product
2.12.4.3 Project
2.12.4.4 Execution
2.12.4.5 Test
2.12.4.6 Kanban
2.12.4.7 Feedback
2.12.4.8 Tickets
2.12.4.9 User
2.12.4.10 Relations (Standard Version)
2.12.4.11 Meaturement
2.12.5 Migrate Jira Data to Sanplex
2.12.6 Jira to Sanplex Migration Mapping
2.12.7 Migrate Confluence Data to Sanplex
2.12.8. Agent Configuration
2.13. Asset Library (Premium)
2.13.1 Asset Library Management (Premium)

Configure Notifications

2026-10-15 19:18:30
Sanplex Content
97
Last edited by Jing WANG on 2026-10-15 19:32:46
Share links
Summary: Learn how to configure Email, Webhook, SMS, and System Notification channels in Sanplex and define which actions trigger notifications for each channel.

Administrators can configure notification channels and notification triggers in Admin > Notifications.

Sanplex provides notification settings for Email, Webhook, SMS, and System Notification. Use the Settings page to define which actions trigger notifications through each channel.

I. Configure Email Notifications

Go to Admin > Notifications > Email.

Enable Email Notification, then configure the email delivery settings as needed.

Available settings include:

  • Async Sending
  • Sender Email
  • Sender Name
  • Sanplex Domain
  • SMTP Server
  • SMTP Port
  • Encryption
  • Authentication
  • SMTP Account
  • SMTP Password
  • Debug Level
  • Encoding

For Encryption, you can select Off, ssl, or tls. If SMTP authentication is enabled, enter the SMTP account and password used by the mail server.

Click Save after completing the configuration.
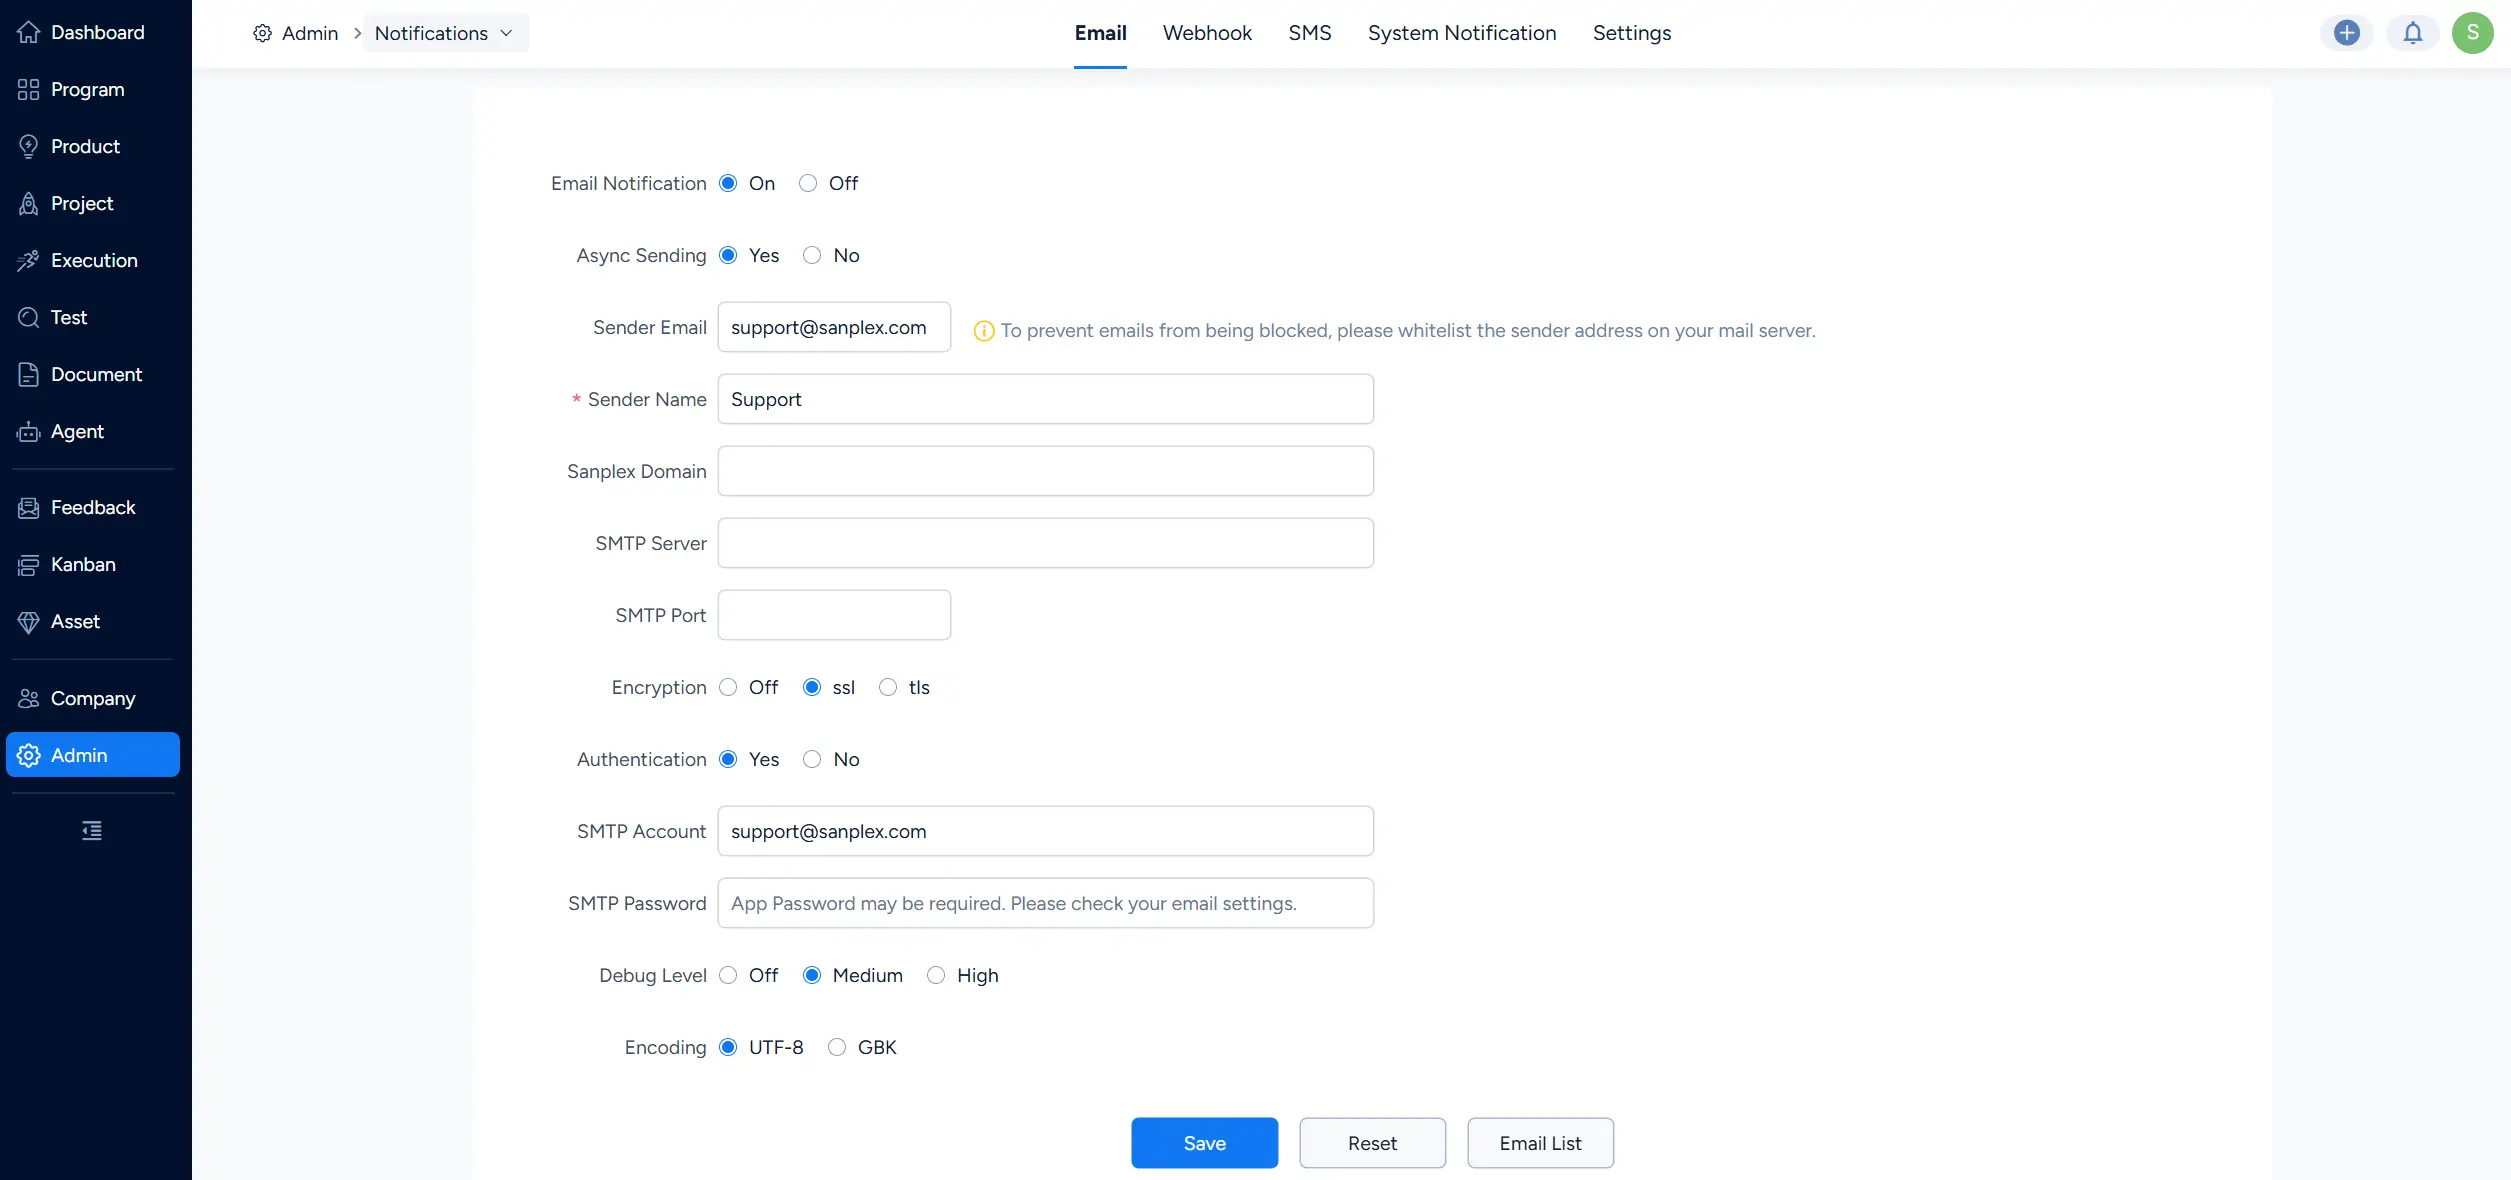
Admin > Notifications > Email page showing Email Notification, Async Sending, sender information, SMTP server and port, encryption, authentication, SMTP account, debug level, and encoding settings.

II. Configure Webhook Notifications

Go to Admin > Notifications > Webhook to configure a webhook connection.

Enter a Name and Webhook URL, then configure the webhook options as needed. Available settings include:

  • Sanplex Domain
  • Sending Type
  • Link Product
  • Link Execution
  • Parameters
  • Description

When Asynchronous is selected as the sending type, scheduled tasks are used to process webhook notifications.

You can link the webhook to a specific product or execution. If Link Product or Link Execution is left empty, actions from all corresponding products or executions can trigger the webhook.

Under Parameters, select the information to include in the webhook request, such as Object Type, Object ID, Product, Execution, Action, Acted by, Acted on, Comment, and Action Details.

Click Save to save the webhook configuration.
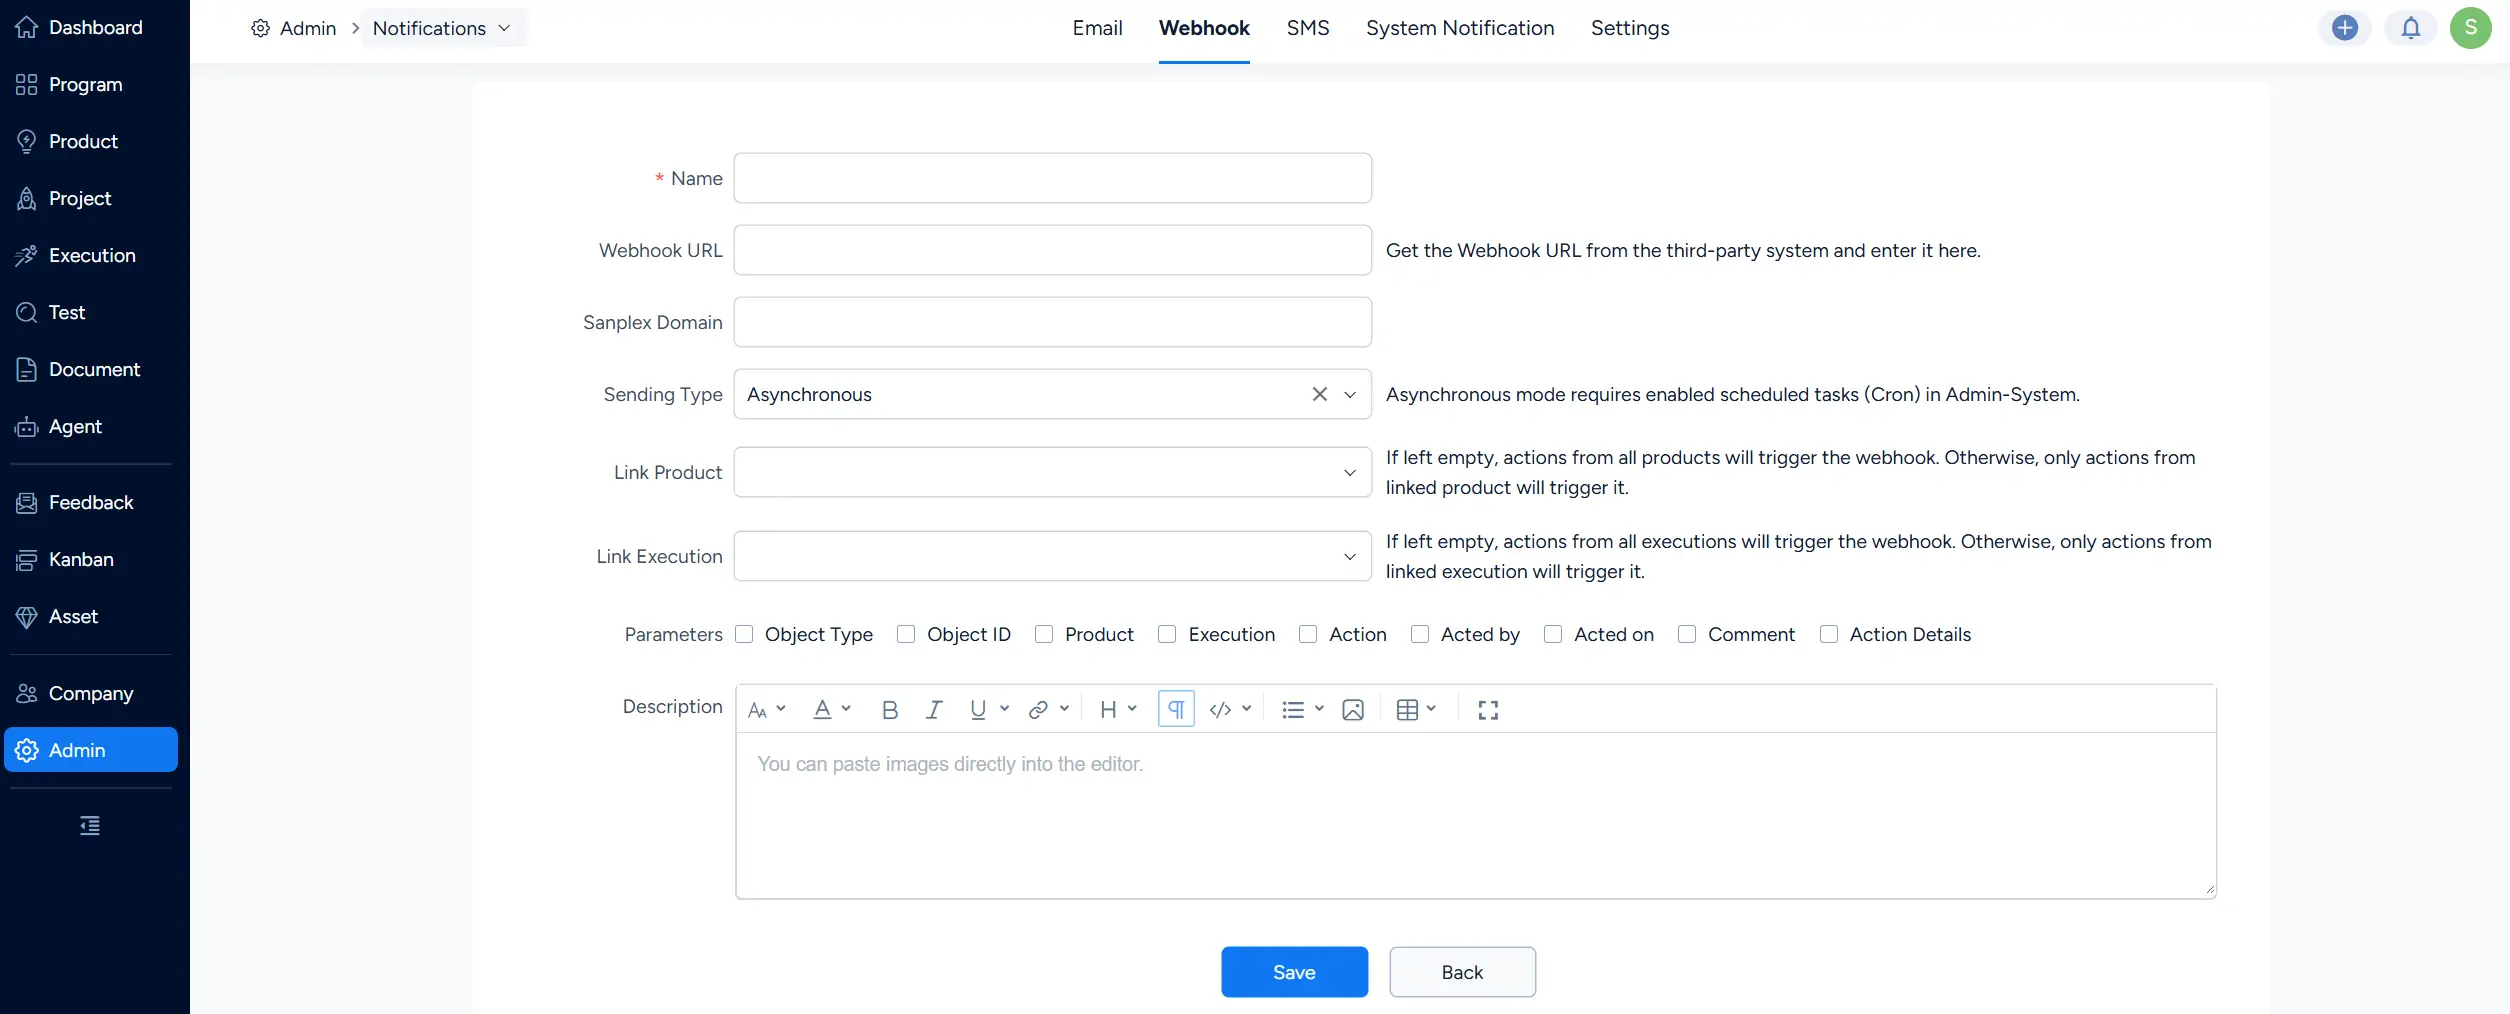
Admin > Notifications > Webhook page showing fields for Name, Webhook URL, Sanplex Domain, Sending Type, linked Product and Execution, webhook parameters, and Description.

III. Configure SMS Notifications

Go to Admin > Notifications > SMS.

Turn SMS on, then configure the SMS request settings.

Available settings include:

  • Debug
  • Method
  • URL
  • Encoding
  • Phone Number
  • Delimiter
  • Message
  • Signature
  • Returned
  • Parameters

For Method, select GET or POST according to the SMS service configuration.

Use the Parameters section to provide additional key-value pairs required by the SMS request.

Click Save after completing the configuration.
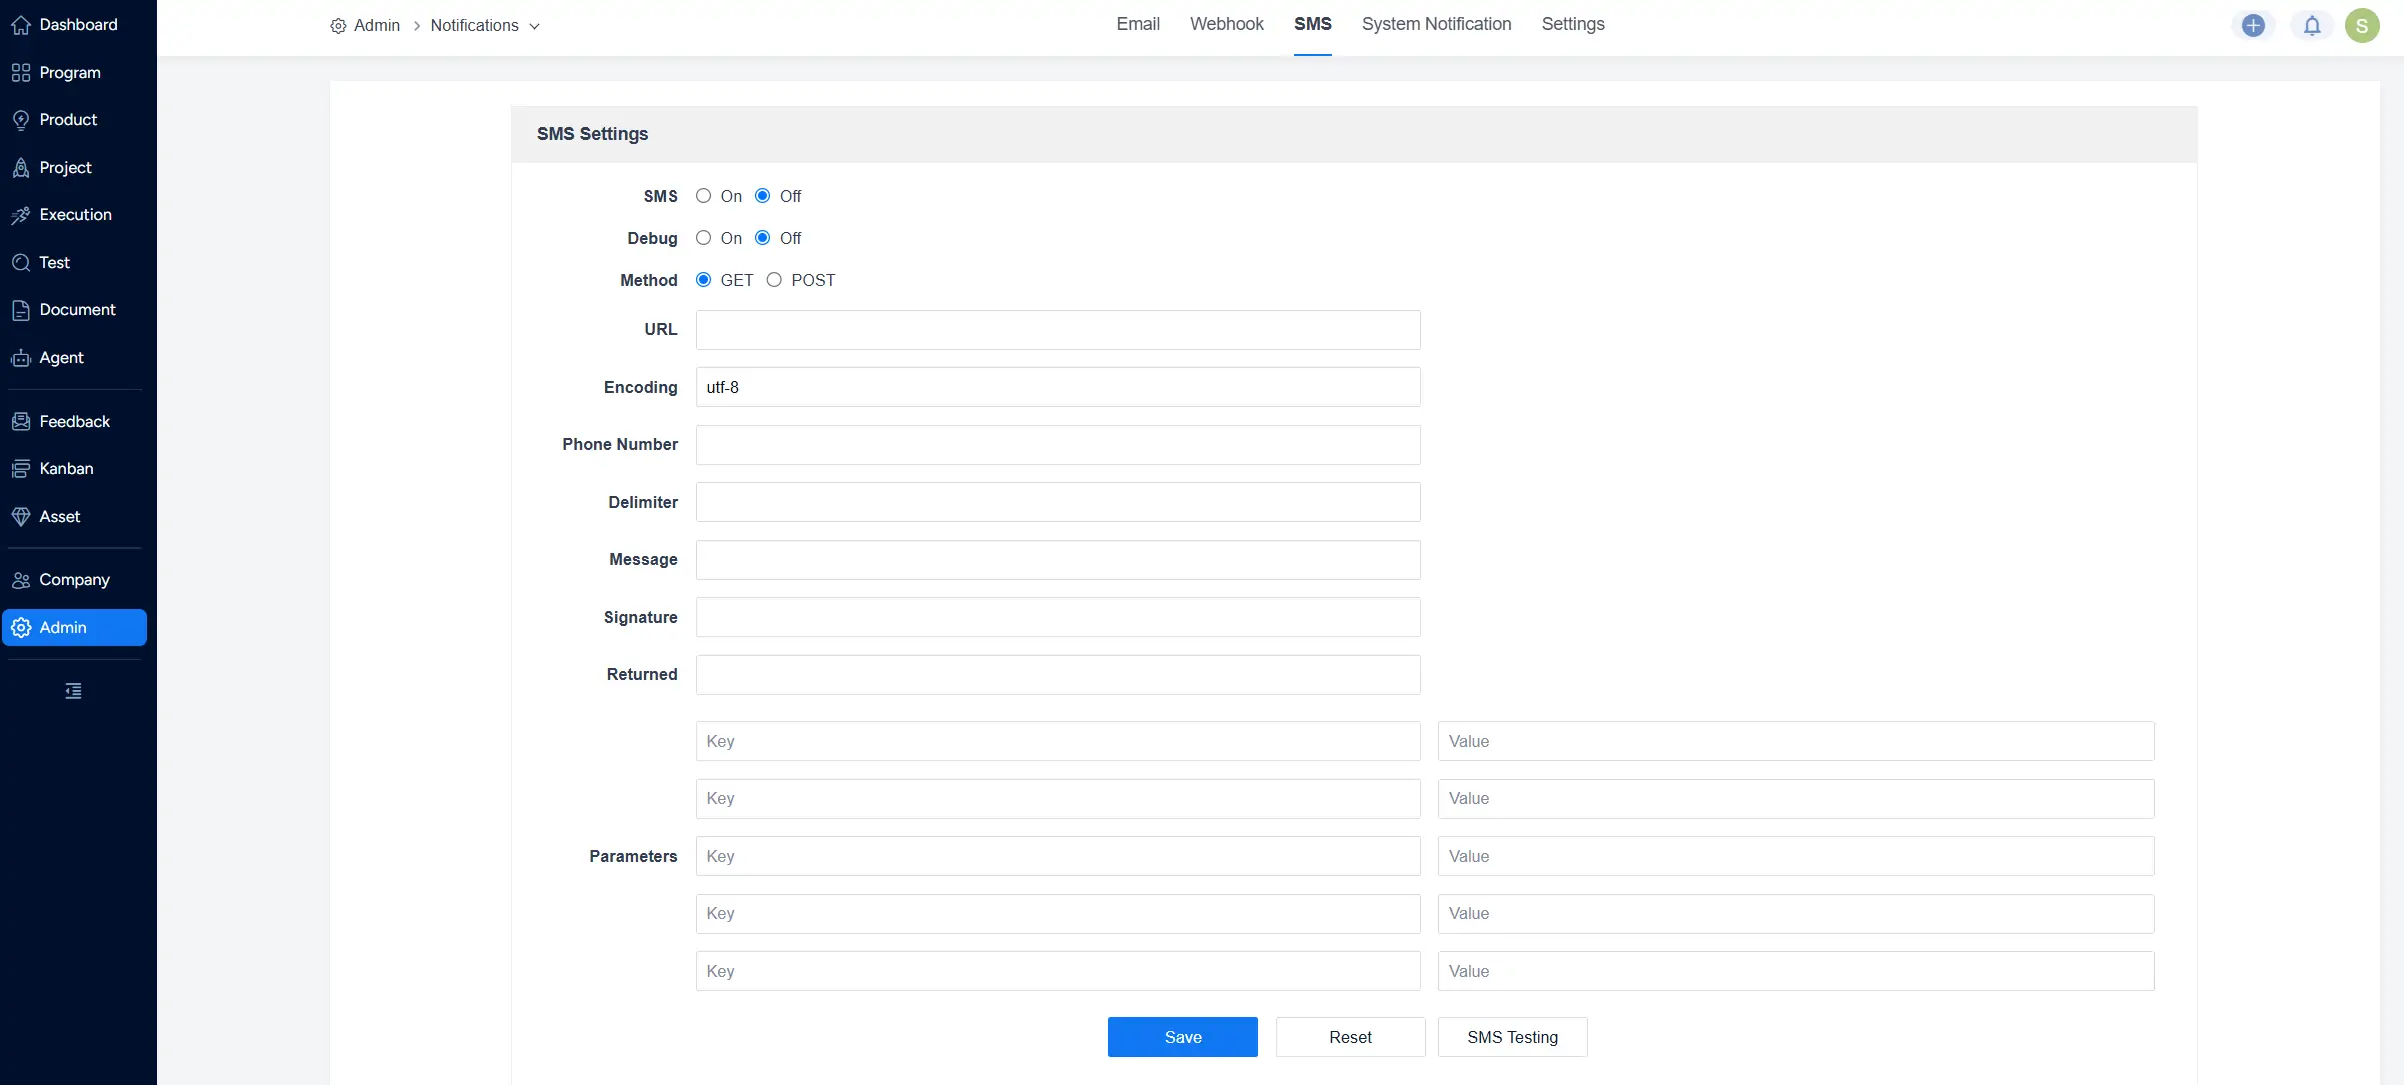
Admin > Notifications > SMS page showing SMS and Debug switches, GET and POST methods, URL, encoding, phone number, delimiter, message, signature, returned value, and parameter fields.

IV. Configure System Notifications

Go to Admin > Notifications > System Notification.

Turn Notification on to enable system notifications.

Use Polling Interval to specify how often Sanplex checks for notifications. The interval is entered in seconds.

Click Save to apply the configuration.
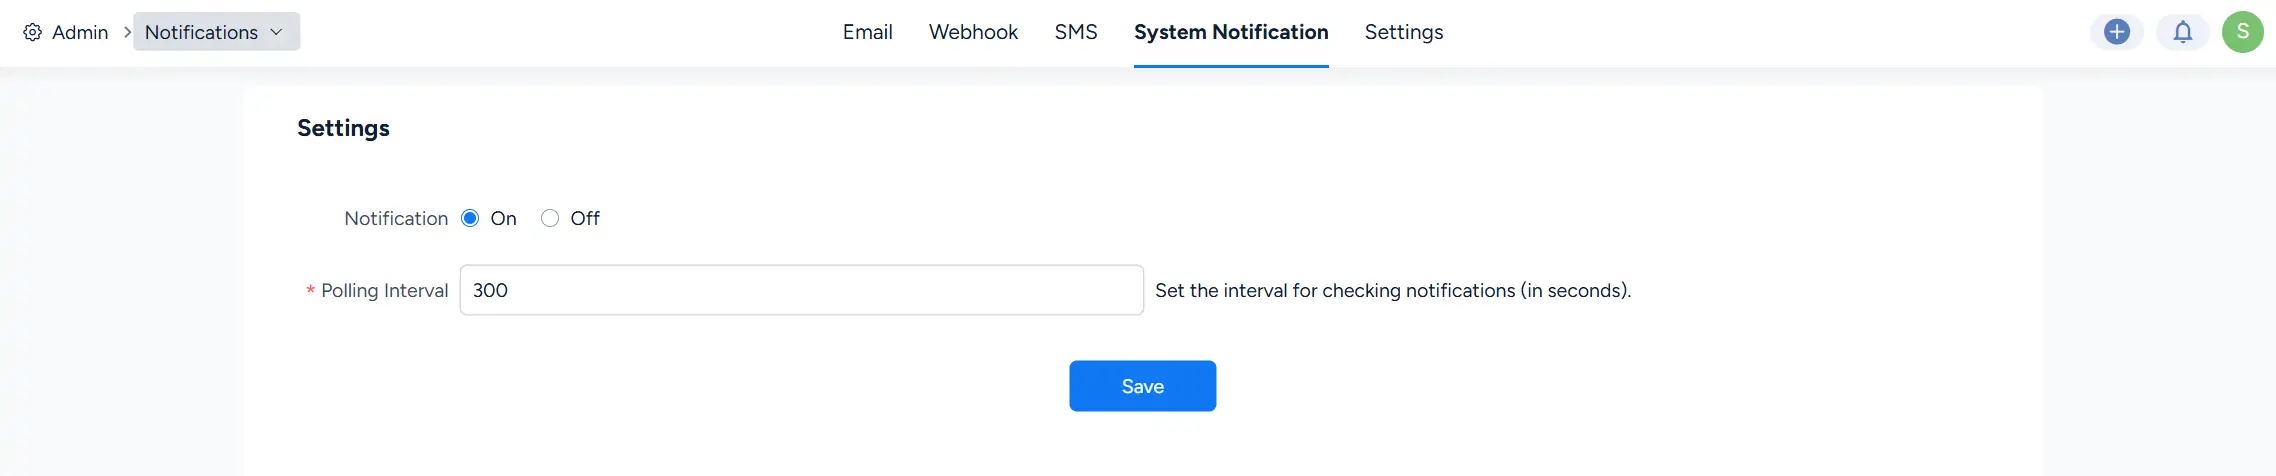
Admin > Notifications > System Notification page showing the Notification On and Off options and a Polling Interval field set to 300 seconds.

V. Configure Notification Triggers

Go to Admin > Notifications > Settings to configure which actions trigger notifications.

The settings page organizes notification rules by notification channel:

  • Email
  • System Notification
  • Webhook
  • SMS

Notification rules are organized by Sanplex object type. The Settings page includes objects such as Product, Epic, Feature, Story, Plan, and Release.

For each object type, select the actions that should trigger notifications through the corresponding channel. Available actions vary by object and may include Create, Edit, Comment, Change, Submit Review, Reviewed, Close, Activate, Assign, Release, and @Mention.

This allows administrators to configure notification behavior separately for each channel and operation.
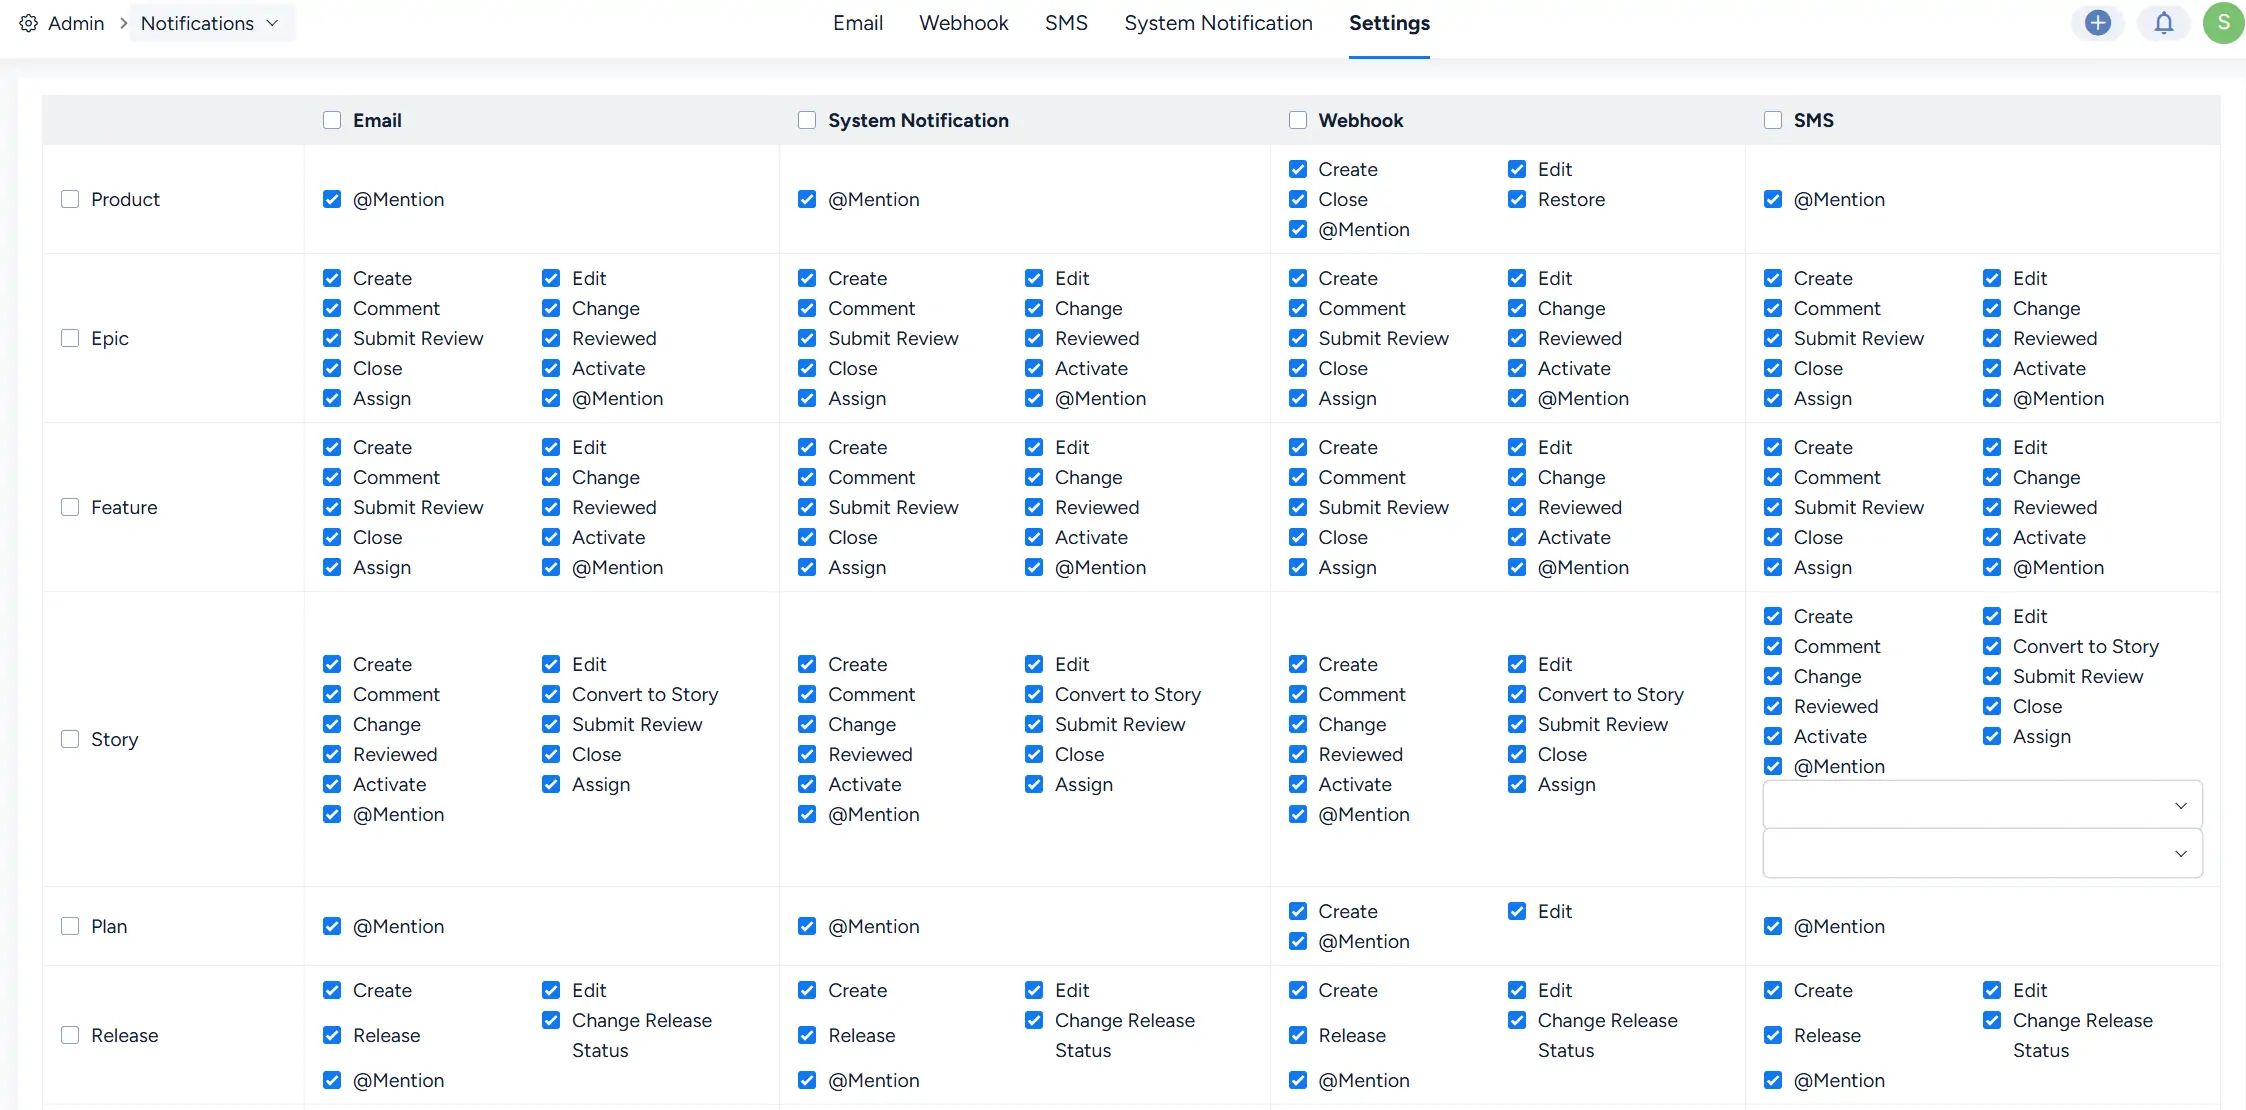
Admin > Notifications > Settings page showing notification trigger rules organized by object type and by Email, System Notification, Webhook, and SMS channels, with selectable actions such as Create, Edit, Comment, Close, Assign, and @Mention.

Tags

Write a Comment
Comment will be posted after it is reviewed.
